TL;DR
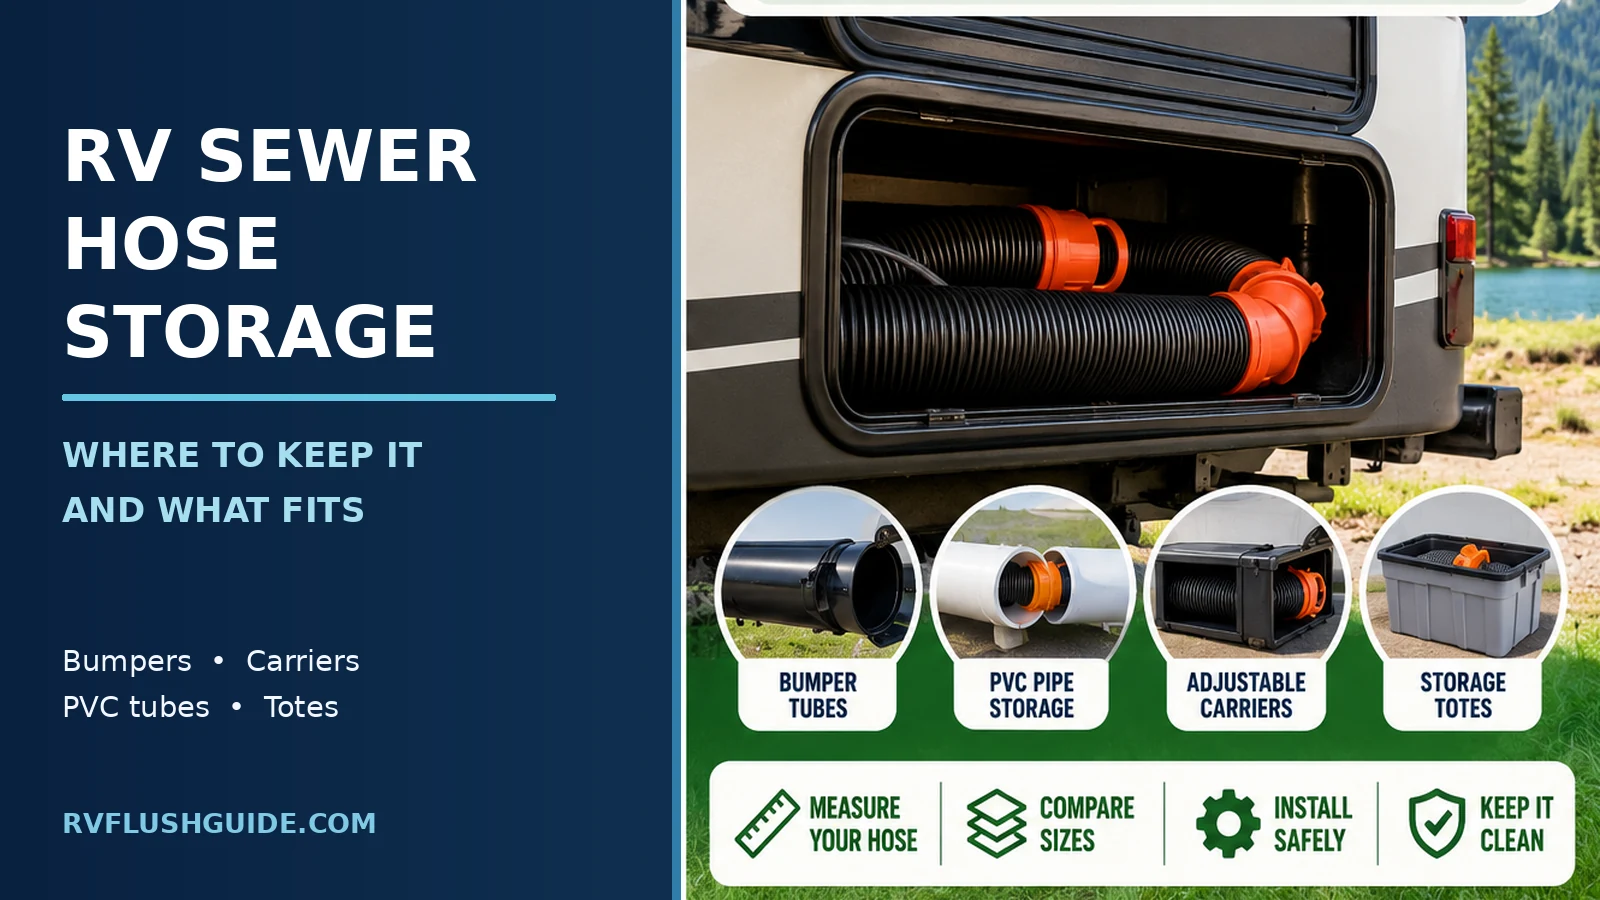
- The best place for a used sewer hose is a closed, dedicated spot away from food, clothing, and your fresh water gear. Common options are a bumper, a mounted tube or carrier, or a lidded tote.
- Measure your compressed hose length and the widest point of its fittings before you buy or build anything. Rinse the hose, cap both ends, and wash your hands afterward.
You finish dumping your holding tanks, rinse the hose, and now need a safe place to carry it. RV sewer hose storage keeps dirty fittings away from clean gear and stops the hose from sliding around on the road. Depending on your rig, a built-in bumper, mounted carrier, DIY tube, or lidded tote may work best.
First, measure your compressed hose and its widest fittings. Then compare four common storage options and choose one that fits your RV. If you’re still shopping for the hose itself, compare RV sewer hose options.
A hose’s advertised length tells only part of the story: bulky elbows or bayonet fittings can be too wide for an otherwise roomy tube.
RV Sewer Hose Storage: Where Should You Keep It?
Keep the used sewer hose in its own closed compartment, carrier, or washable lidded tote—away from drinking-water hoses, food, and clothing. Your choice depends on the hose’s compressed length, fitting size, and available space.
A few ground rules apply to every option:
- Keep the sewer hose and the fresh water hose separate. Crystal RV’s dump station guide says to stow the hose in a dedicated compartment, then remove your gloves and wash or sanitize your hands.
- Cap the ends. Hose makers that include storage caps in their kits, such as Camco’s RhinoFLEX kits at Camping World, show that caps are a normal part of storing a hose.
- Real owners solve this in different ways. In one iRV2 thread, one owner keeps the hose and fittings in a lidded tub in the sewer-hookup bay, and another uses a capped pipe. These are individual reports, not tested recommendations.
How Do I Measure What My Hose Needs to Fit?
Measure three things: the hose length when fully compressed, the widest point of the fittings at both ends (the bayonet ends and any elbow or adapter), and the inside width or height of the container. The container’s inside size has to clear the widest fitting, not the hose body.
Here is a simple method:
- Compress the hose Squeeze it down by hand and measure the length.
- Measure each fitting Use a tape or caliper on the widest outside width of each end.
- Check what detaches Camco says its 4-in-1 adapter has to come off for the hose to store in a 4 inch square bumper, according to manufacturer text on a Home Depot listing. Plan a spot for any elbows and adapters you remove.
- Compare to the INSIDE size Measure the inside of the bumper, tube, or tote, not the outside.
For a sense of scale, Camco says each 10 ft section of its RhinoFLEX hose compresses to 39 in with fittings, and its 15 ft hose compresses to 56 in (Camping World). Your hose may differ, so use your own numbers.
Pipe names can fool you. PVC sizes are nominal, meaning the outside diameter is larger than the name, and a Schedule 40 inside is only close to the name (Formufit’s PVC guide). Always measure the inside yourself.
Don’t cut or modify a sewer hose just to squeeze it into a tube. If the manufacturer allows a detachable elbow or adapter to come off, store that piece separately.
| Measurement | How to take it | Write it down |
|---|---|---|
| Compressed hose length | Squeeze by hand, measure end to end | ______ in |
| Widest fitting, end 1 | Tape or caliper, outside width | ______ in |
| Widest fitting, end 2 | Tape or caliper, outside width | ______ in |
| Container inside size | Measure inside width or height | ______ in |
Will an RV Sewer Hose Fit in a 4 Inch Pipe?
A 4-inch tube may fit the hose body but not its couplers. Standard 4-inch Schedule 40 PVC has an inside diameter of roughly 4 inches, so measure the opening and your widest fitting before buying. A ready-made alternative is Valterra’s adjustable EZ Hose Carrier: the manufacturer confirms a 4.5-inch inside diameter for the 50–94-inch model, as well as the shorter 34–60-inch version.
| Container | Verified inside size | What you still must check |
|---|---|---|
| Standard 4 in square bumper | Camco says its hose fits with the adapter removed (manufacturer claim) | Bumpers vary; inspect the inside for rust, sharp edges, and clearance |
| 4 in Schedule 40 PVC | About 4.0 in | Schedule 80 is smaller, at about 3.79 in |
| 4 in drain and sewer (thin wall) PVC | OD 4.215 in, ID about 4.065 in | Your widest fitting |
| Valterra Adjustable EZ carrier (34–60 or 50–94 in) | 4.5 in ID, 4-7/8 in OD | The A04-5094BK listing text says it fits most 3 in hoses and fittings except one-piece 90-degree fittings |
| 5×5 vinyl fence post | True 5 in outside, wall about 0.135 to 0.150 in; inside about 4.7 in square (calculated) | Rounded corners reduce the usable space |
Where these numbers come from:
- Bumper claim: Camco text on a Home Depot listing and Camping World.
- PVC sizes: US Plastic lists Schedule 40 at an average ID of 3.998 in and drain and sewer pipe at 4.065 in. PexUniverse lists Schedule 40 at 4.026 in. Because the charts disagree, treat it as “about 4.0 in.” Schedule 80 averages 3.786 in.
- Carrier: Valterra confirms a 4.5 in inside diameter for its 50–94 in carrier and lists the same size for the 34–60 in model. Check one-piece elbows before ordering; they can be too bulky to store inside.
- Fence post: Hoover Fence lists a 5 in by 5 in post with a 3/8 in corner radius and a 0.135 in wall, and a fence post guide gives the 0.135 to 0.150 in range. The roughly 4.7 in inside figure is our own calculation, not a published number.
Some owners use capped PVC tubing or square vinyl posts instead of a commercial carrier, as described in this RV-owner discussion. Those examples are useful ideas, not fit guarantees for your hose.
Which Storage Option Fits My RV?
Match the option to your rig and your hose. These are reasoned suggestions, not tested results.
| Your situation | Best option | Watch out for |
|---|---|---|
| Travel trailer or fifth wheel with a bumper tube that fits | Use the bumper tube | One owner reports bumper interiors are painted only near the ends and can rust |
| No bumper, or the bumper is too small | Mounted carrier or DIY tube | Fitting width versus inside size |
| Motorhome with a wet bay or basement bay | Lidded tote for hose, caps, and elbow | Keep it away from food and fresh water gear |
| Camper van or very little space | Lidded tote or a dedicated hose bag, stored away from living space | Use a dedicated, washable bag; keep it separate from clean gear |
| Long hose, or hose plus extras | Adjustable carrier | Carrier length range |
Check older bumper interiors for rust or rough metal that could damage a hose. A tote avoids installation but uses more cargo space.
| Option | Best for | Pros | Cons | Relative cost |
|---|---|---|---|---|
| Built-in bumper | Rigs that have one that fits | Already there, out of the way | Size varies, inside can rust | None |
| Ready-made carrier | No bumper, or a short one | Adjustable, mounting parts included | Must clear your fittings | Moderate |
| DIY PVC or vinyl tube | Hands-on owners | Size you choose | You handle the mounting | Low to moderate |
| Lidded tote | Bays and vans | No mounting, easy to clean | Takes up cargo space | Low |
Storage is where your hose rides between trips; a support holds it at the campsite. Compare RV sewer hose supports for the second job.
Is a Ready-Made Hose Carrier Worth It?
A ready-made carrier is useful when the RV bumper is too small. Valterra’s adjustable EZ models come in 34–60-inch and 50–94-inch lengths, both with a 4.5-inch inner diameter. Their vented caps and mounting hardware are convenient, but wide one-piece elbows may still need separate storage.
Per Valterra, the carrier adjusts in length, includes brackets and screws, and has a vented twist-lock cap with a strap and an optional padlock.
The largest fitting—not the nominal hose diameter—determines whether the hose passes through the carrier opening.
Listed prices for these carriers vary widely between retailers, so check the current price before buying. You can compare one retailer’s listing at etrailer.
How Do I Build a PVC or Vinyl Fence Post Hose Tube?
For a DIY tube, start with the largest fitting and the inside width of your PVC pipe or square vinyl post. Leave room for end caps and detachable adapters. Commercial carrier brackets are designed for their own products, so don’t assume they are suitable for a homemade tube.
Let the rinsed hose drain before storage. Vented end caps are one way to avoid a water-tight storage tube; Valterra uses them on its EZ carriers. Keep drips away from clean supplies and drinking-water equipment.
For an underbody installation, check the RV maker’s approved mounting locations and clearance requirements. Avoid electrical cables, brake and fuel lines, tanks, and moving suspension parts. If you cannot verify a safe installation point, have an RV technician mount the carrier.
- Use only attachment points approved for your RV; don’t assume it is safe to drill a frame rail.
- If you use a carrier, follow its maker’s instructions.
- Keep the tube clear of the suspension, road hazards, and the RV’s departure angle.
- Check clearance for road and campsite hazards.
Safety
- Never drill into a surface unless you know what is behind it. Fuel, brake, and electrical lines and tanks can run where you least expect them.
Stop and get help
- If your mount needs frame drilling or welding, or the tube hangs low or loose, have a qualified RV technician look at it or check your RV maker’s manual.
How Should I Clean and Cap the Hose Before Storing It?
Use a campground-approved waste-rinse point and a separate rinse hose—not your drinking-water hose. Let the sewer hose drain, cap both ends, and store it in a dedicated container. Wear gloves and wash your hands with soap and water afterward.
Follow this short routine:
- Never use your fresh water hose to rinse sewer hoses. Carry a separate rinse hose (RVDumps, Crystal RV).
- Wear gloves, then wash with warm water and soap for at least 20 seconds (RV Travel). One source says hand sanitizer alone is not enough (RV Show Off). The complete routine is in how to clean an RV sewer hose.
- Use the storage caps. Camco’s kits include caps for the hose ends (Camping World). That said, one owner reports several of their hoses leaked, so they did not trust caps alone. A lidded container as a second layer is our suggestion, not a manufacturer requirement.
- Check the hose each time you hook up. Replace cracked or damaged hoses and worn fittings in line with the manufacturer’s instructions. If you see drips, read about a hose leaking at the connection. No manufacturer guidance on leaks during storage was found.
Safety
- Raw sewage carries pathogens, so treat the hose, caps, and fittings as contaminated until cleaned. Loose support wires in a worn hose can rupture gloves (RV Travel), so replace a hose that is cracked or has wire poking out.
Stop and get help
- If sewage splashes into your eyes, mouth, or broken skin, rinse right away and seek medical advice. For the preceding steps, use the RV tank dumping procedure.
Common Mistakes and Quick Fixes
- Buying a tube before measuring fittings. Measure first, using the checklist above.
- Tossing the hose loose in the cargo bay. One retailer page claims this can damage the hose. Treat that as a retailer claim, but a closed container is still cleaner.
- No spot for the elbow, adapter, or caps. Camco says to remove the adapter for bumper storage, so plan where it goes.
- Cutting the hose to fit. Don’t, unless the maker’s instructions allow it.
- Storing it near the fresh water hose. Keep them separate.
- Skipping the check before the next trip. Look the hose over before hooking up to the sewer.
- Assuming macerator hoses store the same way. Macerator hoses are different, so storage needs may differ. See macerator hoses for more.
Conclusion
Good RV sewer hose storage comes down to three things:
- Measure first Get your compressed length and the widest fitting before choosing a container.
- Match the option to your RV A bumper, carrier, DIY tube, or lidded tote each suit different rigs.
- Rinse, cap, contain, and wash Keep the hose away from fresh water gear and wash your hands every time.
Your next step is simple: measure your hose today and compare it with the container sizes in the table above.