TL;DR
- To clean an RV black tank, dump the waste, rinse with a built-in tank flush (if equipped) or careful fill-and-drain cycles, then use a dedicated tank cleaner only when buildup calls for it.
- Keep the black dump valve open while operating a built-in flush, follow your RV manual, and keep drinking-water equipment separate from sewer gear.
- Skip bleach and homemade cleaning mixtures. A false “Full” reading may need sensor cleaning, while a tank that will not drain needs clog troubleshooting.
An RV black tank can still smell or show “Full” after you’ve emptied it. Usually, the next step is a thorough rinse—not another dose of deodorizer. Learning how to clean an RV black tank helps you remove loose residue, spot sensor problems, and avoid turning a routine dump into a plumbing mess.
You don’t need to take the tank apart. Start with the cleaning method your RV supports, use water carefully, and save specialized cleaners for stubborn buildup. If you’ve never emptied a tank before, the basics of dumping RV black and gray tanks come first.
How to Clean an RV Black Tank: Choose the Right Method
The simplest method depends on whether your RV has a separate black tank flush inlet. A flush inlet sends water through a sprayer inside the tank; it isn’t the same connection as your fresh-water fill. If yours is unfamiliar, the RV black tank flush system article explains its parts.
| Your situation | Start here | Important note |
|---|---|---|
| Built-in black tank flush | Dump, then rinse through the flush inlet | Keep the black dump valve open while the flush is running |
| No flush inlet | Dump, then add clean water through the toilet and drain again | Know your tank capacity; do not rely on dirty sensors |
| Tank smells despite rinsing | Try a purpose-made deep tank cleaner | Follow the label’s tank-size dose and soak time |
| Gauge reads Full after dumping | Rinse first; consider a sensor cleaner | A bad reading does not always mean a full tank |
| Tank will not drain | Stop the cleaning cycle and diagnose the blockage | A black tank that won’t drain needs a different approach |
What You Need Before Cleaning
Affiliate disclosure: As an Amazon Associate I earn from qualifying purchases. Some product links below are paid links.
Have your RV owner’s manual nearby, especially for instructions about the flush inlet, gate valve, water pressure, and backflow protection. Gather disposable gloves, an RV sewer hose, a clear sewer elbow, and a dedicated non-potable-water hose for the tank flush. A clear elbow makes it easier to tell when the rinse water is carrying less debris. The Camco RhinoFLEX Clear Sewer Elbow (39736) (paid link) is one option; check that its fittings match your sewer hose and dump-station inlet.
If you’re planning a deeper clean, pick a product labeled for RV black holding tanks rather than an ordinary household disinfectant. Regular odor-control treatments, deep tank cleaners, and sensor cleaners do different jobs; more on that below.
Before you open a valve
- Use an approved dump station or sewer connection and secure both ends of the sewer hose.
- Keep the drinking-water hose and its fittings away from the flush inlet, waste outlet, and contaminated equipment.
- Never leave a running tank flush unattended. Overflow can cause sewage damage inside the RV.
- Follow your model’s backflow-protection instructions. Do not add or remove check valves based on a forum tip.
- If you’re in freezing conditions, follow the RV’s winterizing procedure instead of leaving rinse water in the system.
How to Clean an RV Black Tank With a Built-In Flush
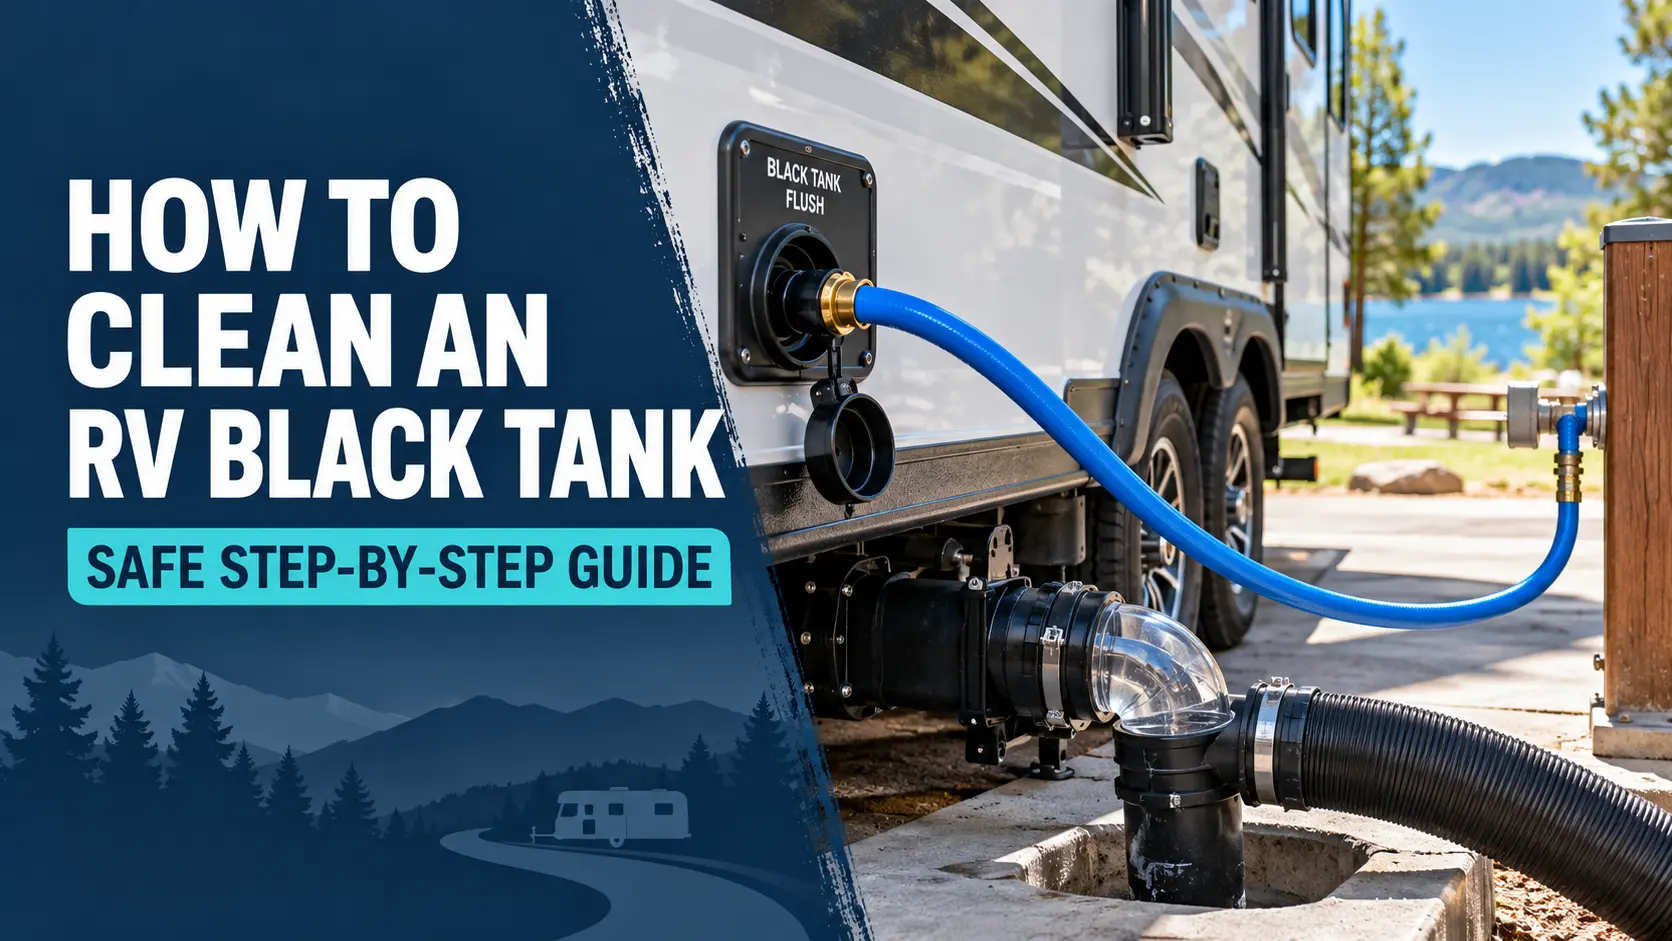
A built-in flush is usually the easiest way to rinse loose waste off the tank walls after dumping. The key safety rule: the black tank dump valve must be open while the flush water is running, unless your manufacturer gives a different approved procedure. For example, Grand Design’s Imagine owner’s manual specifically warns against running its flush with the valve closed.
- Connect the sewer hose Put on gloves, secure the RV sewer hose to the waste outlet, and seat the other end in the approved dump-station inlet. A clear elbow helps you watch the flow.
- Empty the black tank Open the black dump valve and let the tank drain completely. Keep that valve open for the rinse. If the tank will not drain, stop and troubleshoot the blockage.
- Connect the flush-water hose Attach a hose reserved for sanitation to the RV’s black tank flush inlet. Follow the manual for required backflow protection and water-pressure limits. Never use your drinking-water hose.
- Run the flush while monitoring Turn on the rinse water according to your manual. Watch the hose and clear elbow as loosened material comes out. Stay beside the system; never walk away while water is flowing.
- Turn off the water and allow drainage When the rinse runs substantially clearer, turn off the water supply. Let the remaining water drain through the open sewer connection. Clear-looking water indicates a better rinse, not necessarily a spotless tank.
- Disconnect in the correct order For Grand Design’s procedure, disconnect the hose at the water source first, then wait for the flush system to drain before removing it from the RV inlet. Follow your own RV manual if its sequence differs.
- Finish the dump and reset the tank After the flush has fully drained, close the black valve, finish any gray-tank dumping, and clean your sewer equipment. For normal use, add the amount of water and optional routine treatment specified by your RV and product instructions.
Do not close the black valve and continue running the flush to “fill the tank for a stronger clean.” That creates an avoidable overflow risk. Also, the instruction not to add check valves in Grand Design’s manual is specific to that system—other rigs may have different protection requirements.
How to Clean a Black Tank Without a Flush Port
No flush inlet? You can still rinse the tank. The basic approach is to dump first, add a controlled amount of clean water through the toilet, and dump again. This takes longer than a built-in sprayer but doesn’t require modifying your RV’s plumbing.
- Dump normally. Secure the sewer hose, empty the black tank, and close its valve when drainage stops.
- Add a measured amount of water. Use the toilet’s own flush supply or a clean container to add water. Stay well below the tank’s known capacity and account for anything already inside; a dirty tank monitor is not a reliable overfill warning.
- Drain again. Open the black valve and inspect the outflow through a clear elbow. Repeat if debris is still coming out and conditions are safe.
- Finish and store equipment. Close the valve after draining and clean and dry the sewer hose before storage.
An outlet-mounted backflush attachment is another option. Devices such as the Camco Rhino Blaster connect at the waste outlet and are designed to direct rinse water toward the tank. Follow the exact device instructions and backflow requirements; an outlet rinser isn’t the same as the RV’s built-in flush system.
Paid link. Check current availability and product specifications on Amazon.
Keep the drinking-water hose out of the toilet and away from sewage equipment. Afterward, clean the RV sewer hose before packing it away.
How to Deep-Clean a Black Tank or Fix Dirty Sensors
A normal rinse removes loose material. If smells return quickly, a neglected tank has buildup, or the gauge stays on “Full,” a purpose-made cleaner may be more useful than repeated rinsing. Check the label: a regular holding tank treatment mainly helps with ongoing waste management and odor control; a deep cleaner targets deposits; a level-gauge cleaner targets residue affecting sensors. None should automatically be treated as a disinfectant.
For stubborn waste and residue
Thetford Tank Blaster is one example of a deep-cleaning product for black and gray holding tanks. Its maker says to let it work overnight for best results. Use its specified amount for your tank size, respect the stated soak time, then empty and rinse as directed. Don’t improvise a stronger dose or combine cleaners.
Paid link. Check current availability and product specifications on Amazon.
For a false Full reading
First make sure the tank has actually drained. If the gauge remains inaccurate, buildup on in-tank probes may be involved. Thetford Level Gauge Cleaner (paid link) is specifically marketed for black and gray holding-tank sensors. For a 40-gallon black tank, Thetford’s published procedure calls for half a bottle, filling with water, driving to mix, waiting 24 hours, then driving again before dumping and rinsing. That’s one product’s instructions, not a universal recipe; don’t use the stated dose or fill procedure for a different cleaner or tank without checking the label and capacity.
If the problem continues after cleaning, inspect the sensor system rather than adding more chemicals. The black tank sensor troubleshooting steps cover common reasons for false readings, and black tank sensor cleaner options explain which products are designed for that job.
Should You Use Bleach, Ice, Dawn, or Calgon?
These remedies are popular in RV discussions, but popularity doesn’t make them the best first choice. For a straightforward cleaning routine, water rinsing and a product approved for your plumbing are more predictable.
| Method | What to know | Our recommendation |
|---|---|---|
| Bleach or harsh drain cleaner | Dometic’s Model 310 manual warns that chlorine and caustic chemicals damage toilet and plumbing seals. | Avoid unless your exact equipment manual explicitly permits the product and procedure. |
| Ice cubes | Anecdotes and small demonstrations cannot establish reliable whole-tank cleaning. | Don’t rely on ice to remove buildup or fix sensors. |
| Dish soap (including Dawn) | Foam and detergent compatibility vary, and it isn’t designed as a holding-tank deep cleaner. | Use a tank-approved product instead. |
| Calgon / GEO mixtures | DIY recipes vary widely and aren’t interchangeable with manufacturer directions. | Skip homemade mixtures unless your equipment and product instructions support them. |
Never mix bleach with another cleaning product. If someone recommends Pine-Sol, Borax, or a homemade “GEO method,” check the RV and toilet manufacturers’ compatibility guidance before using anything. A household cleaner can create a second problem while you’re trying to solve the first.
How Often Should You Clean an RV Black Tank?
For everyday use, dump when the tank is appropriately full and rinse after dumping when your RV setup allows it. A more thorough clean makes sense when odors persist, gauges become unreliable, or you’re preparing for seasonal storage. You don’t need to deep-clean after every toilet use.
There is no single deep-cleaning interval that applies to every RV and product. As one concrete example, Thetford recommends using Tank Blaster quarterly and before end-of-season storage. That’s its recommendation for that cleaner, not a rule for every black tank.
During normal camping, use plenty of water with toilet waste, keep the black dump valve closed between dumps, and follow the holding-tank treatment label if you use one. Before winter storage, use the RV’s winterization instructions rather than leaving an ordinary water soak in a tank that may freeze.
When Cleaning Isn’t Enough
A rinse is not a repair. If the black tank won’t drain, the valve sticks, or water comes back into the toilet, stop the water flow before the problem becomes an overflow. A blockage, pyramid plug beneath the toilet, or stuck black tank gate valve needs a different diagnosis.
If the tank drains but odor persists, check more than the tank itself. The toilet seal, vent, sewer connections, and dry plumbing traps can also let smells into an RV. The RV toilet smell after dumping checklist helps separate those causes.
Call a qualified RV service professional if a blockage won’t clear safely, the gate valve leaks or won’t operate, the flush system appears to be backflowing, or you suspect hidden water damage. Don’t force a valve or keep adding rinse water to an unknown obstruction.
Frequently Asked Questions
Can you clean an RV black tank without a built-in flush?
Yes. After dumping, add a controlled amount of clean water through the toilet, drain it, and repeat as needed. An appropriately rated outlet rinser can also help if used according to its instructions.
Does clear rinse water mean the black tank is completely clean?
No. It means the water exiting the tank is carrying less visible material. Deposits can still remain on the tank walls or sensor probes, especially if the tank has gone a long time without cleaning.
Should you leave cleaner in the tank overnight?
Only if the product’s label calls for it. Deep cleaners and sensor cleaners have different contact times, fill levels, and dosing instructions. Regular deodorizing treatments may have completely different directions.
Why does my RV black tank still read Full after I clean it?
Residue on probes is one possibility, but damaged wiring, sensor design, or a faulty monitor can also cause incorrect readings. Confirm the tank is empty, then follow the tank sensor troubleshooting process before replacing parts.
Bottom Line
The best way to clean an RV black tank is also the least complicated: dump it safely, rinse using the method your RV supports, and reach for a dedicated cleaner only when there’s a reason. Protect your fresh-water equipment, follow the owner’s manual for the flush connection, and stop if the tank backs up or refuses to drain. A consistent, careful routine does more than a complicated homemade recipe.