TL;DR: If your RV black tank sensor reads full after dumping, the tank is probably empty but the sensor isn’t clean. Most probe sensors work by electrical conductivity. When waste residue, toilet paper, or sludge coats the probe tip and bridges the gap to liquid below, the panel reads full even with nothing in the tank. An enzyme soak followed by a clean water rinse clears many cases. This guide covers every cause, a step-by-step fix order, and when to stop cleaning and replace the system.
You just dumped the black tank. You watched the clear elbow go dark, then murky, then clear. You know the tank is empty.
The monitor panel still says full.
This is one of the most complained-about problems in RV ownership. And if your RV black tank sensor reads full after dumping, you’re almost certainly not dealing with a broken sensor. You’re dealing with a dirty one. But there are a few different reasons it happens, and the right fix depends on which one you have.
Work through this guide in order. Most people find the answer before they reach the upgrade section.
If you’re also getting odor at the same time the sensor is stuck, check our guide on RV toilet smell after dumping — the two problems often share the same root cause.
Why Does My RV Black Tank Sensor Read Full After Dumping?
Most RVs use probe-style sensors: small metal studs screwed through the tank wall at different heights, usually at 1/3, 2/3, and full. When liquid in the tank touches a probe, it completes a low-voltage electrical circuit and lights up the corresponding indicator on your monitor panel. The problem is that the circuit doesn’t care what completes it. If waste residue, wet toilet paper, or sludge coats the probe tip and creates a conductive path to the liquid below, the circuit closes and the panel reads full, even when the tank is bone dry.
As Unique Camping + Marine explains, many sensor problems are caused by buildup rather than a dead sensor. That’s important because it means the fix is usually a cleaning job, not a replacement. Between flushes, residue accumulates on the probe tips. If you don’t flush with enough water, or if you leave the black valve open at a hookup site and let the liquid drain while solids stay behind, the sensors get coated fast. The reading gets stuck. And it stays stuck even after you dump.
Is It a Dirty Sensor or a Tank That Didn’t Fully Empty?
Before you start cleaning, confirm the tank actually drained. A tank that didn’t fully empty will keep its lower sensors wet, and the panel will read full because the tank is partially full. That’s a different problem from a dirty sensor — and it needs a different fix.
Use this table to figure out which situation you’re in.
| Symptom | Most Likely Cause | First Step |
|---|---|---|
| Reads full immediately after dumping | Probe residue or tank didn’t fully empty | Run the fresh water test below |
| Reading slowly drops over several hours | Partial drain issue or residue dissolving | Check your sewer hose for a low U-trap |
| Reading jumps randomly while driving | Loose ground connection or sloshing residue | Check wiring and ground terminal |
| All tanks show wrong readings at once | Shared ground fault or monitor panel failure | Check ground bus and panel |
| Reads full with a completely dry, unused tank | Wiring short or failed probe | Skip straight to the wiring section |
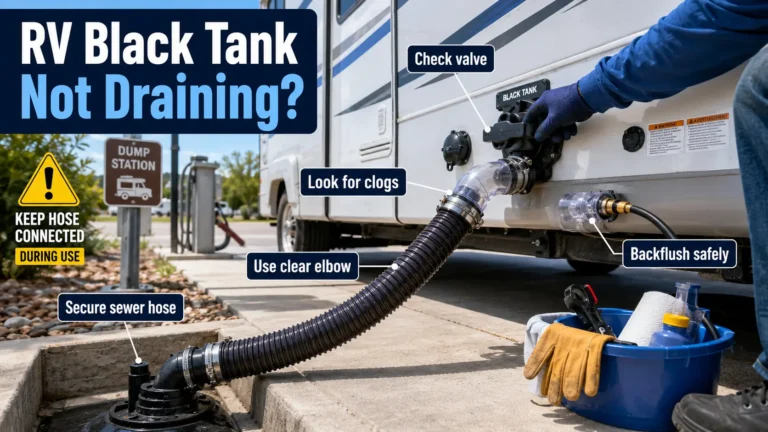
The fresh water test: Close the black valve. Pour 2 to 3 gallons of fresh water into the toilet and then dump again. If the reading drops right away, the tank wasn’t fully emptying before — not a dirty sensor. A sagging sewer hose that forms a low trap, a stuck gate valve, or a pyramid plug in the black tank can all prevent a full drain. If the reading stays stuck after the fresh water test, you’re almost certainly dealing with residue on the probe.
If the sensor problem comes with toilet bubbling, sewer smell during flushing, or unusually slow draining, also check for a clogged RV black tank vent. A vent problem can mimic a tank blockage because trapped air has nowhere to escape.
Sometimes the tank outlet itself is partially blocked. If you suspect a blockage between the toilet and the tank, our guide on how to unclog an RV toilet without a snake covers that separately.
Can You Still Use the RV Toilet If the Black Tank Sensor Says Full?
Yes, if you’ve confirmed the tank is actually empty. A false full reading means the sensor is wrong, not that the tank is at capacity. If you’ve run the fresh water test and watched a clear elbow confirm the tank is empty, it’s safe to keep using the toilet while you work on fixing the sensor.
The real risk comes when you’re not sure whether the reading is false or real. If you haven’t dumped recently and haven’t confirmed the tank is empty by physical check, don’t assume the sensor is lying; keep filling the tank. An actual full black tank can back up into the toilet bowl, and that’s a much bigger problem to deal with.
The practical rule: if you’ve confirmed the tank is empty and the sensor is stuck, use the toilet normally. Track your usage manually — days since you dumped, number of people using it, number of flushes — until you fix the sensor. Don’t rely on a sensor you know is wrong.
The Main Cause: Waste Residue and Toilet Paper on the Probe Sensors
This is behind most false full readings after dumping.
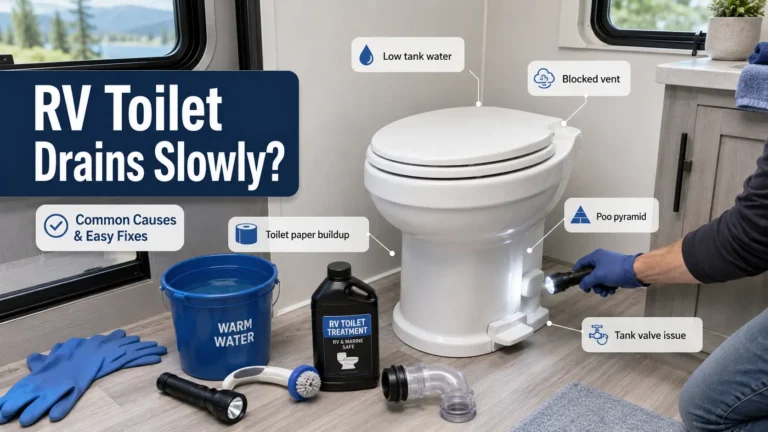
When you flush, solid waste and toilet paper travel into the black tank. In an ideal setup, enough water keeps everything suspended, and it all flushes out cleanly when you dump. In practice, many RVers don’t use enough water per flush — either to conserve tank space or out of habit. That’s when residue starts sticking to the probe tips and tank walls.
Toilet paper is a common culprit. It can snag directly on the metal probe tip and hang down into the liquid at the bottom of the tank. That damp piece of paper completes the electrical circuit and holds a false full reading indefinitely, even after you dump. Non-dissolving regular home toilet paper makes this worse. Our guide on what toilet paper is safe for your RV covers what to look for and what to avoid.
Leaving the black valve open at a full-hookup site is one of the fastest ways to destroy sensor accuracy. Liquid drains out continuously while solids stay behind and dry onto the probe tips and tank walls. After a few days, the coating is thick enough to hold the reading at full regardless of actual tank level.
Signs this is your problem:
- Sensor read correctly when the RV was new, then gradually got stuck
- Problem got worse after trips where you used less water per flush
- You’ve been leaving the black valve open at hookup sites for convenience
- The reading is stuck at 2/3 or full, not jumping around erratically
A Less Common but Stubborn Problem: Mineral Deposits on the Sensor Probes
Some RVers run multiple enzyme soaks, do thorough rinse cycles, and still can’t get the reading to clear. If that’s you, mineral deposits may be coating the probes.
Struvite is a hard, crystalline deposit that forms from urine phosphates, ammonia, and magnesium in hard water. As RV Upgrade Store explains, it creates a scale-like coating on the probe tips that standard enzyme treatments won’t dissolve. Think of it like hard water scale in a coffee maker, but tougher and conductive enough to close the electrical circuit.
This is a less common cause than simple residue buildup, but it’s worth considering if cleaning has repeatedly failed.
Signs mineral deposits may be the issue:
- Enzyme cleaning and rinsing have failed multiple times with no change
- The sensor was accurate for a long time, and then it suddenly got stuck
- You can see white or yellow scale around the toilet bowl rim or inside the bowl neck
- You’re in a hard water area
For struvite, enzyme cleaners won’t do much. You need a surfactant-based or mineral-dissolving cleaner rated for RV holding tanks. These work faster than enzyme products but can be harder on valve seals, so rinse thoroughly afterward.
When the Tank Isn’t the Problem: Wiring and Ground Issues
A loose or corroded ground connection can keep the sensor circuit permanently closed and produce a false full reading that no amount of tank cleaning will fix. This is less common than residue buildup, but worth checking before you spend money on cleaning products or new probes.
Signs it’s a wiring problem and not the tank:
- All tanks show wrong readings at the same time
- The reading changes noticeably when you drive over bumps
- The reading is clearly impossible: full on a completely dry, unused tank
- Cleaning has been done thoroughly multiple times with no change in reading
What to check:
Look at the sensor studs on the outside of the tank. Green or white corrosion on the ring terminals is a clear sign of a connection problem. Disconnect your RV battery first, then clean the terminals with a wire brush and contact cleaner, and reconnect firmly.
As Black Series notes, a loose ground wire, a short circuit from frayed insulation, or moisture in the wiring harness can all cause erratic or stuck readings. If you have a multimeter, test for continuity between the probe wire and the monitor panel. No continuity means a broken wire that needs to be tracked down and repaired.
If multiple tanks went wrong at the same time, check the shared ground wire and the monitor panel itself. A faulty panel is rare, but it does happen — especially after a 12V power surge.
How to Fix an RV Black Tank Sensor That Reads Full After Dumping
Work through this in order. Start with the cheapest, simplest steps. Move to the next only if the previous one doesn’t clear the reading.
Fix order: Dump test → Rinse → enzyme soak → GEO method → Drive and agitate → Wiring check → Probe replacement or sensor upgrade.
Step 1: Confirm the tank is actually empty. Use the fresh water test described earlier. A clear elbow at the sewer connection lets you watch the flow and see when the tank is truly empty.
Step 2: Rinse thoroughly. If your RV has a built-in black tank flush port, use it. Run water for 30 to 60 seconds, close the valve, wait 30 seconds, then dump again. Repeat 2 to 3 times until the water runs clear. This alone clears many mild residue cases.
Step 3: Enzyme soak. After a clean dump and rinse, close the black valve. Add an enzyme-based tank cleaner with 2 to 3 gallons of fresh water through the toilet. Let it soak for 12 to 48 hours. Then dump and rinse again. Enzyme cleaners can help break down waste and paper residue that’s coating the probe tips, though results depend on how severe the buildup is. Our best RV toilet treatment guide covers options that are safe for probe sensors and tank seals.
Step 4: GEO Method. If the enzyme soak didn’t clear the reading, try the GEO Method. Add one cup of Calgon water softener and a small amount of automatic dishwasher detergent (not hand dish soap, which foams too much) to the tank with enough fresh water to fill it roughly halfway. The Calgon makes tank walls and probes slick so residue can’t hold on as easily. The detergent lifts oils and grease. This is a deep-clean intervention, not a routine treatment.
Step 5: Drive and agitate. After adding any cleaning solution, take the RV for a drive. The sloshing inside the tank works the solution against the probe tips and walls. Even 20 to 30 minutes of road movement helps. Then dump and rinse when you arrive.
A note on the ice and drive method: Adding a bag of ice to the tank and driving is a popular tip. It can dislodge some settled solids at the bottom of the tank, and it’s unlikely to cause harm. But as Unique Camping + Marine points out, ice floats on the surface and melts before it reaches the probes on the tank sidewalls. For cleaning the actual probe tips, an enzyme soak or GEO Method is more targeted.
Step 6: Check wiring and ground connections. If all cleaning steps have failed, inspect the probe terminals for corrosion and test the wiring as described in the wiring section above. This rules out an electrical fault before you spend money on replacement parts.
Step 7: Replace the probes or upgrade the sensor system. See the next section.
When to Stop Cleaning and Upgrade the Sensor System
If you’ve worked through every step above, the wiring checks out clean, and the sensor still reads full after dumping, the probe has likely failed internally due to corrosion or physical damage. At that point, you have two real options.
Option 1: Replace the internal probe sensors. You can swap the factory probes with aftermarket kits designed to resist fouling better than standard equipment. Horst Miracle Probes are commonly mentioned in RV owner communities as a drop-in replacement that works with existing wiring and monitor panels. A 4-pack typically costs $25 to $40, depending on the retailer. They’re still internal probes, so they can eventually have the same buildup problems, but they tend to perform more reliably with consistent maintenance.
Option 2: Upgrade to an external capacitive sensor system. This is the permanent fix for RVers who are done with the cleaning cycle. Systems like the Garnet SeeLevel II use sensor strips mounted on the outside of the tank wall. They read the tank level through the plastic without ever contacting the waste inside.
Because they don’t touch the tank contents, they are much less vulnerable to internal residue than factory probe sensors. They provide percentage-based readings, often in small increments depending on the model and tank height. Full kits for fresh, gray, and black tanks typically run $200 to $300 or more, depending on configuration. External sensors are not compatible with metal holding tanks, so confirm your tank material before ordering.
For RVers who are completely done with black tank management and considering a different approach entirely, our guide on RV composting toilets covers that option honestly.
How to Keep Your Black Tank Sensors Working Accurately
These habits prevent most sensor problems from coming back after you fix the current one.
Use plenty of water with every flush. Hold the pedal for a full 8 to 10 seconds per flush. Water keeps solids suspended and prevents them from sticking to probes and tank walls.
Keep the black valve closed until the tank is at least two-thirds full before dumping. Never leave it open at a hookup site. This is the single most common cause of hardened buildup and stuck sensors.
Add 1 to 2 gallons of fresh water back into the tank after every dump. This keeps the lowest sensor area moist and prevents waste from drying on the probe tips.
Use RV-safe toilet paper that dissolves quickly. Long-fiber paper that doesn’t break down is a leading cause of probe bridging and false full readings.
Add an enzyme treatment after every dump as routine maintenance. Consistent use helps keep the probe surface clear of buildup between deep cleans.
Do a deep clean using the GEO Method or a long enzyme soak at least every three to four months, or before storing the RV for the season.
Conclusion
An RV black tank sensor that reads full after dumping is almost always a solvable problem. In most cases, the tank is empty, and the sensor is dirty. Waste residue, toilet paper, and sludge coat the probe tips and keep the circuit closed long after you’ve dumped. Enzyme soaks, the GEO Method, and thorough rinsing clear most of these cases.
If cleaning doesn’t work, check the wiring before assuming the sensor is dead. A loose ground or corroded terminal produces the same false full reading as a failed probe, and it costs nothing to check.
And if you’ve genuinely worked through every step above, external capacitive sensors offer a permanent solution: accurate readings without the cleaning cycle.
Two things to do today: pick up an enzyme-based treatment and add it after every dump, and close the black valve at your next hookup site. Those two habits alone prevent the majority of sensor problems before they start.
Frequently Asked Questions
Why does my RV black tank sensor read full after dumping?
Your RV black tank sensor usually reads full after dumping because residue, wet toilet paper, sludge, or mineral buildup is bridging the probe and completing the sensor circuit. Less commonly, the tank did not fully empty, or there is a wiring, ground, or probe failure.
Can toilet paper cause my black tank sensor to read full?
Yes. Toilet paper that doesn’t dissolve quickly can snag directly on the metal probe tip and hang down into liquid at the bottom of the tank. That damp piece of paper completes the electrical circuit and holds a false full or 2/3 reading indefinitely, even after you dump. This is one of the most common causes of stuck sensor readings. Using quick-dissolving RV-safe toilet paper and flushing with more water per use reduces the chance of it happening.
Can I just ignore the sensor if I know it’s reading wrong?
Many experienced RVers do. Once you know the sensor is stuck, tracking usage manually, counting days since you last dumped and factoring in the number of people using the toilet, is a reliable workaround. The risk is training yourself to ignore the reading and then missing an actual full tank. If you’re going to rely on manual tracking, confirm the tank is actually empty after each dump with a clear elbow or the fresh water test, and build a consistent dump schedule so you’re not guessing.
Should I leave water in the black tank after dumping?
Yes. Adding 1 to 2 gallons of fresh water into the black tank immediately after dumping is one of the best habits you can build. It keeps the lowest sensors moist, prevents waste from drying and hardening on probe tips and tank walls, and gives enzyme treatments something to work with. A completely dry black tank between trips speeds up both sensor buildup and odor problems. Dump the tank, rinse it, then close the valve and add fresh water before leaving the dump station.
Does leaving water in the tank after dumping make the sensor read full again?
It can make the 1/3 indicator light up, which is normal. That small amount of water is intentionally covering the bottom of the tank. The 1/3 reading in this case reflects actual liquid, not a false signal. You want the tank to have a small amount of water at the bottom between uses. The problem is when the 2/3 or full indicator lights up right after dumping even with no water added. That’s when residue on the higher probes is the likely cause.