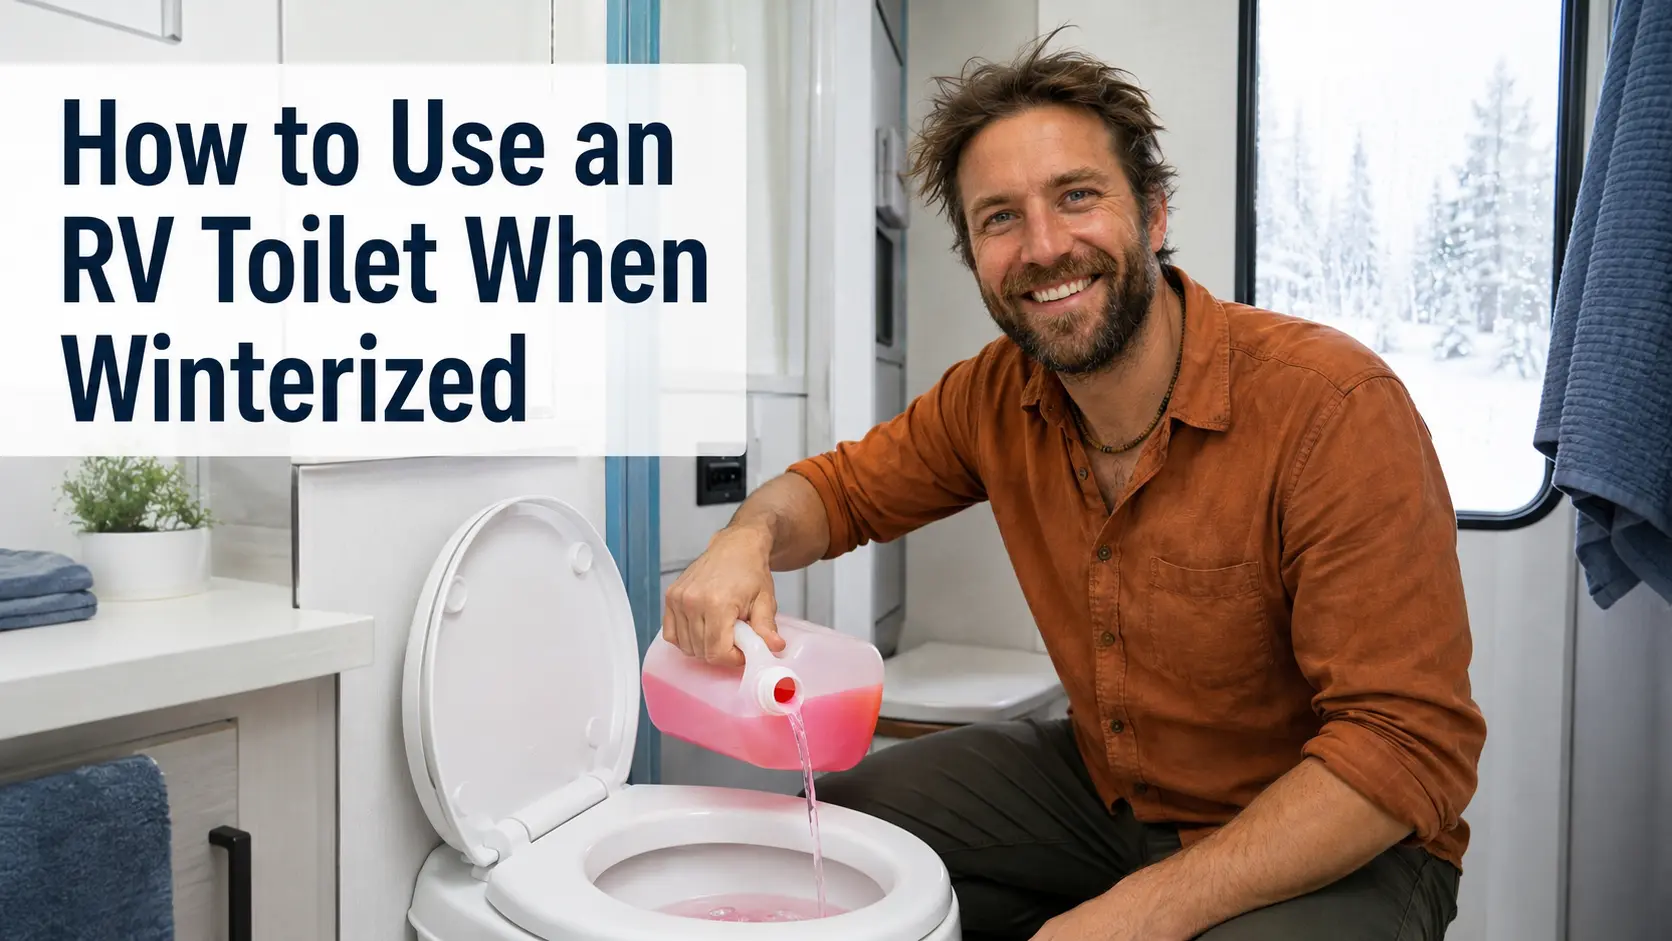
A winterized RV toilet can still be used. Keep the water pump and freshwater tank off. Pour 2-3 gallons of RV antifreeze into the black tank first (3-4 gallons if temperatures are very cold or the underbelly is exposed), then manually pour ½ to 1 cup into the bowl before each flush. Add 2-3 gallons back after dumping if you continue winter use. RV antifreeze is the safest default. Dump before the tank hits half full, then re-winterize or de-winterize when the trip ends.
The temperature dropped overnight. The RV is winterized. And now you need to use the bathroom.
You press the foot pedal. Nothing happens. No water, no flush, nothing. It feels broken.
It isn’t. The valve at the base of the bowl still opens when you press that pedal. You just don’t have water in the system to flow through it. That’s exactly what winterizing does: it drains the freshwater tank, shuts off the water pump, and removes water from the lines so nothing freezes. But the toilet itself is fine. The mechanism works. You just need to supply the liquid yourself.
This guide covers the antifreeze flush method for a winterized RV toilet, the windshield washer fluid option and its risks, how to manage the black tank safely in freezing temperatures, and what to do when the trip ends.
Quick answer: Yes, you can use an RV toilet when winterized. Keep the water pump and freshwater tank off. Pour RV antifreeze directly into the bowl before each flush and press the foot pedal normally. Keep 2-3 gallons of antifreeze in the black tank at all times to protect the outlet valve and drain connection from freezing.
Why Your RV Toilet Stops Working When Winterized
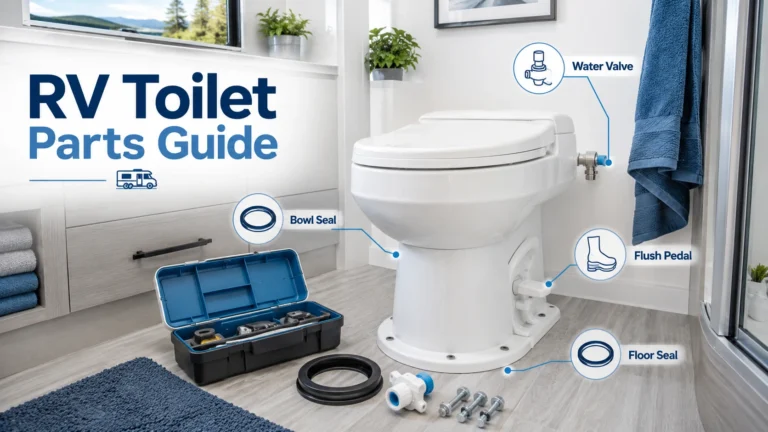
Unlike a home toilet, an RV toilet has no tank on the back. Water comes directly from your freshwater system when you press the foot pedal. The pedal does two things at once: it opens the valve at the base of the bowl so waste drops into the black tank below, and it opens the water inlet valve so fresh water flows in to rinse the bowl.
When you winterize, the freshwater system goes offline. The tank is drained, the pump is off, and the water lines are empty. Press the foot pedal and both valves still open. But nothing flows through the water inlet. The bowl stays dry.
That’s actually good news. The mechanism is still fully intact. You just need to pour the liquid in yourself rather than relying on the pump.
If you’re not sure what your winterization covered, our guide on how to winterize your RV toilet walks through the full process and what each step protects.
Can You Use an RV Toilet When the RV Is Winterized?
Yes. The foot pedal opens the valve at the base of the bowl. It doesn’t need water pressure to do that. Any liquid you pour directly into the bowl will drop into the black tank when you press the pedal. The key is using RV antifreeze or winter-rated windshield washer fluid instead of water so nothing in the bowl, valve area, or tank outlet can freeze.
This comes up in two situations. The first is a cold-weather trip where you don’t want to fully de-winterize the system. The second is storage use, where someone needs occasional toilet access during winter without running the whole water system.
Both work with the method below.
One thing to understand before starting: how exposed your drain valve and tank outlet neck are to outside temperatures matters. Most black tanks are somewhat insulated by the RV floor. But the drain valve and the short connection between the tank and the exterior sewer port can be exposed to cold air. RV travel experts note this neck is the most common freeze point, which is why keeping antifreeze in the tank is critical, not optional.
When You Should Not Use a Winterized RV Toilet
The method below works in most cold-weather situations. But there are cases where using a winterized toilet creates more risk than it solves.
- The black tank outlet, sewer pipe, or gate valve is already frozen. Forcing the pedal won’t clear a frozen valve, and adding liquid to a sealed system can cause pressure problems.
- You have no way to dump safely after the trip. Used black-tank waste containing antifreeze needs to go to a proper RV dump station. Never leave it sitting for weeks.
- Temperatures will stay far below freezing and your RV has an exposed underbelly or uninsulated tanks. Even antifreeze has limits at extreme temperatures.
- You only have summer windshield washer fluid. Summer fluid has no freeze protection and will freeze solid at 32°F or below.
- The product in your hand is not rated for freezing temperatures. Check the label before using anything other than pink RV antifreeze.
- Children or pets have access to the toilet area. Some windshield washer fluids contain methanol or other compounds that are toxic if swallowed. Store all fluids securely.
- You’re considering automotive antifreeze (green or orange). Never use it. It is toxic to humans and animals and will damage your plumbing.
What You Need Before You Start
You don’t need much. But getting the right supplies before you head out makes the whole process easier.
RV antifreeze (pink). This is propylene glycol-based, non-toxic, and safe for RV plumbing. Ethanol-free propylene glycol RV antifreeze is generally gentle on RV plumbing seals and can help keep the bowl blade seal from drying out during winter use. Buy at least 2-3 gallons for a short trip in normal cold weather. Add a fourth gallon if temperatures will be well below freezing or your drain valve is exposed to outside air.
A clean gallon jug or pitcher. You’ll pour from this directly into the bowl before each flush. Any clean container with a pour spout works.
A spray bottle. Optional but worth having. Fill it with antifreeze to rinse the bowl walls after each use without wasting a full pour.
Rubber gloves. Propylene glycol RV antifreeze is much lower-toxicity than automotive antifreeze, but you should still avoid ingestion, limit prolonged skin contact, and follow the product label.
Winter-rated windshield washer fluid. This is the cheaper alternative to pink antifreeze. More on how to use it safely in the section below.
⚠️ Hard rule: Never use automotive antifreeze. The green or orange kind is ethylene glycol-based, toxic to humans and animals, and will degrade rubber seals and plastic fittings. Pink RV antifreeze only, or the windshield washer option below.
How to Flush Your RV Toilet Without Water: Step-by-Step
Pour ½ to 1 cup of RV antifreeze into the bowl before each use. Liquid waste needs about ½ cup. Solid waste needs closer to 1 cup to move everything fully into the tank. Press the foot pedal and hold it down for a full 3-5 seconds so waste drops completely into the black tank. Then spray or pour a small amount of antifreeze around the bowl to rinse it. That’s the complete flush cycle.
⚠️ Do not fill your freshwater tank with RV antifreeze or windshield washer fluid to make the toilet flush. Keep the water pump off and pour liquid directly into the bowl instead. This keeps the winterized system protected, avoids freshwater tank contamination, and makes spring de-winterizing much easier.
Before the very first flush, you need to prime the black tank. Here’s the full setup and use process:
- 1 Hold the foot pedal down to open the valve at the base of the bowl.
- 2 Slowly pour 2-3 gallons of RV antifreeze directly through the open bowl into the black tank. Use 3-4 gallons if temperatures are well below freezing or your RV has an exposed underbelly or drain valve.
- 3 Release the pedal.
- 4 Check that a small amount of antifreeze is visible at the bottom of the bowl. This keeps the blade seal from drying out and blocks tank odors.
- 1 Pour ½ to 1 cup of antifreeze into the bowl (½ cup for liquid waste, up to 1 cup for solid waste).
- 2 Use the toilet normally.
- 3 Press the foot pedal and hold for 3-5 seconds.
- 4 Spray or pour a small rinse of antifreeze around the bowl walls.
- 5 Release the pedal.
RV winterizing experts recommend keeping a spray bottle filled with antifreeze next to the toilet for the rinse step. It uses less antifreeze per flush and cuts costs on longer trips.
On solid waste: If campground restrooms are available, use them for solid waste when you can. It stretches the time before you need to dump and reduces antifreeze use. When that’s not an option, use closer to 1 cup of antifreeze per flush and make sure you’re using RV-safe toilet paper only. Don’t skimp on flush liquid for solid waste. Dry solids can stack directly below the toilet opening and create a pyramid plug that’s difficult to clear in any season, let alone in freezing temps. Hold the pedal down long enough for everything to drop fully before releasing.
How much to budget: A rough estimate for light use is ½ to 1 gallon of antifreeze per person per day. Plan accordingly before the trip so you don’t run short mid-trip.
How often to top up: After every 3-4 flushes, pour an extra half cup into the bowl and press the pedal once without using it. This re-coats the blade seal area and maintains the antifreeze level in the tank.
The Windshield Washer Fluid Option: What You Need to Know
RV antifreeze is the safest default for flushing a winterized RV toilet. Winter-rated windshield washer fluid is an option some RVers use for the black tank only, typically when antifreeze isn’t available or to reduce cost. It is not a direct replacement for RV antifreeze in every situation.
- Black tank only. Never put windshield washer fluid in your freshwater tank or water lines. Some formulas contain methanol or other compounds that are not safe for potable water systems.
- Check the label carefully. Look at the freeze rating, ingredient list, toxicity warnings, and disposal instructions before using any product. Formulas vary by brand.
- Never use summer fluid. Standard blue fluid has no freeze protection. At 32°F it freezes solid, which is exactly the problem you’re trying to avoid.
- Avoid extras. Skip products with wax, rain-repellent coatings, or other additives. Stick to a basic winter-rated formula.
- Keep it away from children and pets. Some washer fluids are toxic if swallowed. Store bottles securely.
- If you’re unsure, use pink RV antifreeze instead. It’s the safer, better-documented option for this use case.
What to look for if you do use it: a temperature rating of -20°F or lower and “winter formula” or “all-season” on the label. Some long-term winter campers have used winter-rated fluid in the black tank without issues, but their rigs, climates, and products vary. What worked for someone else may not apply to your setup.
Use the same amount per flush as RV antifreeze: ½ to 1 cup into the bowl before use, and a small rinse after.
Also skip your regular black tank treatment tablets when using washer fluid. The alcohol content can interact with enzyme-based treatments.
Pink RV antifreeze
Best Use: Default choice for winterized toilet use
Pros: Designed for RV plumbing, lower-toxicity formulas available, generally gentle on seals if labeled RV/marine safe
Main Risk: Costs more than washer fluid; formulas vary
Safe for Freshwater System? Yes, if labeled RV/marine potable-system safe
Winter-rated windshield washer fluid
Best Use: Black-tank-only budget/emergency option
Pros: Cheaper, widely available, freeze-rated
Main Risk: May contain methanol or other toxic/flammable ingredients; label and disposal rules matter
Safe for Freshwater System? No
Plain water
Best Use: Only if temps stay above freezing
Pros: Free, no residue
Main Risk: Will freeze below 32°F and damage valves
Safe for Freshwater System? Yes
Automotive antifreeze (green/orange)
Best Use: Never
Pros: None
Main Risk: Toxic to humans, animals, and RV seals
Safe for Freshwater System? Never
Managing Your Black Tank During a Winterized Trip
Never let the black tank fill past half capacity in freezing temperatures. Dump at the one-third to half-full mark, then immediately add 2-3 gallons of fresh antifreeze before continuing use. Keep the black tank valve closed between every dump.
Here’s why this matters. The antifreeze you add protects the liquid in the tank from freezing. But a full tank dilutes that antifreeze faster, and there’s more pressure on the outlet valve if liquid starts to freeze around the edges. A half-full tank is easier to protect and easier to dump.
The most vulnerable spot isn’t the main tank. It’s the drain valve and the short connection between the tank and the exterior sewer port. This area is often exposed to outside air, and it fills first. Forum reports from RVers who winter camp regularly show this neck freezing and blocking the valve, even when the main tank is fine. After dumping, add 2-3 gallons of RV antifreeze again before continued winter use. Use the higher end if the outlet valve or underbelly is exposed.
Keep the valve closed. In warm weather, some RVers leave the black tank valve open at hookup sites to drain continuously. In freezing temps, that leaves the outlet completely unprotected and the tank dry. Ice can lock the valve in place. And when you finally need to dump, you may find the valve is frozen shut. If that combined with low liquid levels causes solids to stack up, you’re also looking at a pyramid plug situation. Our guide on how to fix a pyramid plug covers that if you’re already dealing with one.
On odors: You might expect antifreeze flushing to cause worse smells. In practice, odors are often less noticeable in cold weather because bacterial activity in the tank slows down significantly. If odors are still an issue after a winter trip, our guide on RV toilet smell after dumping covers the most common causes.
After Your Trip: Dumping and Re-Winterizing
Dump the tank as soon as the trip ends. Don’t let antifreeze sit in a used tank any longer than necessary. An empty, clean tank is easier to maintain.
After dumping, you have two choices.
Re-winterize if nighttime temperatures are still dropping below 32°F. Run pink antifreeze back through the flush valve and supply lines the same way you did the first time. Our step-by-step winterizing guide covers the full process if you need a refresher.
De-winterize if freezing nights are behind you for the season. This means flushing all antifreeze out of the system, sanitizing the freshwater tank, and getting the water pump back online. Our de-winterize guide walks through every step in order.
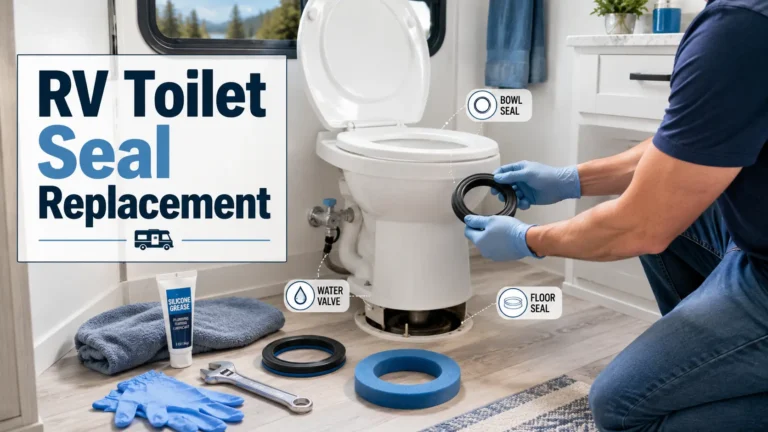
Before you do either, check the toilet seals. The blade seal at the base of the bowl and the floor seal at the toilet base are the two most common wear points. Ethanol-free propylene glycol antifreeze is generally gentle on RV plumbing seals and can help prevent the blade seal from drying out during winter use. But if the blade seal looks cracked or isn’t holding water in the bowl after the trip, replace it before the next one. Our RV toilet repair guide covers seal diagnosis and replacement.
Conclusion
Using your RV toilet when winterized comes down to three things. Replace water with RV antifreeze or winter-rated windshield washer fluid. Keep the black tank under half full. Dump promptly when the trip ends and re-winterize or de-winterize based on the forecast.
The method works for a surprise cold-weather outing, a planned winter trip, or just needing occasional access to the toilet during storage. Your plumbing stays protected. The blade seal gets some liquid contact instead of sitting completely dry. And you don’t have to search for a rest stop every time.
If winter is behind you and it’s time to open everything back up, the de-winterize guide is the next read.
Frequently Asked Questions
How much RV antifreeze do I need to flush a winterized RV toilet?
Plan on 2-3 gallons to prime the black tank before first use in normal cold weather. Use 3-4 gallons if temperatures are well below freezing or your RV has an exposed underbelly or drain valve. After that, use ½ to 1 cup per flush. A rough estimate for daily use is ½ to 1 gallon per person. After dumping mid-trip, add 2-3 gallons back before continuing. Keep a spare gallon in the rig.
Can I use regular water instead of antifreeze if temperatures are above freezing?
Yes, if temperatures are staying above 32°F consistently. Pour water from a jug into the bowl, flush, and rinse the same way you would with antifreeze. But if nighttime temperatures are dipping below freezing at all, stick with antifreeze or winter-rated windshield washer fluid. A partially frozen valve is a much bigger problem than the small cost of using antifreeze.
Will flushing with antifreeze damage the black tank or toilet seals?
No, if you use pink RV antifreeze (propylene glycol-based). It is non-toxic and generally gentle on RV plumbing components. Avoid automotive antifreeze (ethylene glycol-based, green or orange), which is toxic and will degrade seals. If your toilet manufacturer warns against alcohol-based products, avoid windshield washer fluid as well and stick to propylene glycol RV antifreeze only.
Can I put RV antifreeze in my freshwater tank to flush the toilet?
No. Do not fill the freshwater tank with antifreeze just to use the toilet. Keep the pump off and pour RV antifreeze directly into the toilet bowl instead. Filling the fresh tank contaminates your drinking water system and makes spring de-winterizing much more work than it needs to be.
Can I use a winterized RV toilet for solid waste?
Yes, but use more flush liquid than you would for liquid waste. Solid waste needs close to 1 cup of antifreeze or winter-rated liquid per flush to move fully into the tank. Don’t skimp. Dry solids can stack below the toilet opening and cause a pyramid plug that’s hard to clear in any season. Also, use RV-safe toilet paper only.
Can I flush a winterized RV toilet with plain water?
Only if temperatures stay above freezing long enough will the bowl, valve, tank outlet, and sewer connection not freeze. If nighttime temperatures may drop below 32°F, use RV antifreeze instead. A frozen valve or drain connection is a much bigger problem than the cost of a gallon of antifreeze.