You’re parked at a beautiful campsite, miles from the nearest town — and your RV toilet just stopped working. Whether it won’t flush, won’t hold water, or is leaking at the base, there’s almost always a straightforward fix you can handle yourself.
This complete RV toilet repair and troubleshooting guide covers every common problem, a fast diagnostic flowchart to pinpoint your issue, and step-by-step fixes with the exact parts you need. No plumber, no shop visit required.
How Does an RV Toilet Actually Work?
Before you can fix it, you need to understand how it works — and it’s simpler than you might think.
Unlike home toilets, RV toilets have no tank on the back. Water comes directly from your freshwater system when you press the foot pedal. Waste drops straight down into the black tank below. There’s no complex flushing mechanism — just a few rubber seals, a water valve, and a pedal linkage.
Key components to know:
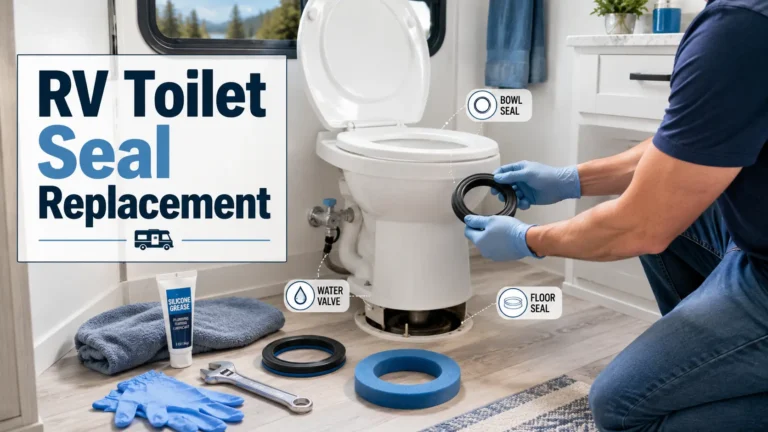
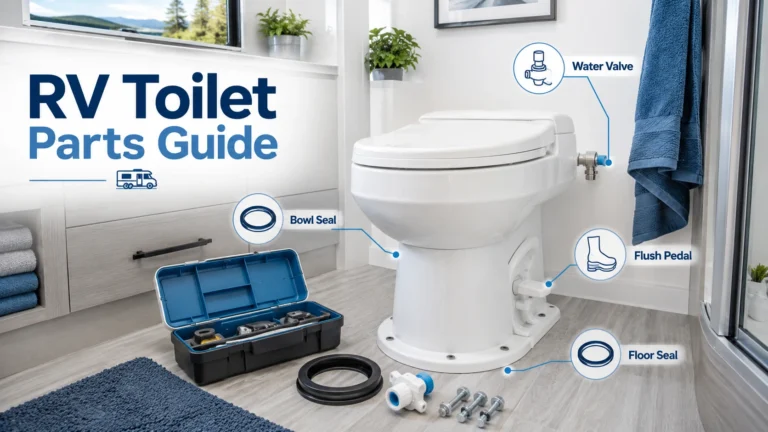
- Blade / Flush ball seal — The rubber seal at the bottom of the bowl. Holds water in and blocks odors from the black tank—the single most common failure point.
- Water valve — Controls water flow when you press the pedal. Can fail open (water runs constantly) or fail closed (no water enters).
- Foot pedal/flush linkage — Activates flushing. A broken linkage or cracked pedal disables the entire flush mechanism.
- Floor flange gasket — The rubber ring at the toilet base. Prevents leaks and odors escaping around the bottom.
- Vent pipe — Runs from the black tank up through the roof. If blocked, waste and water can’t drain properly.
Key difference from home plumbing: RV toilets use a rubber floor gasket at the base — never a wax ring. This is essential to know before buying any replacement parts.
Quick Diagnostic: Find Your Problem Fast
Not sure what’s wrong? Use this flowchart to identify your issue in under 2 minutes.
Start here — press the foot pedal and observe what happens:
→ No water enters the bowl when you press the pedal
- Check: Is your water pump on and your freshwater tank not empty?
- If pump is off or tank is empty → Fill the tank or turn on the pump
- If pump is on and tank has water → Water valve is faulty or pedal linkage is broken
→ Water enters but waste won’t go down
- Check: Is the black tank full?
- If black tank is full → Empty the black tank at a dump station first
- If black tank is empty → You have a clog
- Check: Does the blade valve at the bottom of the bowl open when you press the pedal?
- If blade doesn’t open → Stuck or seized blade valve
→ Water enters and waste flushes, but the bowl drains empty between uses
- Blade seal is dirty, dry, or worn
→ Water keeps trickling into the bowl without pressing the pedal
- Water valve not closing properly
→ Water or smell coming from around the base
- Floor flange gasket has failed
→ Toilet rocks or moves
- Base mounting bolts are loose
→ Sewage smell without visible leak
- Dry seal, or black tank valve left open
The 8 Most Common RV Toilet Problems
Problem 1: RV Toilet Won’t Flush
Symptom: You press the pedal and nothing happens — no water enters the bowl, or water enters but waste stays in the bowl and won’t drop into the black tank.
Why it matters: This is one of the most searched RV toilet problems. There are two distinct versions of this issue and they have different causes.
Root causes:
- No water entering the bowl: Water pump is off, freshwater tank is empty, water valve has failed closed, pedal linkage is disconnected, or kinked water line restricting flow
- Water enters but won’t drain: Full black tank, clogged pipe between toilet and tank, or a seized/stuck blade valve
Difficulty: Easy to Moderate | Cost: $0 to $40 depending on cause
How to fix it — no water entering:
- Verify your water pump is switched on and your freshwater tank has water in it. This solves the problem more often than you’d expect, especially for new RV owners.
- Check the water supply line at the back of the toilet for kinks. Even a slight bend can reduce pressure enough to prevent flushing.
- Press the pedal firmly and fully — RV toilet pedals require a full, deliberate press. A partial press often fails to open the valve completely.
- If none of the above work, the water valve itself has likely failed. Replace the valve.
How to fix it — water enters but won’t drain:
- Check your black tank level monitor. A full black tank physically prevents flushing. If full, drive to a dump station and empty before attempting to diagnose further.
- If the tank isn’t full, hold the pedal down and look into the bowl. Does the blade valve at the bottom open? If the blade doesn’t open, it may be seized.
- If the blade opens but waste still won’t go down, you have a pipe clog between the toilet and the black tank.
For new RV owners: RV toilets work differently from home toilets. You fill the bowl first by pressing the pedal halfway, then press it fully to flush. Make sure you’re using enough water — insufficient water with each flush is one of the leading causes of both clogs and non-flushing issues.
Problem 2: RV Toilet Clogged / Not Draining {#clogged}
Symptom: Waste won’t flush down, water backs up in the bowl, or the toilet drains extremely slowly. This is one of the most common — and most unpleasant — RV toilet problems.
The three types of RV toilet clogs:
RV clogs aren’t all the same. Identifying which type you have determines how you fix it.
Type A: Pyramid plug (most common) A pyramid of solid waste has built up directly below the toilet opening inside the black tank. This happens most often when the black tank valve is left open at hookup sites — liquids drain out freely but solids accumulate into a pyramid shape, eventually blocking the drain opening.
Type B: Blocked toilet line A clog in the pipe between the toilet and the black tank. This is more likely when the black tank isn’t positioned directly below the toilet, meaning waste travels through longer pipe runs with turns and elbows. Not using enough water per flush is the most common trigger.
Type C: Compacted tank This occurs when an RV has sat in storage with a full or partially full black tank. As the RV sits unused, liquid evaporates and leaves behind hardened waste that blocks the tank exit.
Difficulty: Moderate | Cost: $10–$30 for treatment products; plumber’s snake $20–$40
How to fix a pyramid plug:
- Close the black tank valve if it’s been left open.
- Add as much water as possible to the black tank through the toilet.
- Pour a full bottle of enzyme-based black tank treatment (such as Unique Clear-It or Aqua-Kem) directly down the toilet.
- Let the water and treatment soak for at least 48–72 hours. Longer is better for stubborn plugs.
- Drive the RV if possible — road movement helps break up the plug and slosh the treatment around the tank.
- Open the black tank valve at a dump station and flush with a tank rinse wand.
How to fix a blocked toilet line:
- Hold the flush pedal down to keep the blade valve open. Pour several gallons of hot (not boiling) water directly into the bowl to try to push the clog through.
- If water still backs up, use a flexible RV tank wand connected to a garden hose — insert it through the toilet and into the pipe to break up the blockage with water pressure.
- For stubborn line clogs, a 5–6 foot section of 1/2-inch PEX tubing works well as a manual rod — flexible enough to navigate the pipe, stiff enough to break up compacted material.
- If the blade valve won’t open at all when you press the pedal, it may be seized. Pour a holding tank cleaner like Aqua-Kem into the bowl and let it sit for several hours before attempting to force the pedal again.
How to fix a compacted tank:
- Fill the tank completely with water through the toilet.
- Add two full bottles of enzyme treatment.
- Wait 72+ hours — for heavily compacted tanks, 5–7 days gives the enzymes time to break down the hardened waste.
- Drive the RV to agitate the mixture if possible.
- Dump at a station and repeat if necessary.
Important: Do not use a standard household plunger on an RV toilet — it can damage the blade seal. Use a flexible wand or soft-cup plunger designed for RV toilets instead.
Prevention is everything here: The single best way to prevent clogs is to use plenty of water with every flush, only use RV-safe toilet paper (see What Toilet Paper Is Safe for RV), and never leave the black tank valve open at hookup sites.
Problem 3: Bowl Won’t Hold Water
Symptom: The bowl drains slowly or is completely dry between uses.
Root cause: The blade seal at the bottom of the bowl is dirty, dried out, or worn. It can no longer create a watertight barrier.
Difficulty: Easy | Parts cost: $15–$25
How to fix it:
- Start with the simplest fix — clean around the seal edge with a soft cloth. Even a small piece of toilet paper stuck in the seal gap will prevent it from closing fully.
- Apply a thin layer of RV toilet seal lubricant around the entire seal. Never use petroleum jelly — it degrades rubber and accelerates wear.
- If the bowl still won’t hold water after cleaning and lubricating, the seal is worn out and needs replacing. Remove the toilet and replace the blade seal from underneath.
- Test by filling the bowl and checking again after 15 minutes. A good seal holds water with no visible drop.
Problem 4: Water Keeps Running / Won’t Stop
Symptom: Water trickles into the bowl continuously, even when you haven’t pressed the pedal.
Root cause: The water valve isn’t closing fully, or a clogged diffuser screen is causing back-pressure that mimics a valve failure.
Difficulty: Moderate | Parts cost: $25–$40
How to fix it:
- First, check the diffuser screen at the water inlet. Mineral deposits from hard water create buildup that prevents the valve from fully closing. Remove the screen and soak it in white vinegar for 30 minutes, then rinse and reinstall.
- If water still runs after cleaning the diffuser, the water valve itself needs replacing. Turn off the water supply at the pump, then remove the toilet to access the rear valve connection.
- Swap in the new valve, reconnect the water line, and test.
Protect your freshwater tank: A running toilet can drain your entire freshwater supply overnight. If you notice this issue while camping, switch off the water pump until the repair is done.
Problem 5: Toilet Leaking at the Base
Symptom: Water or odor seeping from around the toilet base onto the bathroom floor.
Root cause: The floor flange gasket (rubber ring) has compressed or cracked over time.
Difficulty: Moderate | Parts cost: $10–$20
How to fix it:
- Remove the toilet completely
- Lift off the old gasket and clean the flange surface thoroughly. Any residue from the old gasket will prevent a proper new seal from forming.
- Press the new rubber gasket firmly into place. Do not use a wax ring — RV toilets require rubber only.
- Reinstall the toilet, tighten both base bolts evenly, and check for movement before reconnecting the water line.
Problem 6: Foot Pedal Not Working
Symptom: Pressing the pedal does nothing — no water flow, no blade movement. See also our detailed guide: How to Fix an RV Toilet Foot Pedal
Root cause: The flush linkage has disconnected, or the pedal assembly has cracked.
Difficulty: Easy | Parts cost: $10–$30
How to fix it:
- Look underneath the pedal — a small plastic clip or rod often simply pops out of place during travel. Snap it back in and test before buying any parts.
- If the pedal itself is cracked or broken, order a replacement pedal assembly for your specific model number. Both Thetford and Dometic sell these as individual parts — you don’t need to replace the whole toilet.
Problem 7: Toilet Wobbling or Loose
Symptom: The toilet rocks from side to side, most noticeable while driving or on uneven ground.
Root cause: The two base mounting bolts have worked loose from road vibration over time.
Difficulty: Easy | Cost: Free — just a wrench
How to fix it:
- Pop off the plastic caps at the front base of the toilet to expose the two mounting nuts.
- Tighten both bolts evenly with an adjustable wrench. Do not overtighten — the plastic base will crack. Firm and snug is enough.
- If the toilet still wobbles after tightening, the floor flange may have shifted. Reinstall with a fresh rubber gasket.
Problem 8: Persistent Odors
Symptom: Sewage smell in the bathroom area, even when the toilet hasn’t been recently used.
Root cause: Black tank valve left open, a dry blade seal, or not enough water left in the bowl.
Difficulty: Easy | Cost: $5–$15 for treatment products
How to fix it:
- Close the black tank valve. Never leave it open while at a full-hookup campsite. When the valve stays open, all liquid drains out freely but solids accumulate — and odors travel back up freely into the RV.
- Always leave 2–5 gallons of water in the bowl after each dump. Water in the bowl keeps the blade seal moist and creates an odor barrier between you and the black tank.
- Add a black tank treatment after every dump. Drop-in pods are the most convenient option.
- Apply seal lubricant to the blade seal. A dry seal allows odors through even when it looks perfectly intact visually.
Tools & Parts You’ll Need
Gather these before you start so you’re not stopping mid-repair:
- Adjustable wrench
- Thick rubber gloves
- Blade seal kit (model-specific — check your toilet’s model number first)
- RV toilet seal lubricant — not petroleum jelly
- Replacement water valve (if water won’t stop running)
- Rubber floor gasket (if leaking at base)
- Enzyme-based black tank treatment (for clogs)
- Flexible tank wand/garden hose (for clog clearing)
- Bucket and old towels
- Flashlight or headlamp
Finding your model number: Check the underside of the toilet seat, the rear of the base, or on a label near the waterline inside the bowl. You need this exact number before ordering parts — Thetford and Dometic both make many variations that look identical but use different seals and kits.
How to Remove an RV Toilet
Most seal and valve repairs require removing the toilet. It sounds daunting the first time, but it’s a 15-minute job once you know the steps. There are no wax seals, no lead pipes — it’s a clean, straightforward process.
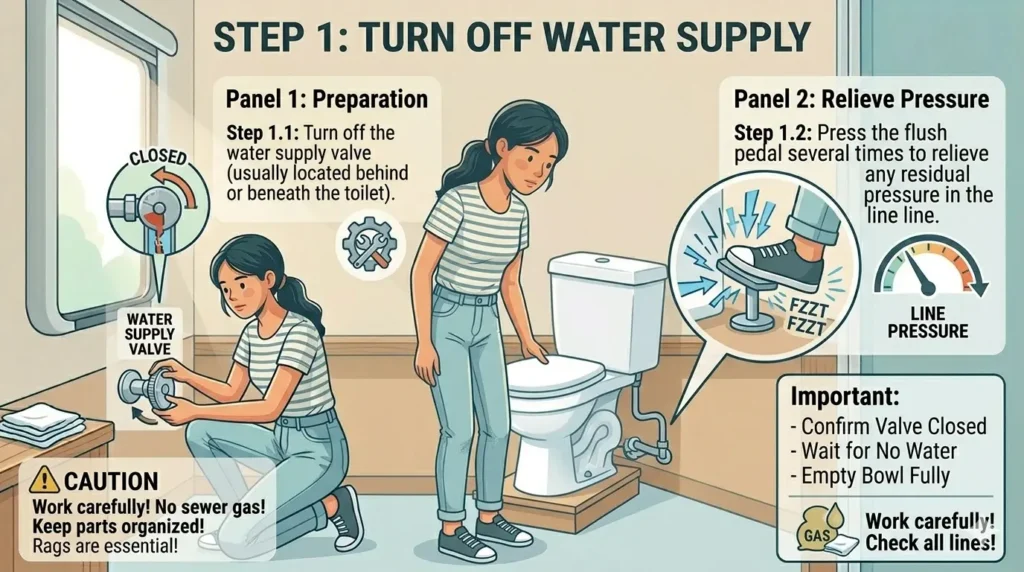
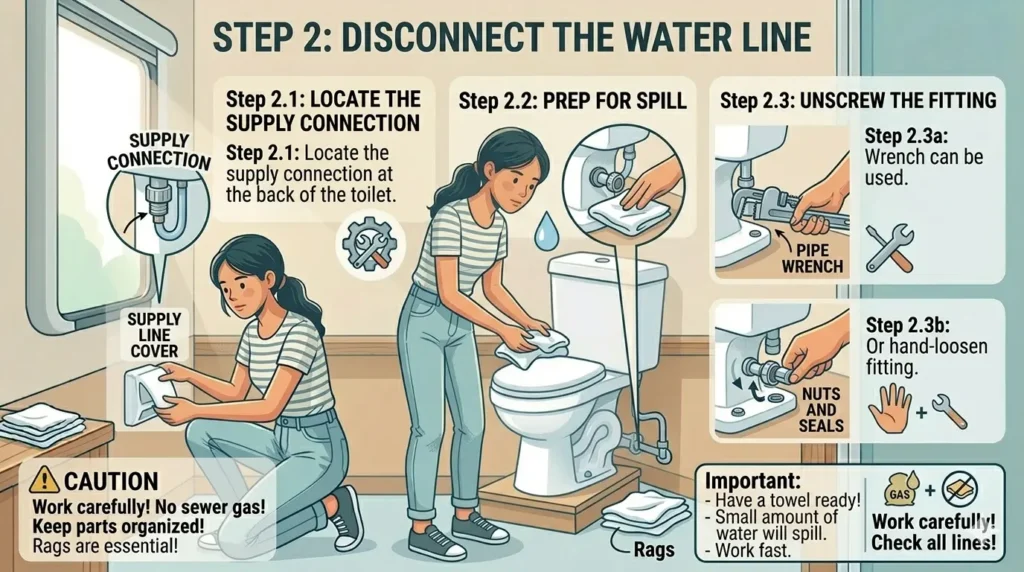
Step 1: Turn off the water supply Close the valve near the toilet or switch off the freshwater pump. Press the flush pedal several times to relieve any residual pressure in the line.
Step 2: Disconnect the water line Locate the supply connection at the back of the toilet. Have a towel ready — a small amount of water will spill. Unscrew the fitting by hand or with a wrench.
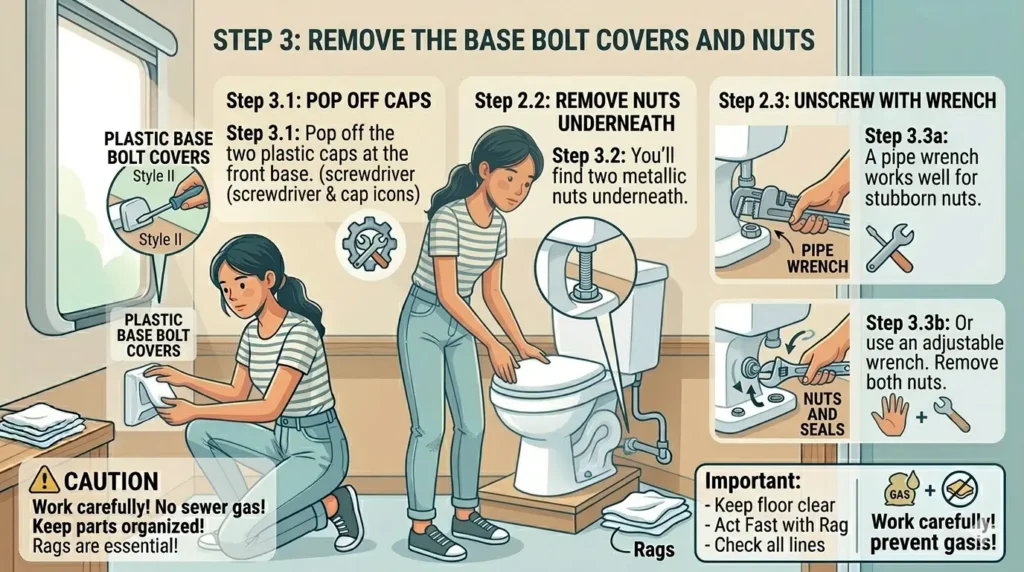
Step 3: Remove the base bolt covers and nuts Pop off the plastic caps at the front base of the toilet. You’ll find two nuts underneath — remove both with a wrench.
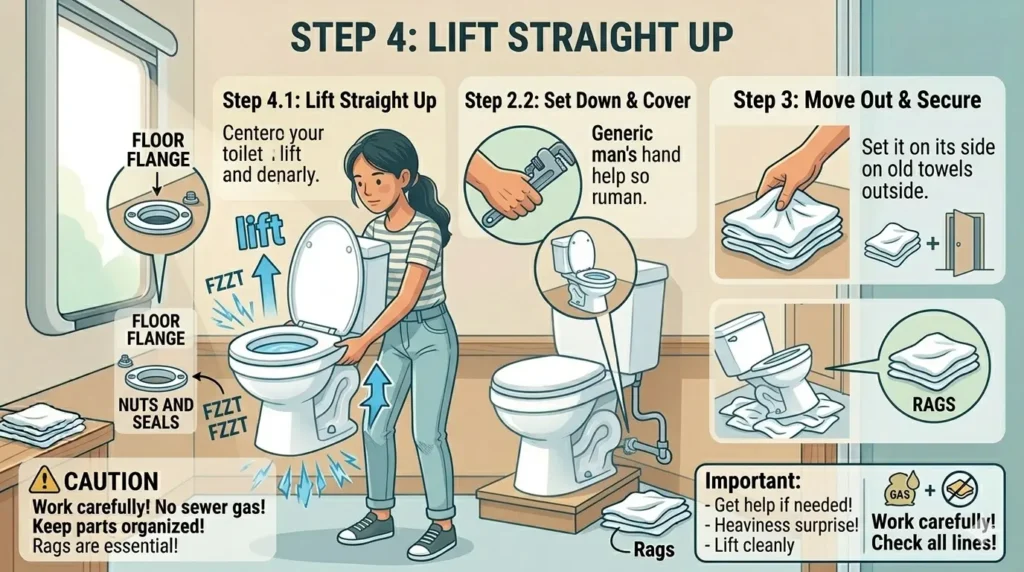
Step 4: Lift straight up The toilet lifts cleanly off the floor flange. Porcelain models are heavier than expected — get help if needed. Set it on its side on old towels outside the bathroom.
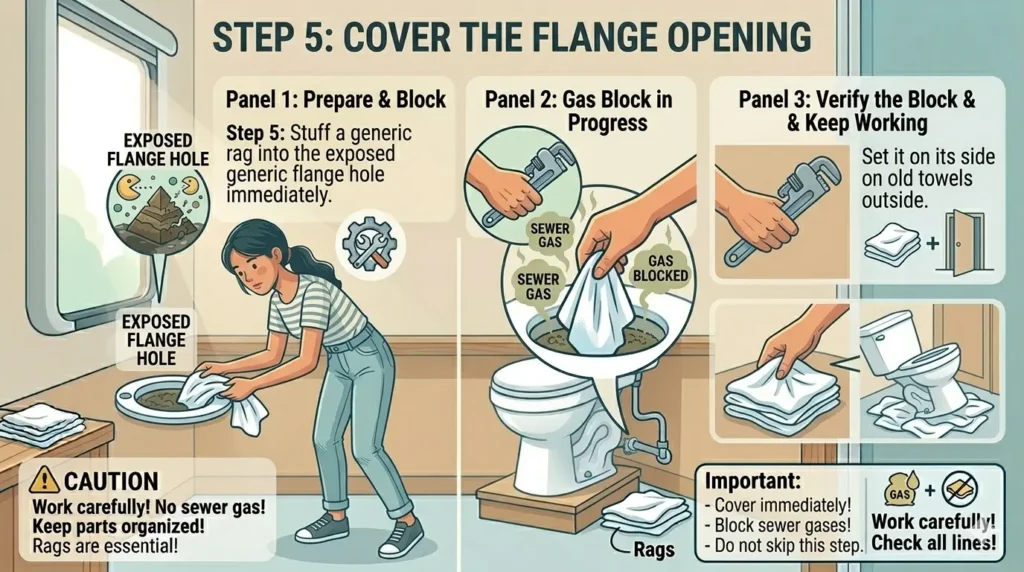
Step 5: Cover the flange opening Stuff a rag into the exposed flange hole immediately to block sewer gases while you work. Do not skip this step.
Reinstallation tip: When putting the toilet back, tighten the two base bolts in small, alternating increments — like tightening lug nuts on a wheel. Tightening one side fully before the other will crack the plastic base.
Thetford vs. Dometic: Brand-Specific Notes
Thetford and Dometic cover the vast majority of RV toilets on the road. Here’s what you need to know before buying parts or starting any repair.
Thetford Aqua-Magic
- The most common RV toilet in North America. Parts are widely available at Walmart, Amazon, and most RV supply stores.
- Blade seal replacement requires removing the toilet — access is from underneath. There is no shortcut.
- Freeze damage warning: The Aqua-Magic Style II is especially vulnerable in cold climates. Any water left in the valve housing during freezing temperatures will crack the plastic. Always winterize by draining fully and adding RV antifreeze before cold-weather storage.
- The official Thetford seal kit includes a lubricant packet inside the box — don’t throw it out.
Dometic 310 / 320
- The Dometic 320 has a significant advantage: the seal can be replaced from above through the bowl opening, without removing the toilet at all.
- The 310 and 320 look nearly identical but use different seal kits. Check the model number on the rear of the base before ordering — this is a very common and expensive mistake.
- Dometic toilets use a ball-and-seal system rather than a flat blade. Parts are slightly more expensive, but the design holds up better with heavy or daily use.
- Widely used in European RV and motorhome markets.
Should You Repair or Replace?
Repair when:
- The problem is a seal, gasket, or water valve ($15–$45 in parts)
- The toilet is 5 years old or newer with an intact bowl
- Only a single component has failed
Replace when:
- The plastic blade housing or bowl itself is cracked
- Multiple parts are failing simultaneously
- The toilet is 10+ years old and repairs aren’t holding
- You want to upgrade from plastic to porcelain
- Repair cost exceeds 50% of what a new toilet costs
Cost reference:
| Repair / Part | DIY Cost | Shop Labor |
|---|---|---|
| Blade seal replacement | $15–$25 | $80–$130 |
| Water valve replacement | $25–$40 | $90–$150 |
| Floor gasket replacement | $10–$20 | $75–$120 |
| Full pedal assembly | $20–$35 | $85–$140 |
| New Thetford Aqua-Magic V | $110–$140 | + ~$80 install |
Preventive Maintenance Tips
These six habits will prevent almost every common RV toilet problem before it starts.
1. Lubricate the seal every 6 months. Use RV-specific seal conditioner — never petroleum jelly. A moist, well-lubricated blade seal lasts 4–6 years. A neglected, dry one can fail in under a year.
2. Only use RV-approved toilet paper. Standard household tissue doesn’t break down properly in the black tank and can cause both line clogs and blade seal jams. When in doubt, check out What Toilet Paper Is Safe for RV for a full breakdown of safe options.
3. Never leave the black tank valve open. Only open it to dump when the tank is full, then close it immediately. Leaving it open is the leading cause of pyramid plugs, compacted tanks, and chronic odor problems. For more, see How to Unclog an RV Toilet Without a Snake.
4. Winterize properly. Drain all water from the valve and water lines before temperatures drop below freezing. Add RV antifreeze to the system if storing the RV in a cold climate. This single step prevents the most expensive RV toilet damage.
5. Descale the diffuser screen in hard water areas. Remove the screen every 6 months and soak in white vinegar for 30 minutes. Mineral buildup can restrict flow enough to cause flushing problems or mimic a valve failure.
6. Always leave water in the bowl. Keep 2–4 inches of water in the bowl when the toilet isn’t in use. This maintains the odor barrier and keeps the blade seal properly lubricated between uses.
Frequently Asked Questions
Why won’t my RV toilet flush?
There are two distinct causes. If no water enters the bowl, the most likely culprits are a faulty water valve, a disconnected pedal linkage, or the water pump being off. If water enters but waste won’t drain, the issue is usually a full black tank, a clog in the pipe to the tank, or a seized blade valve. See the Quick Diagnostic section above to pinpoint your exact problem.
How do I unclog an RV toilet?
First, identify the type of clog. A pyramid plug (waste buildup inside the black tank) requires enzyme treatment and soaking for 48–72 hours. A line clog (blockage in the pipe between toilet and tank) can often be cleared with a flexible tank wand or hot water. A compacted tank from long-term storage requires extended enzyme soaking. Full step-by-step instructions are in Problem 2 above, and our dedicated guide covers How to Unclog an RV Toilet Without a Snake in more detail.
How much does it cost to repair an RV toilet?
Most DIY repairs cost between $15 and $55 in parts. A blade seal kit runs $15–$25, and a replacement water valve $25–$40. Professional shop labor adds $75–$150 on top of parts. In most cases, the repair is simple enough that paying for labor isn’t necessary.
Can I repair my RV toilet without removing it?
Sometimes. Some Dometic 320 seal replacements can be done from above through the bowl opening. Most Thetford repairs, however, require removing the toilet. Clog clearing, wobbling, odor fixes, and pedal linkage repairs can often be done without removal.
Why does my RV toilet smell even after cleaning?
The most common cause is a dry blade seal that’s no longer blocking odors from the black tank. Apply seal lubricant and keep 2–4 inches of water in the bowl at all times. Also, verify your black tank valve is fully closed — a slightly open valve is a surprisingly common source of persistent odor. If the smell continues, inspect the floor flange gasket for cracks.
How often should I replace the RV toilet seal?
With regular lubrication, a blade seal lasts 4–6 years. In hard water regions or with very frequent use, inspect and replace it every 3 years. If the bowl won’t hold water, replace it immediately — a dry seal wears out very quickly once it’s stopped holding properly.
Is there a wax ring under an RV toilet?
No. RV toilets use a rubber floor gasket instead of a wax ring. This is an important distinction when buying replacement parts — a wax ring will not form a proper seal and will cause leaks and odors.
Should I consider a composting toilet for my RV?
If you frequently boondock off-grid and want to eliminate black tank management, a composting toilet is worth considering. They require no water and produce no liquid waste. Our detailed guide on RV Composting Toilet Pros and Cons covers everything first-time buyers need to know.
Most RV toilet problems — the stuck flush, the dry bowl, the draining clog — come down to a $20 part or a simple procedural fix. Once you’ve done your first repair, the system demystifies completely. You’ve got this.