✅ Quick Answer: De-winterizing your RV plumbing means flushing out the antifreeze from last season, sanitizing the water system, and restoring safe water flow to every faucet, shower, and toilet. Most RV owners complete the process in 1 to 3 hours, plus a 12-hour sanitization soak. You need a potable water hose, fresh water, household bleach, and a new water filter cartridge. Done correctly, your water is safe to drink, your pipes are leak-free, and you are ready for the season.
Before you hook up and hit the road, one job needs doing first: de-winterizing the plumbing system. Skip it and you risk contaminated drinking water, a blown water heater element, or a slow leak behind a cabinet wall. Follow these steps and you are done in an afternoon.
What You Will Need
Must-Have
- Potable water hose — not a standard garden hose, which can leach chemicals into drinking water
- Household bleach (regular, unscented)
- Fresh potable water
- Replacement water filter cartridge — last season’s filter holds antifreeze residue and affects water taste all year
- Teflon tape — useful if any fittings need resealing during the process
- Basic tools — adjustable wrench, screwdriver, and pliers for drain plugs and valve fittings
- Water pressure regulator — RV plumbing is rated for 40 to 50 PSI; city water can push 80 PSI or more and damage your lines
Optional but Useful
- Camco Pump Converter Kit (36543) — for testing the water pump and next fall’s winterization
- Water heater bypass kit — if your rig does not have one factory-installed, add one before starting
- Replacement anode rod — swap it now if yours is visibly corroded or worn down
- Collection buckets — for catching antifreeze when draining the water heater
When to De-Winterize
Do not rush this. One late frost can freeze freshly flushed lines and send you right back to the start. Wait until overnight temperatures are consistently above freezing for at least two weeks. That window varies depending on your climate and location.
Always check your owner’s manual before starting. Valve layouts and bypass configurations vary by manufacturer and model year.
How to De-Winterize Your RV Plumbing: Step by Step
Step 1 — Full Walk-Around Inspection
Before you touch the water system, inspect the entire rig. Check roof seals, window gaskets, hose connections, and any plumbing fittings you can see. Catching damage before you pressurize is the goal — a hairline crack in a fitting looks minor until water pressure turns it into a steady drip inside a wall.
Open all windows and exterior compartment doors to air out the interior while you work.
Step 2 — Close Low-Point Drains and Reinstall Drain Plugs
Locate every low-point drain on the exterior and close them completely. Reinstall any drain plugs removed during winterization.
While the water heater drain plug is out, inspect the anode rod. If it is heavily pitted or worn to less than half its original size, replace it now — it protects the tank lining from corrosion and is inexpensive.
Anode rod location and type differ by brand and model — confirm with your RV manual.
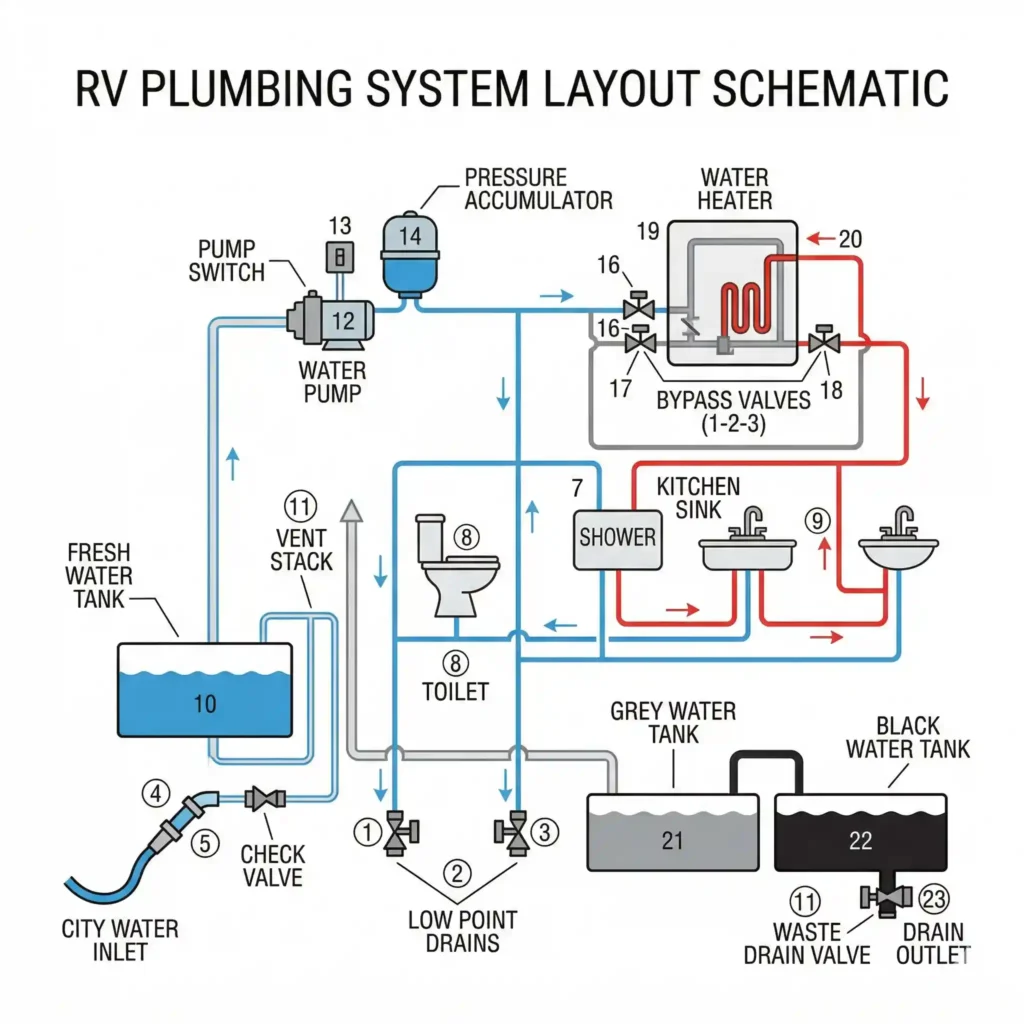
Step 3 — Remove the Water Heater from Bypass Mode
Get this right and the rest of the process goes smoothly. Locate the bypass valves behind your water heater access panel and turn them back to the normal operating position. During winterization they were set to keep antifreeze out of the tank — now they need to allow water back in.
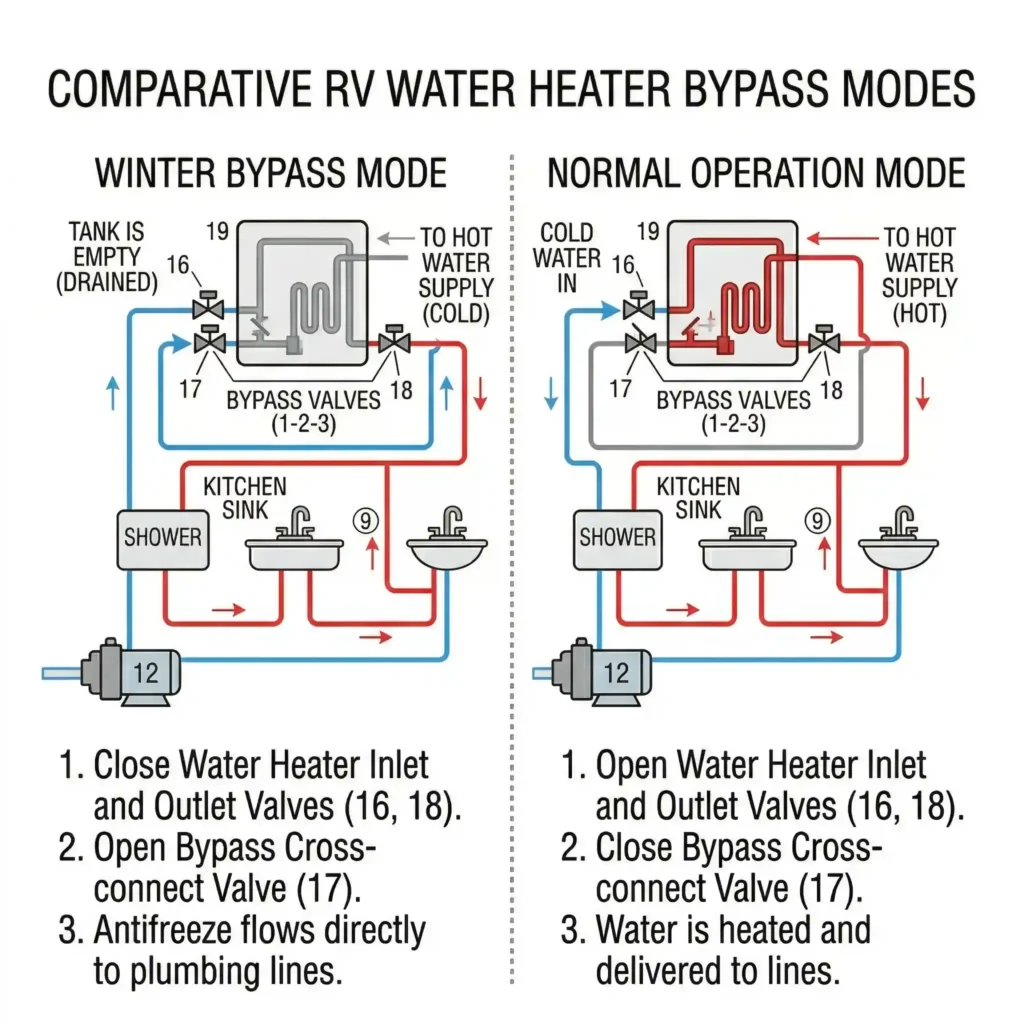
⚠️ Important: Do not turn the water heater on yet. Let it fill naturally when water enters the system in the next step. Turning it on dry destroys the heating element instantly.
Step 4 — Flush Out the Antifreeze
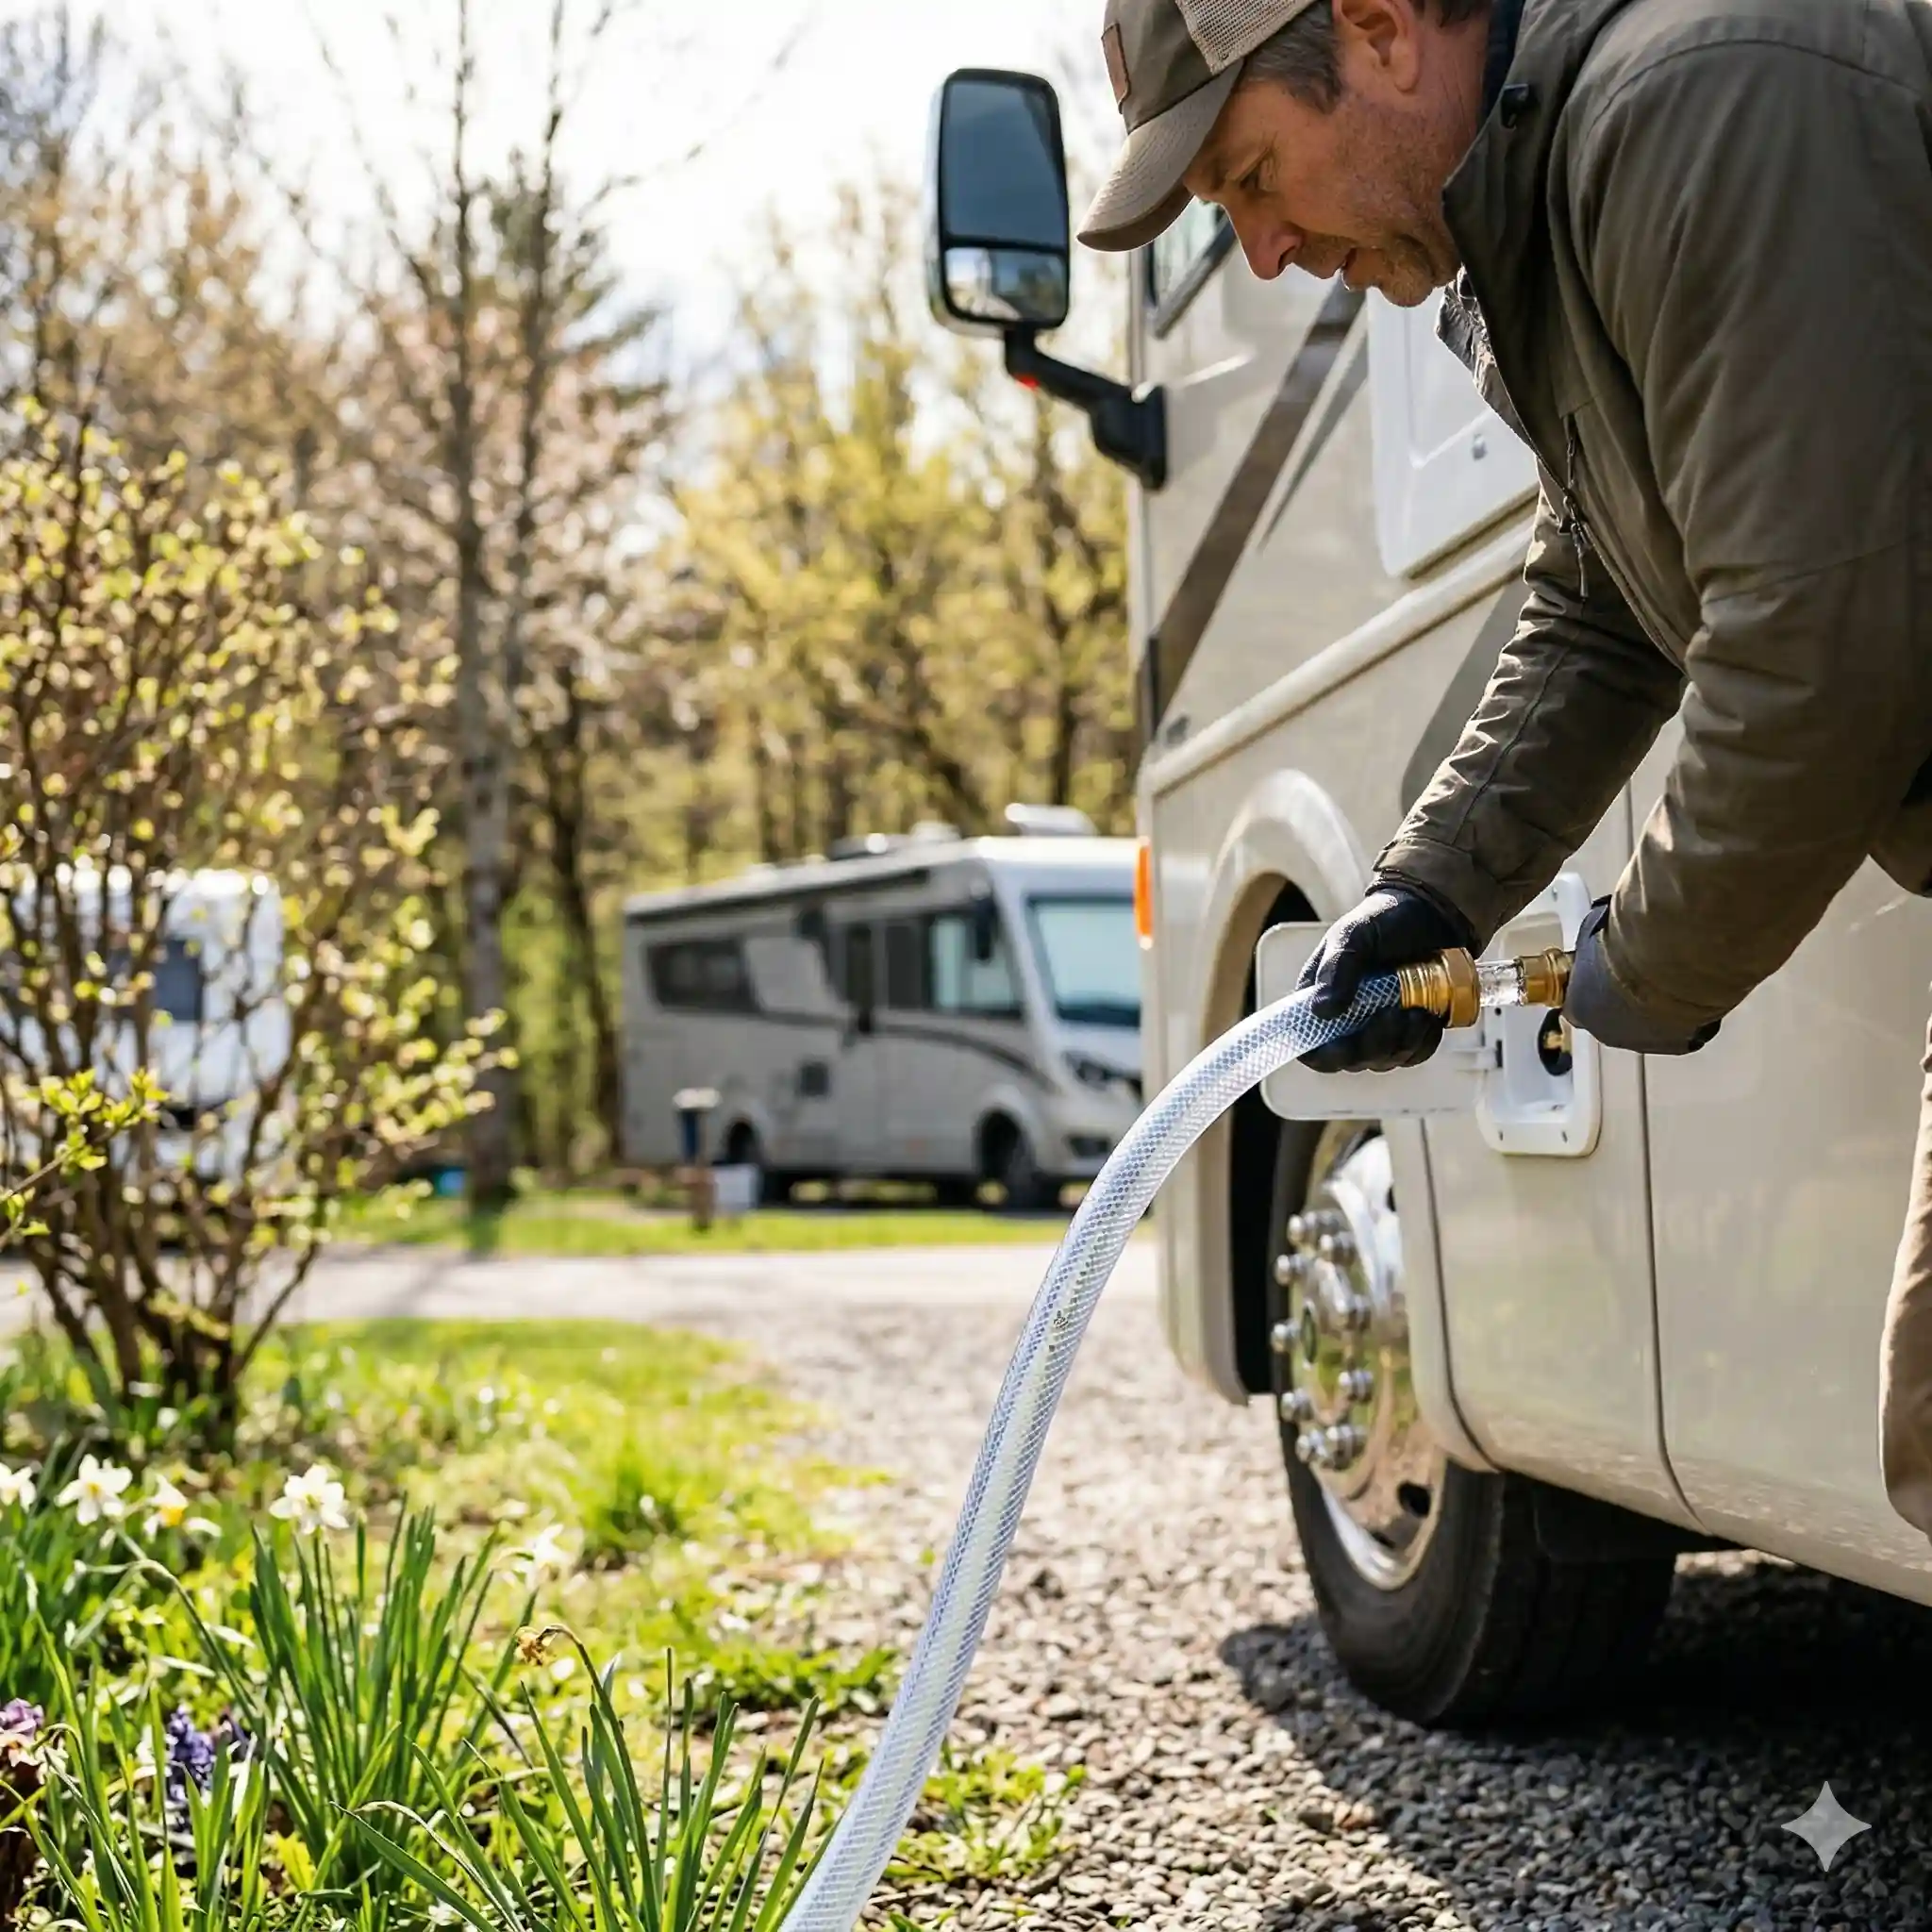
Connect your potable water hose to the city water inlet through a pressure regulator, then start flushing.
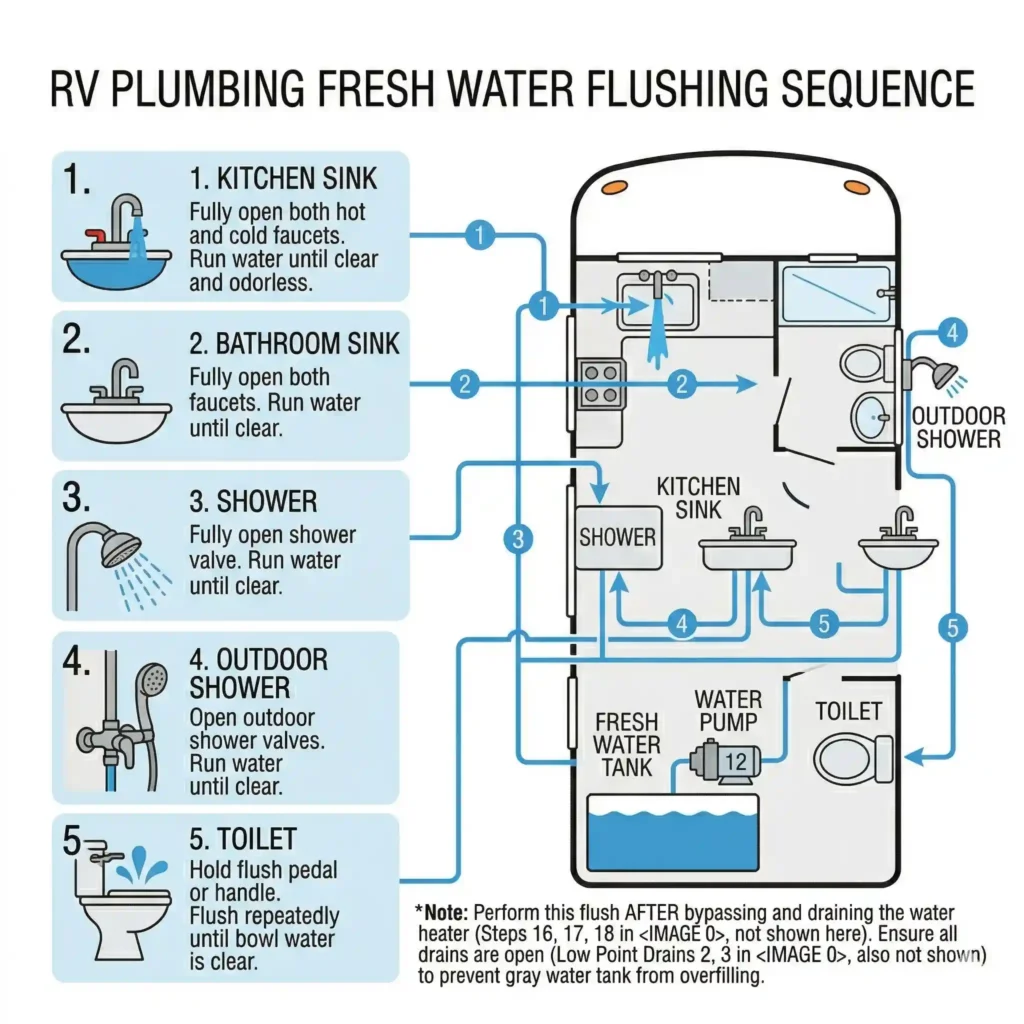
Open every hot and cold faucet one at a time and run each for 2 to 3 minutes, or until the water runs completely clear. Work in this order:
- Kitchen sink (cold, then hot)
- Bathroom sink (cold, then hot)
- Shower or tub (cold, then hot)
- Outdoor shower (cold, then hot)
- Toilet — flush 4 to 5 times until clear
Most RVers use 2 to 3 gallons of antifreeze during winterization, so this goes quickly. Flushed antifreeze collects in the gray and black tanks — empty them at any certified dump station.
If you added antifreeze directly to the fresh water tank: Drain it completely before filling with potable water.
Environmental note: Do not pour drained antifreeze onto grass, soil, or a storm drain. Dispose at a certified waste site or check local municipality guidelines.
Step 5 — Water Filter: Timing and Replacement
Do not reinstall the old filter. Antifreeze residue lingers in filter media and affects water taste for the entire season.
Two approaches work here. Installing before sanitization means bleach runs through a clean filter from the start, but bleach can slightly shorten filter life. Installing after the sanitization flush avoids that. Either is fine — just never reuse last season’s cartridge, and never leave the filter housing empty under pressure. Follow your filter manufacturer’s guidance if they address bleach exposure.
Step 6 — Sanitize the Fresh Water System
This step applies whether you used antifreeze or compressed air. Six months idle means bacteria can develop in the lines. Sanitization is what makes the water safe to drink.
Bleach ratio: ¼ cup of regular household bleach per 15 gallons of tank capacity.
| Tank Size | Calculation | Bleach Needed |
|---|---|---|
| 30 gallons | 30 ÷ 15 = 2 | ½ cup |
| 40 gallons | 40 ÷ 15 = 2.6 | ⅔ cup |
| 60 gallons | 60 ÷ 15 = 4 | 1 cup |
Mix bleach with water in a one-gallon container first, pour it into the fresh tank, then fill the tank completely with potable water. Turn on the pump and open all faucets. Run each until you smell bleach, then close it. Let the solution sit for at least 12 hours.
After soaking, drain the system and refill with fresh water. Open all faucets and run until no bleach smell remains.
Step 7 — Test the Water Pump
Add water to the fresh tank, switch on the 12V pump, and open each faucet. You should hear steady pressure with no sputtering. If the pump runs continuously without holding pressure, there is a leak somewhere. Track it down before moving on.
City water can mask leaks. The pump reveals the real story.
Step 8 — Leak Check Under Pressure
Check every connection you can access: under sinks, behind panels, at the water heater fittings, along exposed lines.
For a thorough test, use 20 to 30 PSI — lower than the normal 40 to 50 PSI operating pressure. Lower pressure makes small drops easier to detect. Pressurize the system, shut off the water source, and watch whether the pump kicks on within a few minutes without anyone using water. If it does, a leak is present somewhere.
Now turn on the water heater. The tank has filled during flushing and sanitization, so it is safe to fire up on electric or propane. Run hot water at each faucet to confirm it is working.
Step 9 — Test All Appliances and Safety Devices
Test every water-connected appliance: refrigerator, stove, water heater, ice maker, washer if applicable. Confirm each is working before you leave the driveway.
Then check safety devices:
- Reinstall any batteries removed from detectors during storage
- Test smoke alarm, carbon monoxide detector, and LP gas leak detector
- Inspect fire extinguishers for full charge and current service date
Batteries lose up to 10 percent of charge per month in storage. Fully charge them before you rely on them.
De-Winterizing Checklist: RV Water System Startup
Save this to your phone or print it for every spring startup.
Before Starting
- Overnight temps consistently above freezing
- Owner’s manual reviewed for model-specific steps
- All supplies gathered
Inspection and Prep
- Full walk-around inspection complete
- Low-point drains closed
- Drain plugs reinstalled
- Anode rod inspected (replaced if worn)
- Water heater removed from bypass mode
- Pressure regulator attached to city water connection
Flushing
- All faucets run 2 to 3 minutes until clear (cold and hot)
- Outdoor shower flushed (cold and hot)
- Toilet flushed 4 to 5 times until clear
- Fresh water tank drained if antifreeze was added to it
- New water filter cartridge installed
Sanitization
- Correct bleach ratio calculated for tank size
- Bleach solution run to all fixtures
- System soaked minimum 12 hours
- Flushed until no bleach smell at any fixture
System Testing
- Water pump tested and holding pressure
- Leak check completed at 20 to 30 PSI
- Water heater turned on and tested
- All appliances tested
Safety
- Smoke alarm tested
- CO detector tested
- LP gas detector tested
- Fire extinguisher inspected
- Batteries charged and reconnected
DIY vs. Professional De-Winterization
| Factor | DIY | Professional |
|---|---|---|
| Cost | $20 to $50 (supplies only) | $85 to $150+ |
| Time | 1 to 3 hours + 12-hour soak | Drop-off, often 1 to 2 days |
| Skill needed | Beginner-friendly | None from you |
| Risk of error | Low with this guide | Minimal, not zero |
| Best for | Anyone comfortable with basic maintenance | First-timers or complex rigs |
| Long-term value | You learn your system thoroughly | Convenient but creates dependency |
DIY supplies typically run $20 to $100 and most are reusable year after year. Professional service averages $85 to $150. The real argument for doing it yourself at least once is knowing your rig well enough to catch problems before they become expensive repairs.
5 Mistakes That Can Wreck Your RV Plumbing
1. Firing Up the Water Heater Before the Tank is Full
Running a water heater dry destroys the heating element in seconds. Always confirm hot water is actively flowing from a tap before you switch it on. No flow means the tank is not full yet.
2. Skipping Sanitization
Antifreeze is non-toxic, but residue affects taste and bacteria can develop during months of storage. Even the compressed-air method requires a bleach soak — it is the step that makes the water safe to drink.
3. Forgetting the Outdoor Shower and Toilet
Antifreeze hides in the outdoor shower valve and toilet long after interior lines run clear. Run the outdoor shower cold and hot until clear, and flush the toilet 4 to 5 times. Skip these and the next person to use them finds out the hard way.
4. Reinstalling the Old Water Filter
Old filters trap antifreeze residue and affect water taste all season. A new cartridge costs a few dollars. Swap it during Step 5 and move on.
5. De-Winterizing Too Early
One late frost means starting over. Check the 14-day overnight forecast before you begin. If there is any chance of freezing temps, wait.
Pro Tips for a Cleaner Startup
- Use city water for initial flushing, not the pump. It moves more volume faster and clears antifreeze from lines more efficiently.
- Check the P-traps. These U-shaped sections under every sink and shower are where antifreeze pools after the rest of the lines are clear.
- Treat the black tank on day one. A clean, treated tank from the start prevents buildup and sensor issues all season. See our guide: RV Black Tank Cleaning and Maintenance.
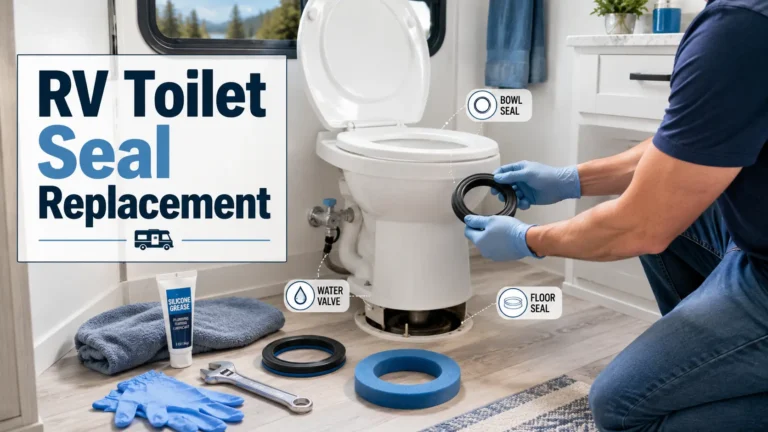
- Inspect the toilet seal. A dry winter can crack the rubber gasket. If it looks brittle or cracked, replace it now. See our guide: RV Toilet Seal Replacement.
- Keep a maintenance log. Note the date, bleach ratio used, fittings tightened, and anode rod condition. Makes next year faster and gives a baseline if something goes wrong.
Frequently Asked Questions
How much antifreeze does it take to winterize an RV?
Most RVs require 2 to 3 gallons of non-toxic RV antifreeze. Rigs under 18 feet use about 2 gallons, 18 to 30 feet use 3 gallons, and over 30 feet may need 4 or more. Knowing how much was used helps you judge how long to flush each line before it runs clear.
What if my water still tastes like antifreeze after flushing?
Flush the system again, running each fixture 2 to 3 minutes. If the taste persists, check whether the old water filter is still installed — antifreeze absorbs into filter media and keeps leaching flavor. Replace the cartridge and run one more flush cycle.
Do I need to sanitize if I used the compressed-air method?
Yes. Compressed air clears standing water but does not remove bacteria that develop during months of storage. A bleach soak is standard practice regardless of which winterization method you used.
Compressed air vs. antifreeze — does it change how I de-winterize?
The antifreeze method pumps pink fluid through every line until it appears at every fixture. Compressed air blows out all standing water instead. After the antifreeze method, flush until water runs clear. After the air method, there is nothing to flush — but you still need to sanitize, install a new filter, and take the water heater out of bypass before use.
What happens if I turn on the water heater before it is full?
Running a dry water heater destroys the heating element in seconds — that means a costly repair right at the start of camping season. Always confirm hot water is flowing from a tap before switching on the heater. Flow means the tank is full. No flow, no power.
You Are Ready When:
- Water from every fixture runs clear with no antifreeze taste or smell
- The water pump builds and holds pressure without cycling on by itself
- The water heater is producing hot water
- No visible drips or moisture at any plumbing connection
- All safety devices are tested and functioning
When all five are true, the season is open.