TL;DR: Water at the base of a Thetford RV toilet does not always mean the floor seal is the problem. The leak can start at the blade seal, water valve, vacuum breaker, or even a loose mounting bolt. Water runs down to the lowest point, so the base is where it shows up, not always where it starts. This guide covers how to diagnose the real source first, which Thetford part numbers apply to each model, and how to replace the floor seal step by step when that is the actual cause.
Quick Repair Snapshot
| Diagnosis time | 5 to 10 minutes |
| Floor seal replacement time | 30 to 60 minutes |
| Difficulty | Beginner to moderate |
| Main risk | Buying the wrong part before diagnosing |
| Parts that may be needed | Floor seal, waste ball seal, water module, vacuum breaker |
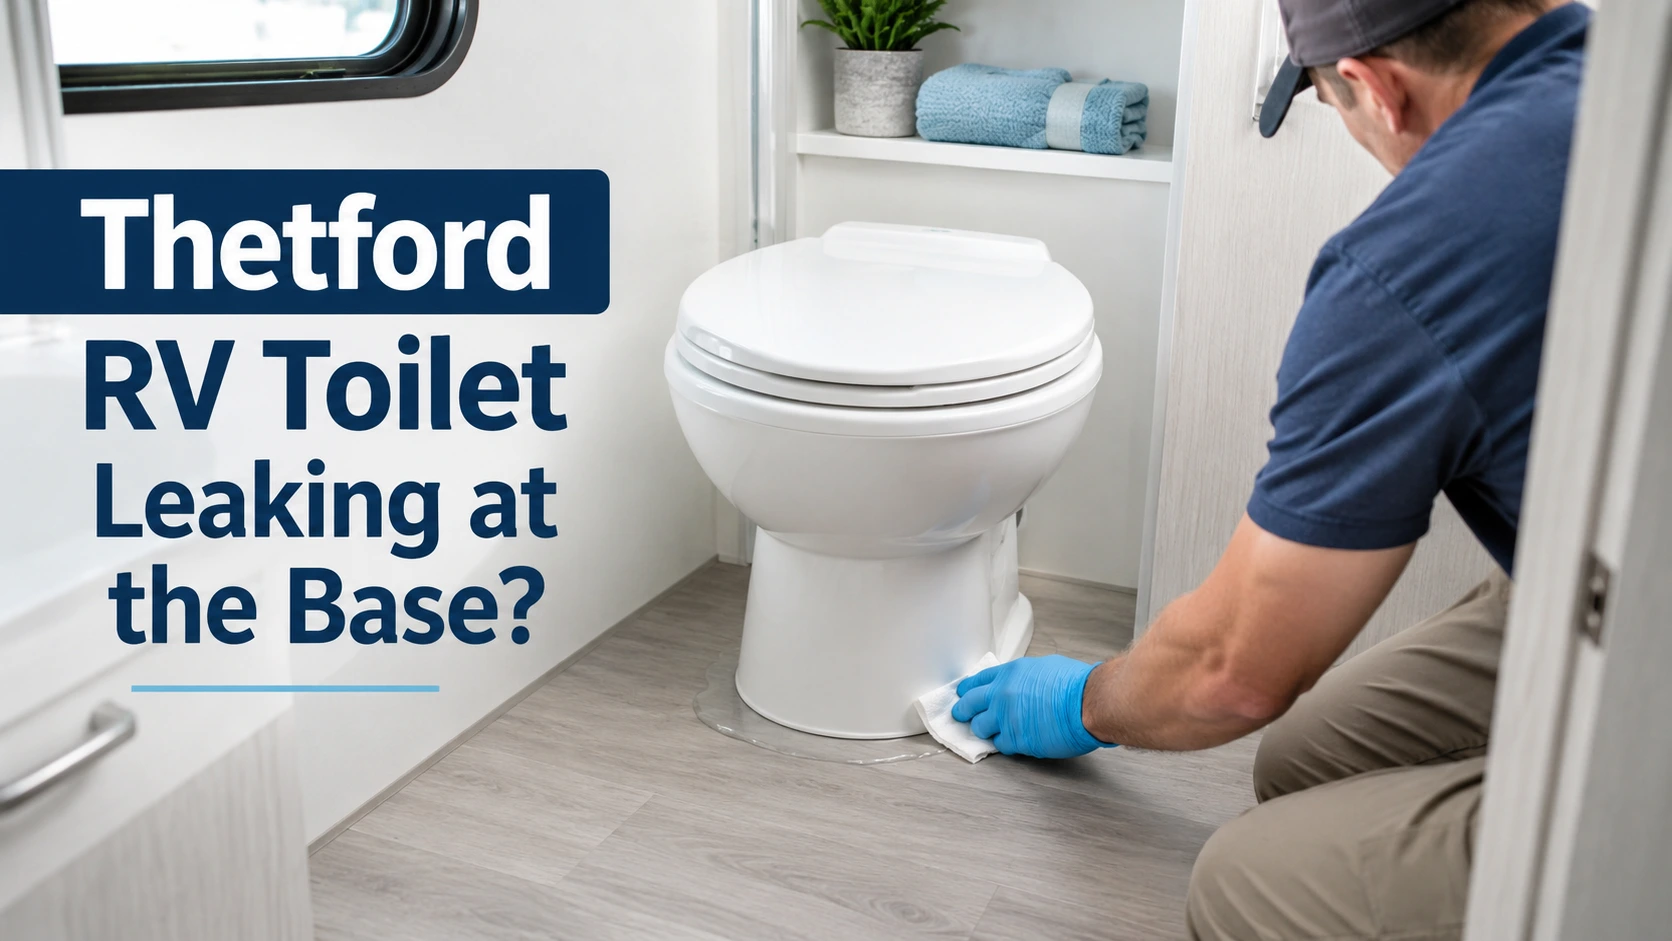
You press the flush pedal and notice water around the base of your Thetford RV toilet. The first instinct is to order a floor seal. But if you replace the floor seal without diagnosing first, you can fix the wrong thing and see the same puddle on your next trip.
A Thetford RV toilet leaking at the base has four distinct causes. Water always runs downward, so the spot where it appears is not always where the leak starts. Five minutes of diagnosis saves you from buying the wrong part twice. If your toilet is a Dometic rather than a Thetford, the Dometic base leak repair guide covers the different anatomy and part numbers for that brand.
Why Is My Thetford RV Toilet Leaking at the Base?
A Thetford RV toilet leaks at the base for one of four reasons: a failed floor seal between the toilet and the floor flange, a worn blade or waste ball seal that lets bowl water drain internally through the toilet body, a cracked water valve or vacuum breaker sending fresh water down the back of the toilet, or loose mounting bolts breaking the compression at the floor. The base is only where the water collects, not necessarily where the problem starts.
All four causes look the same at first glance. A failing blade seal drains water from inside the bowl down through the toilet body to the floor. A cracked water valve sends fresh water down the back of the toilet. Both end up as a puddle at the base joint. Most RV toilet base leaks come from one of three primary failure points: the flange seal, the bowl seal, or the water valve. Knowing which one is failing before you touch a wrench is the difference between a 20-minute repair and doing the same job twice.
One thing to know about Thetford toilets before you start: there is no above-bowl seal access. On some Dometic models, you can replace the flush ball seal through the bowl opening without lifting the toilet. On Thetford models, the blade seal repair almost always requires removing the toilet from the floor. That matters when you are planning your repair.
Quick Diagnosis Test Before You Remove the Toilet
Run the paper towel test before you remove anything or order any parts. Dry the toilet and place dry paper towels in four zones: the floor joint, the pedal area, behind the toilet near the water line, and at the top-back of the toilet. Flush once and watch where the paper towel gets wet first. That result tells you which component is failing.
Finding the source of the leak before reaching for tools is the most important step. A leak from higher up runs down the toilet body and looks exactly like a floor seal failure. The paper towel test separates them in under five minutes.
Here is how to run it:
- Turn off any nearby water source and dry the entire toilet and surrounding floor.
- Place fresh dry paper towels in four zones: around the floor joint, around the pedal area, behind the toilet, and at the top-back near the vacuum breaker.
- Flush once and watch which zone gets wet first.
- Let the toilet sit idle for 10 to 15 minutes, then check again.
? What you notice and what it usually means:
| What you notice | Most likely cause |
|---|---|
| Clear water behind the toilet | Water valve or vacuum breaker |
| Water only during flushing | Floor seal, blade seal, or vacuum breaker |
| Bowl loses water between flushes | Blade/waste ball seal |
| Sewer smell near the base | Floor seal or blade seal failure |
| Soft or discolored floor around the toilet | Long-term leak damage, inspect the subfloor |
✓ Paper towel zone results:
| When it leaks | Where the paper towel gets wet first | Most likely cause |
|---|---|---|
| Only when flushing | At the floor joint | Floor/flange seal |
| Only when flushing | Near the pedal, then runs down | Blade seal or internal water path |
| All the time, even idle | Behind the toilet, clean fresh water | Water valve or water module |
| Only when flushing | Top-back area of toilet | Vacuum breaker |
| After driving or movement | At the floor joint | Loose mounting bolts |
| Bowl loses water between flushes | Bowl goes dry, no floor puddle yet | Blade/waste ball seal |
Before running the test, check the two mounting bolts at the base of the toilet. Use an adjustable wrench and snug them up. Do not overtighten. If snugging the bolts stops the leak, you are done with no parts needed.
Identify Your Thetford Toilet Model First
Do not order parts based on what your toilet looks like. Thetford makes several models that look almost identical but use different seals, valves, and repair kits. The wrong part will not seat correctly, and the leak comes back after the first flush.
Find the model label on the back of the toilet or near the base. The main Thetford models in RVs are: Aqua-Magic V, Aqua-Magic VI, Aqua-Magic Style II, Aqua-Magic Style Plus, Aqua-Magic Style Lite, Aqua-Magic Residence, and Bravura.
Each model uses different parts. The Aqua-Magic V uses a Water Module (#31705) and different blade valve components than the Style II. The Bravura uses a Mechanism Repair Kit because the seal is built into the mechanism assembly, not sold separately. The Style II and Style Plus share some parts, but not all.
Thetford parts diagrams for current models list which kit applies to each toilet. Confirm your model number before placing any order.
Does the Floor Seal Actually Need Replacing?
Replace the floor seal if the paper towel at the floor joint gets wet first during flushing, the bowl is holding water normally between flushes, the toilet feels completely stable with no rocking, and the paper towel behind the toilet stays dry. If the bowl is also losing water, the blade seal is failing too and needs to be addressed at the same time.
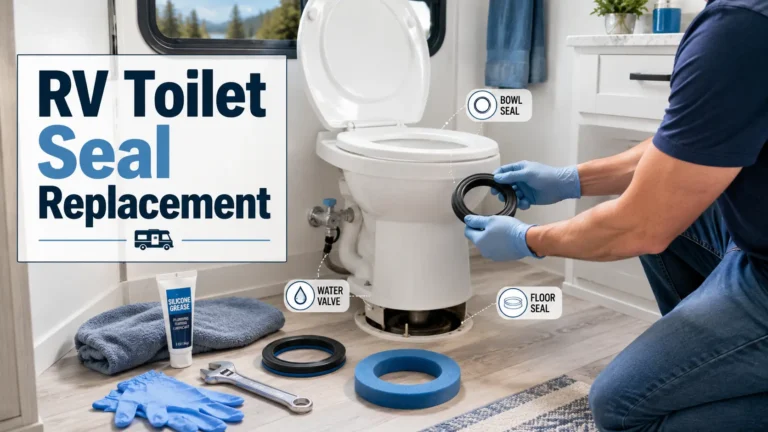
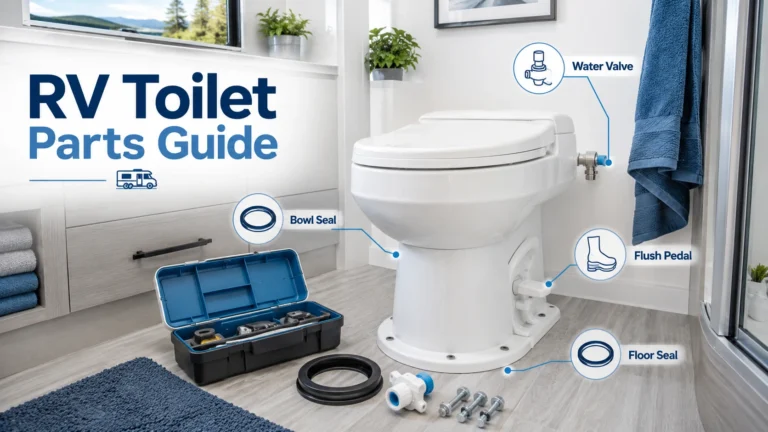
The floor seal is a foam or rubber gasket that sits between the bottom of the toilet and the floor flange. RV toilets do not use wax rings like residential toilets do. They use a compression-style seal that gets squeezed between the plastic toilet base and the plastic floor flange. Road vibration and constant weight compress this seal over time until it cannot hold a watertight connection. That is why base leaks are more common in rigs that are driven frequently or over rough terrain.
Part numbers depend on the model. The Thetford #34120 Waste Ball Seal Kit for the Style II, Style Plus, Style Lite, and Residence includes both a waste ball seal and a floor seal in the same package. Thetford #12524 is commonly listed as a floor seal with closet bolts and flange seal kit. Confirm fitment against your exact Thetford model before ordering. For the Aqua-Magic V, check the Thetford parts diagram for your exact model before ordering, since the floor connection hardware differs from the Style series.
Once the toilet is off the floor, check the blade seal while you have access. The full RV toilet repair guide covers what to inspect and when to replace each component.
Is the Blade Seal or Waste Ball Seal the Real Problem?
If the bowl does not hold water between flushes, the blade seal or waste ball seal is the problem, not the floor seal. Bowl water drains through the toilet body and collects at the base, so the leak appears at the floor even though the floor seal is still intact. Replacing the floor seal in this situation will not fix anything.
The blade seal sits at the bottom of the bowl opening. It does two things: holds water in the bowl to create a gas barrier between you and the black tank, and closes off the tank opening between flushes. When the seal dries out, cracks, or gets a small piece of debris caught on it, bowl water drains slowly into the black tank. Debris on the blade valve is a known cause of slow leaks, and working the flush pedal open and closed several times can sometimes dislodge it. A failing blade seal also creates a direct odor pathway from the black tank into the bathroom. The guide on RV toilet smell after dumping covers why that connection matters and how to address it.
Part numbers by model:
- Style II, Style Plus, Style Lite, Residence: Thetford #34120 (waste ball seal kit, includes floor gasket)
- Aqua-Magic Residence variants: #42141 (waste ball seal)
- Bravura: Mechanism Repair Kit (seal is part of the mechanism assembly)
- Aqua-Magic V: Confirm against the model-specific parts diagram before ordering
Most Thetford blade seal replacements require removing the toilet. There is no shortcut from above. Budget 45 minutes the first time. The second time takes about 20 minutes.
Thetford recommends replacing the blade seal every 4 to 6 years under normal use, and every 3 years in hard water areas. Applying silicone grease after installation extends seal life significantly. Do not use petroleum-based lubricants, which degrade rubber.
When the Water Valve or Vacuum Breaker Is the Problem
If the paper towel gets wet behind the toilet or at the top-back during the diagnosis test, the source is higher than the floor. A failing water valve or vacuum breaker is leaking fresh water down the outside of the toilet body, and that water pools at the base joint.
Water valve or water module: On the Aqua-Magic V, the water module is part #31705. On the Style Plus, the water valve with drive arm is part #34100. When the internal diaphragm or plastic housing fails, fresh water escapes even when you are not flushing. The toilet may also seem to fill on its own or drip continuously.
Freeze damage is the most common cause of water valve failure in Thetford toilets. Blowing out the water lines with compressed air does not always remove every drop inside the valve housing. A small amount of water left inside during freezing temperatures cracks the plastic from the inside out. Running RV potable antifreeze through the toilet until it appears in the bowl is the only reliable protection.
In some cases, the water valve can be replaced without pulling the toilet if you have enough clearance to reach the valve screws from behind. If not, the toilet needs to come up first. The step-by-step RV toilet water valve replacement guide covers the full process. To prevent freeze damage going forward, the RV toilet winterizing guide with antifreeze explains the correct antifreeze method that protects the valve housing.
Vacuum breaker: The vacuum breaker is the anti-siphon valve at the top-rear of the toilet. On the Style Plus, it is part #34122. When the plastic housing cracks or the internal float seal fails, fresh water drips from the upper rear during flushing and runs down to the base. The key difference from a water valve leak: the vacuum breaker only leaks during flushing. A cracked water valve can leak even when the toilet is idle.
What Not to Do When a Thetford Toilet Leaks at the Base
These mistakes are common and most of them make the problem worse or hide it until the floor is damaged.
Do not assume the floor seal is bad before testing. Water at the base can come from four different sources. Ordering a floor seal before running the paper towel test is the most common reason people fix the wrong part and still have a leak.
Do not overtighten the mounting bolts. Snug and firm is enough. Too much force cracks the plastic base on older Thetford toilets. A cracked base cannot be repaired with adhesive and means a full toilet replacement.
Do not use a residential wax ring. RV toilets use foam or rubber compression seals, not wax rings. A wax ring will not compress correctly, will not hold, and can block the tank connection.
Do not use petroleum-based grease on rubber seals. Petroleum products degrade rubber over time. Use silicone grease only. This applies to both the blade seal and the floor seal. Thetford includes a lubricant packet in most official seal kits. Use that.
Do not caulk around the toilet base to stop the leak. Caulk around the base traps water under the toilet and hides ongoing damage to the subfloor. It does not fix the seal and it makes the next repair harder. If a repair technician or inspector sees caulk around the base, it raises an immediate red flag.
Do not ignore soft or spongy flooring around the toilet. Soft flooring means water has been leaking long enough to damage the subfloor. Address the subfloor before reinstalling the toilet. Reinstalling over damaged flooring means the flange sits unevenly, and the new seal will not hold correctly.
How to Replace the Floor Seal on a Thetford RV Toilet
If the diagnosis points to the floor seal, here is how to replace it. This process applies to most Thetford Aqua-Magic models. Confirm your part number against your model before starting.
Tools and parts needed: Adjustable wrench, screwdriver, rubber gloves, old towels, a bucket, mild cleaner, a plastic bag for the old seal, and the correct replacement floor seal for your specific Thetford model.
Step 1: Shut off the water supply. Turn off the RV water pump or disconnect from city water. Use the inline shutoff valve at the toilet supply line if one is installed.
Step 2: Flush once to release pressure. Press the pedal to empty the bowl and release any remaining pressure from the supply line.
Step 3: Disconnect the water supply line. Place a towel under the connection before loosening it to catch residual water.
Step 4: Remove the plastic bolt caps and mounting bolts. Pop off the two plastic caps at the front of the toilet base. Use the wrench to remove the two mounting bolts underneath.
Step 5: Lift the toilet straight up. Do not twist aggressively. Lift straight up and set the toilet on a clean surface nearby. While the toilet is up, inspect the blade seal and check for cracks in the plastic base. This is the best time to address both if needed.
Step 6: Remove the old floor seal. Peel or scrape away the old compressed foam or rubber seal from the flange. Clean the flange surface thoroughly with a mild cleaner.
Step 7: Inspect the flange and floor. Check for cracked plastic, damaged bolt holes, or an uneven floor surface. If the flange itself is broken or stripped, fix that before installing a new seal. Check for soft flooring while the toilet is up.
Step 8: Seat the new floor seal. Place the new seal on the flange in the correct orientation per the kit instructions.
Step 9: Lower the toilet straight down. Center the toilet base over the flange and lower it carefully.
Step 10: Tighten the mounting bolts evenly. Snug both bolts down in even passes. Do not overtighten. Too much force on a plastic base will crack it. Firm and secure is enough.
Step 11: Reconnect the water line and test. Turn the water back on and flush five times. Dry the area and check each zone for leaks.
Testing for Leaks After the Repair
Once the toilet is back in place, do a final check before packing up.
Dry the base area, behind the toilet, the pedal area, and the floor completely. Flush five times. After the last flush, leave everything alone for 15 to 30 minutes. Then check whether the floor is dry, whether the bowl is still holding water, and whether any of the paper towel zones are wet.
If the toilet still leaks at the base after replacing the floor seal, stop and return to the diagnosis table. The source is almost certainly higher up the toilet. A leak from above runs down and pools at the base joint, which is why the floor seal looks like the obvious culprit but often is not. Re-dry, re-test, and identify the correct zone before buying another part.
When Should You Replace the Toilet Instead of Repairing It?
Replace the Thetford toilet rather than repairing it when the plastic base is cracked or warped, the blade seal fails again within the same season after a fresh replacement, or the water valve cracks from freeze damage repeatedly because winterization habits have not changed. At that point, ongoing repair costs more in time and parts than a new toilet does.
A new Thetford Aqua-Magic V runs under $200 at most RV supply stores and bolts onto the existing floor flange in most rigs without floor modification. If you are open to switching brands, other models are also a direct bolt-on for the majority of RV bathroom footprints. The RV toilet replacement guide covers the full removal and installation process, and the best RV toilet replacement options breaks down which models are worth considering by budget and bathroom size.
How to Prevent Future Base Leaks
Apply silicone grease to the blade seal at least once per camping season. A dry seal fails faster and lets black tank odor into the cabin before any visible leak appears. Do not let the bowl sit completely dry during storage.
Do not overtighten the mounting bolts after any repair or reinstallation. Check them once each season and snug them up if road vibration has worked them loose.
Winterize the toilet properly before any below-freezing exposure. Running RV potable antifreeze through the toilet and leaving it inside the water valve housing is the only reliable way to protect the plastic from freeze cracks. Air purging alone leaves enough residual water to cause damage.
Check the area behind the toilet after the first trip of each camping season. A slow drip caught early is a quick fix. Ignoring it until the floor is soaked turns a 20-minute repair into a full afternoon job.
Use enough water when flushing. Short flushes leave solid waste near the toilet drop tube, which increases the risk of buildup and puts extra stress on the base seal over time.
Conclusion
Most Thetford RV toilet base leaks are fixable in under an hour. But only if you fix the right part. The floor seal is one possible cause, not the default one. The blade seal, the water valve, the vacuum breaker, and even a loose bolt can all produce the exact same puddle at the base.
Run the paper towel test before touching anything. Identify your model before ordering parts. If the bowl is not holding water between flushes, the blade seal is the problem, not the floor seal. Fix the correct component and the leak stays gone.
For related repairs, the RV Flush Guide repair section covers water valve replacement, odor troubleshooting, and full toilet replacement guides in the same step-by-step format.
Frequently Asked Questions
How do I know if my Thetford toilet floor seal or blade seal is leaking?
Run the paper towel test before touching any bolts. Dry the entire toilet, place fresh paper towels at the floor joint, the pedal area, and behind the toilet, then flush once and watch which zone gets wet first. If the floor joint paper towel gets wet and the bowl still holds water normally, the floor seal is the problem. If the bowl loses water between flushes, or if the pedal area gets wet before the floor joint does, the blade seal is the real cause.
What part number is the floor seal for a Thetford Aqua-Magic Style II?
The Thetford #34120 Waste Ball Seal Kit covers the Style II, Style Plus, Style Lite, and Residence models and includes both the waste ball seal and the floor gasket in one package. Thetford #12524 is commonly listed as a floor seal with closet bolts and flange seal kit sold separately. Confirm fitment against your exact model before ordering. For the Aqua-Magic V or Bravura, check the Thetford parts diagram for your specific model, as the hardware differs.
Can I replace the Thetford waste ball seal without removing the toilet?
Usually no. Unlike some Dometic models that allow above-bowl seal access, most Thetford toilets require lifting the toilet off the floor to reach the blade or waste ball seal. The process involves disconnecting the water line and removing two mounting bolts. It takes about 45 minutes the first time and closer to 20 minutes once you have done it before.
Why does water show up at the base if the leak is starting higher up?
Water follows gravity. A failing blade seal drains bowl water down through the inside of the toilet body to the lowest point, which is the base. A cracked water valve sends fresh water down the outside of the toilet body to the floor. Both end up looking like a floor seal problem from the outside. That is why diagnosing first, before ordering parts, is the most important step.
Can a leaking water valve cause water to appear at the toilet base?
Yes. A cracked water valve or water module leaks fresh water that runs down the back of the toilet and collects at the base joint. If the paper towel behind the toilet gets wet before the floor joint paper towel does, the valve is the likely cause. Also check whether the leak happens only during flushing or when the toilet is completely idle. An idle leak points to the valve or water module. A flush-only leak at the top-back area is more likely the vacuum breaker.