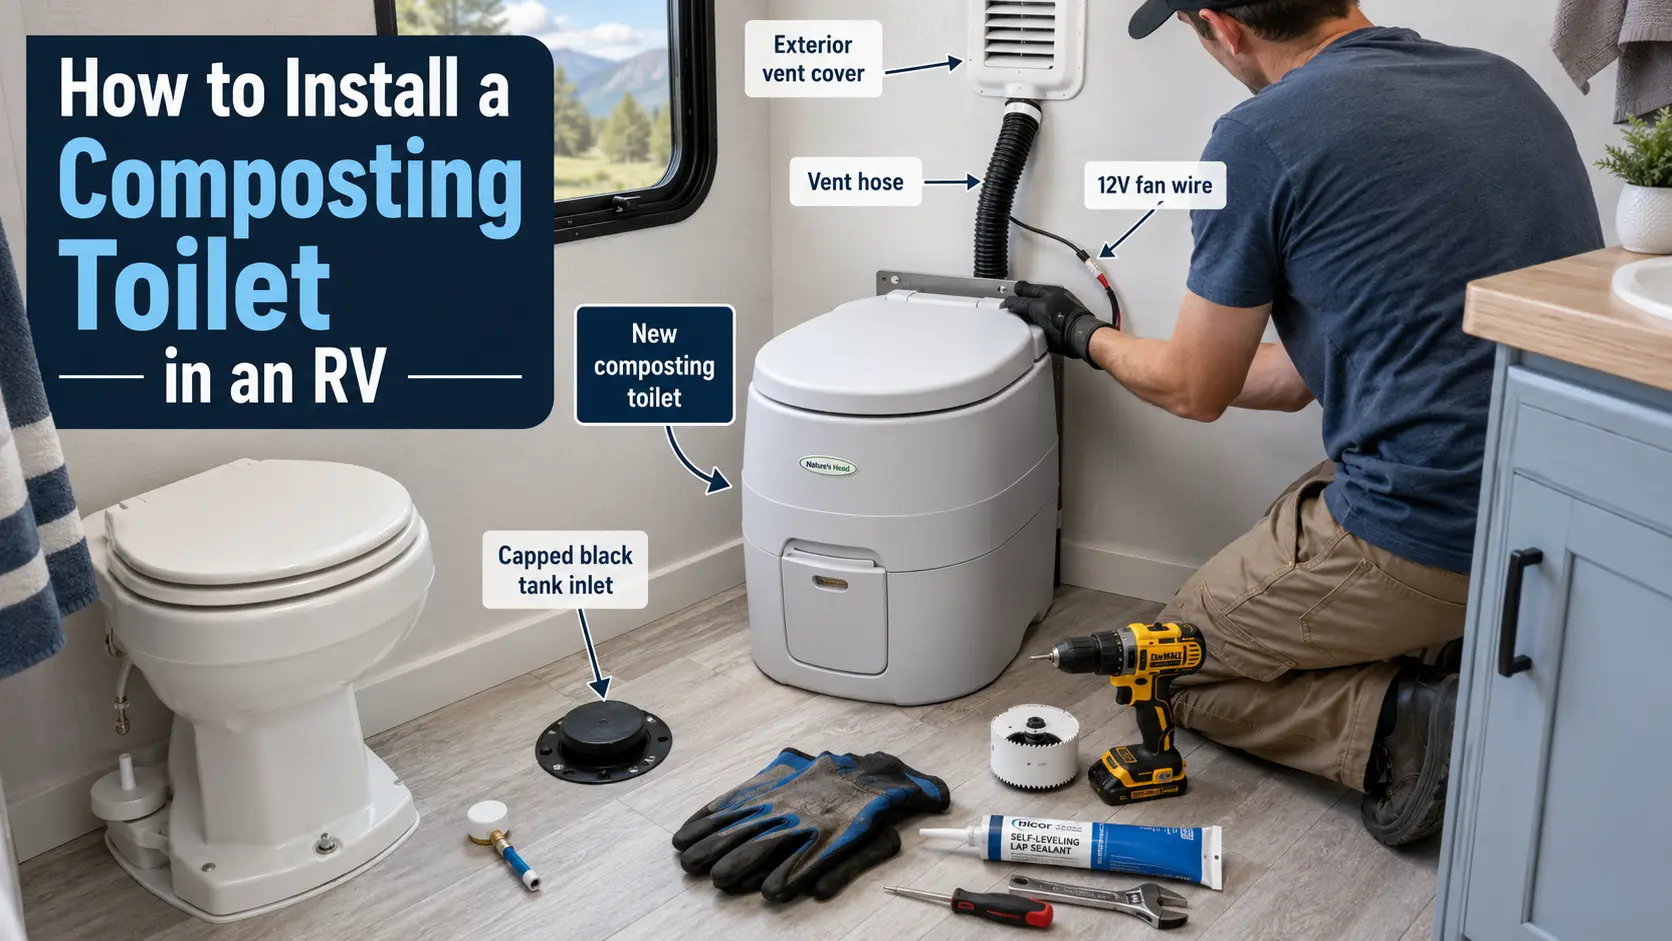
Installing a composting toilet in your RV takes 2–4 hours and doesn’t require advanced electrical experience. You’ll remove the old toilet, cap the black tank inlet and water line, bolt down the new unit, run a vent hose to an exterior wall or roof, wire the 12V fan, and load coconut coir. The vent and the fan are what make or break the system. Get them right and you should not get sewage odor inside the RV.
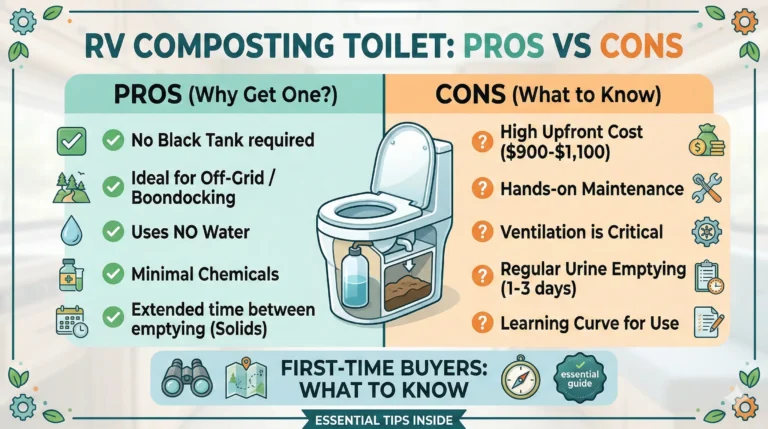
A standard RV toilet still uses fresh water with every flush and sends that water into the black tank. A composting toilet removes flush water from the equation, which can help boondockers stretch both freshwater and tank capacity significantly.
Switching also eliminates black tank maintenance, failed tank sensors, and the chemicals that go with them. This is a genuine DIY job. You don’t need a plumber.
This guide covers every step of how to install a composting toilet in an RV: checking your layout, removing the old toilet, handling the black tank, mounting the new unit, venting it correctly, wiring the fan, and your first use. In that order.
Not sure which model to buy yet? Start with the best composting toilet for your RV first, then come back here.
Is Installing a Composting Toilet in an RV Actually a DIY Job?
Yes. Most RV owners can install a composting toilet in 2–4 hours using basic tools. You don’t need advanced electrical experience, but you should be comfortable with basic 12V wiring. If not, have someone experienced handle the fan connection.
The job has four parts: removing the old toilet, mounting the new one, running a short vent hose, and connecting 12V power. No soldering. No major plumbing. No cutting into water lines beyond capping a single cold water feed.
The level of difficulty depends on your RV’s layout. A straightforward wall vent with easy 12V access is a one-afternoon job. A tighter layout with a long vent run or hard-to-reach wiring can take closer to 4 hours. Always check your model’s installation manual before you start. Instructions vary between units.
Before You Buy or Drill, Check These 7 Things
Before you remove the old toilet or drill a vent hole, confirm the layout will actually work.
Buying a composting toilet without measuring your bathroom first is one of the most expensive mistakes you can make. Composting toilets are often taller than standard RV units and need more clearance than the footprint dimensions alone suggest.
Check these before purchasing:
1. Bathroom width and depth Measure the usable floor space. The toilet needs to fit with the door closed and with enough knee room in front.
2. Seat height and lid opening clearance Composting toilets sit taller than standard RV units. Measure from the floor to the ceiling and to the underside of any overhead cabinet. You need full lid clearance.
3. Space to remove the urine bottle The urine bottle pulls out from the front. Most models need 6–12 inches of forward clearance. Walls, cabinet doors, and shower barriers can all block this. Check before buying.
4. Space to open or remove the solids bin Some models require side clearance to remove the composting bin. Others need the lid to open fully. Measure for both.
5. Vent path to a side wall or roof You need a clear path from the toilet to an exterior surface. Check for framing, insulation, and other obstacles between the toilet and the nearest wall or roof.
6. Nearby 12V power access The fan runs 24/7 and needs a constant 12V source. Identify your nearest fuse panel circuit or battery connection before you start.
7. Wet bath or dry bath A wet bath, where the shower sprays over the toilet area, needs extra planning. The fan, wiring, and vent connections all need protection from water. More on that below.
Do not buy the toilet based only on the footprint dimensions. Composting toilets often need extra front clearance for the urine bottle and additional side or back clearance for the vent hose.
What You Need Before You Start
Most composting toilets come with mounting brackets, a short vent hose (usually 5 feet), a fan, and basic fasteners. That’s enough for simple installs. For most RV bathrooms, you’ll need extra items the kit doesn’t include.
Tools
- Drill
- 2″–2.5″ hole saw (for the vent penetration)
- Flathead and Phillips screwdrivers
- Adjustable wrench or socket set
- Wire strippers
- Utility knife
- Safety glasses
- Masking tape (to mark drill points cleanly)
- Stud and wire finder
- Multimeter
Additional materials
- 3″ gripper plug or test plug (to cap the black tank inlet)
- 1/2″ PEX cap or SharkBite cap (to seal the water line)
- Extra vent hose if your wall is more than 5 feet from the toilet
- Butyl tape (for mounting seals)
- Inline fuse or add-a-fuse connector
- Exterior vent cover with built-in bug screen
- Two hose clamps
- Wire nuts or terminal connectors
- Self-leveling RV lap sealant for roof and horizontal surface penetrations (Dicor is the standard choice)
- Non-sag RV sealant or marine-grade exterior sealant for side wall penetrations
- Manufacturer’s installation template (most brands include one in the box)
Sealant note: Use self-leveling RV lap sealant on roof and horizontal surfaces. Use non-sag or marine-grade exterior sealant on vertical side walls. Using the wrong type is a common mistake. A tube that says “RV sealant” does not mean it’s right for your surface.
Composting medium: Coconut coir (coco coir) is my preferred option for RV use. Most manufacturers allow peat moss or coconut coir as the composting medium, but coconut coir is cleaner to store in a small space, easier to handle, and produces less exterior odor than peat moss. Buy it before you start. You can’t leave your bathroom without a working toilet for long.
One heads-up from real-world installer experience: the included kit usually comes up short for most RV installations. You’ll likely need more wire, a longer vent hose, and extra sealant. Buy all of it before you pull the old toilet.
What Do You Do With the Black Tank When You Switch?
Cap the black tank inlet with a 3″ gripper plug and leave the tank in place for now. A gripper plug inserts into the opening and tightens from above with a single nut. It creates a complete airtight seal. Don’t remove the tank unless you’re permanently committing to the switch. Leaving it in place keeps the install reversible if you ever sell the RV or change your mind.
The three options and when each makes sense:
| Option | Best For | Notes |
|---|---|---|
| Cap the inlet and leave the tank | Most RVers | Reversible. No extra plumbing. Easiest choice. |
| Repurpose as a grey water tank | Full-timers who boondock heavily | Increases grey capacity. Requires extra plumbing work. |
| Remove the tank entirely | Permanent switch, want the storage space | Clean the tank thoroughly before disposal. |
One thing most guides miss: the black tank vent stack. When you cap the inlet, the vent pipe that runs up to the roof is still open. If it isn’t sealed, it can pull sewer odors back into the RV. Capping the inlet handles most situations, but if you notice smell after install, the vent stack may be the source. The full breakdown is in the RV black tank vent troubleshooting guide.
Also disconnect and cap the toilet’s cold water line before removing the old unit. If you need help identifying which line it is, the RV toilet parts guide covers the water valve and supply line layout for Dometic and Thetford models.
Can You Install a Composting Toilet in an RV Wet Bath?
Yes, but it needs extra planning. A wet bath is a bathroom where the shower and toilet share the same space and the floor gets wet regularly. Standard composting toilet installs aren’t designed for direct water exposure.
Cover these points before installing in a wet bath:
- Protect the fan and wiring. Use sealed or waterproof electrical connections. Keep the fan intake away from direct shower spray.
- Protect the vent connection. The vent hose fitting at the toilet must not collect pooled water. Position the toilet so the fitting sits elevated if possible.
- Keep the urine bottle accessible. In a tight wet bath, the bottle needs to be easy to remove without getting in the way of showering.
- Avoid placing the solids bin or fan intake where water pools. Standing water near the solids bin creates moisture problems in the composting medium.
- Choose a compact model. Smaller wet baths have less room to move around a taller composting toilet. Check clearances for lid opening and bin removal before buying.
- Consider a raised mounting platform. If your bathroom floor gets wet after every shower, a permanently floor-mounted unit may collect water around the base. A raised platform helps keep the unit above water pooling.
If your wet bath is very small, measure everything before purchasing. Some models are better suited to tight wet bath spaces than others.
How to Remove the Old Toilet and Mount the New One
This is the most physical part of the job. It takes about 20–30 minutes.
Step 1: Turn off the water. Switch off the water pump. Open the toilet valve briefly to release line pressure.
Step 2: Disconnect the water line. The cold water line connects directly to the toilet base. Unscrew it and cap it immediately with your PEX cap. Cap it securely and leave it accessible so the install stays reversible. For detailed guidance on the water line layout, the RV toilet parts guide covers Dometic and Thetford models specifically.
Step 3: Remove the floor bolts. Most RV toilets have two bolts at the base. Unscrew them and lift the toilet straight up. Remove any floor seal underneath. For guidance on removing a floor-mounted RV toilet, including how to handle stuck seals and floor flanges, that page covers the full process.
Store the old toilet if you might sell the RV later. Buyers generally want to see the original unit.
Step 4: Install the gripper plug. Drop the 3″ gripper plug into the black tank inlet. Tighten the nut from above until it’s snug. Pull up on it to confirm it won’t come loose.
Step 5: Clean and inspect the floor. Wipe the area down. Check for soft spots in the subfloor near the old toilet base. A soft spot means moisture damage. Address it before you mount anything new.
Step 6: Position the composting toilet. Set the unit where you want it. Open the lid and seat fully to confirm clearance against the wall, ceiling, and nearby cabinetry. Mark the mounting hole positions with a pencil.
Step 7: Mark, drill, and bolt down. Drill pilot holes at your marks. Secure the toilet with the provided brackets and hardware. Stainless steel fasteners last longer in a mobile environment. After bolting, pull up on the unit firmly. It should not shift or flex.
Before You Drill Into Your RV Wall or Roof
This step matters. Drilling into the wrong spot can cause damage that is expensive to fix.
- Check both sides of the wall or roof before drilling. Open cabinets, look in the adjacent compartment, and inspect from outside.
- Look for wiring, plumbing, framing, and cabinetry on both sides.
- Use a stud and wire finder if you have one.
- Drill a small pilot hole first to confirm the path is clear before using the hole saw.
- Do not drill into a wall cavity blindly.
- Confirm the vent cap will sit flat against the exterior surface.
- Match your sealant to the surface: self-leveling lap sealant for the roof, non-sag exterior sealant for side walls.
Take 10 minutes to check. It prevents a much longer repair.
How Do You Vent a Composting Toilet in an RV?
Run the vent hose from the toilet to an exterior wall or roof. Use a 2″–2.5″ hole saw to cut the penetration, feed the hose through, and seal the exterior with the correct RV sealant for your surface type. Add an exterior vent cap with a bug screen. Keep the hose run as short and straight as possible. Every 90-degree bend reduces airflow, and airflow is what controls odor.
This is the most critical step in the install. A poorly routed vent is the reason most composting toilet owners end up with smell problems. Always follow your toilet manufacturer’s installation manual for vent size and routing requirements.
Vent routing options:
| Route | Pros | Cons |
|---|---|---|
| Through side wall | Shortest run, easiest for most layouts | Possible odor re-ingestion in certain wind conditions |
| Through roof | Best airflow, siphon effect while driving | Longer run, must seal correctly, more work |
| Through floor | Can work in some van builds | Not recommended as a default for moving RVs (see below) |
For most RVs, a side wall or roof vent is the safest beginner option. Floor venting can work in some van builds, but it is not the best default for a moving RV. Road spray, dust, wind pressure from driving, and underbody odor movement can all create problems with a floor exit. If installing a Nature’s Head or similar unit in a moving RV, avoid floor venting unless the manufacturer confirms it is suitable for your specific setup.
For roof installs, use a siphon-style roof vent cap. The siphon design actively pulls air out while driving rather than simply blocking rain.
Use self-leveling lap sealant on roof surfaces and non-sag marine-grade sealant on side walls, applied around the full perimeter of the vent cap. Never use the wrong sealant just because the label says “RV sealant.”
Always add a bug screen to the exterior cap. Insects can enter an uncapped vent and reach the solids bin. Add a drip loop in the hose run where possible to manage condensate. Do not vent into a closed wall cavity or any space without a sealed exit to the exterior.
Attach the hose using hose clamps at both ends: one at the toilet’s vent flange and one at the exterior cap. Tighten both. A loose connection breaks the negative pressure that keeps odors inside the vent path.
Can You Use the Existing Black Tank Vent for a Composting Toilet?
Sometimes, but it is an advanced modification. The safest setup for beginners is a separate, dedicated side wall or roof vent.
The existing black tank vent runs from the tank up through the roof. It might seem like a convenient path for the composting toilet vent. The problem is that tying in incorrectly can create poor airflow, moisture buildup, or odor backflow into the bathroom.
A few things to understand before attempting it:
- Never vent the composting toilet directly into the black tank itself. The black tank is a sealed waste storage vessel. Routing fresh air from the composting unit into it introduces moisture and creates serious odor problems.
- If tying into the vent stack, the connection must be above the tank and must maintain an upward airflow path. Any downward section traps moisture and can reverse airflow.
- Poor airflow resistance defeats the fan. The black tank vent stack has its own bends and resistance. Adding the composting toilet fan to that circuit may not produce enough draw for reliable odor control.
- Manufacturer instructions take priority. If your toilet manufacturer specifies a dedicated vent, use a dedicated vent.
For most RVers, the extra complexity is not worth it. A short dedicated vent through the side wall or roof is simpler, more reliable, and far easier to troubleshoot.
If you want to understand how the existing vent stack behaves after the switch, the RV black tank vent guide covers airflow, capping, and odor sources related to that stack.
How Do You Wire the 12V Fan?
Connect the fan’s 12V cable to a fused circuit in your RV’s electrical system. The power draw is very low. The Nature’s Head fan draws just 0.07 amps, which is less than a small LED light. Running it continuously won’t noticeably affect your battery.
Two wiring methods:
Option 1 (easier): Tap an existing 12V fuse panel circuit. Find a circuit that stays live when you want continuous power. Pull the fuse. Use an add-a-fuse tap connector to splice in the fan wires. Replace the original fuse. The toilet kit includes an inline fuse for the fan wire. Always use fused 12V power. Don’t skip the inline fuse.
Option 2 (cleaner): Hardwire to the battery or distribution block. Run a dedicated wire from the fan to a fused terminal at the battery. More work, but the cleanest long-term setup for full-timers.
If you’re not comfortable identifying circuits or making a safe 12V connection, have someone with electrical experience handle this step. It’s low voltage, but a poor connection can blow a fuse, drain a battery, or stop the fan without you realizing it.
After wiring, replace the fuse and test the fan before sealing anything. Hold your hand near the exterior vent cap. You should feel airflow. If not, check both ends of the hose and the wire connections before moving on.
The fan must run 24/7, including when the RV is parked. It creates continuous negative pressure in the solids chamber, pulling air inward instead of letting it escape into the bathroom. Turning the fan off even briefly can create a smell problem that takes time to recover from. Wire it to a circuit that stays live when parked.
Does a Composting Toilet Smell After Installation?
Not with sewage odor, when the vent and fan are set up correctly. Get the vent and fan right and you should not get sewage odor inside the RV. A slight earthy smell from the composting medium can be normal, especially when you open the solids bin. That’s the medium working as it should. A sewage smell is not normal and points to a fixable problem.
Odor in a composting toilet almost always traces back to one of five issues:
Vent leak: Inspect every hose clamp connection. Check the exterior sealant around the wall or roof penetration. A small gap between the solids chamber and the bathroom is enough to produce noticeable odor.
Fan off: The fan must run at all times. This is non-negotiable.
Too much moisture in the medium: The compost medium should feel damp, not wet. When it gets waterlogged, the process becomes anaerobic and produces the sewer smell most people associate with a failed composting toilet. Adding dry coconut coir and improving airflow fixes it quickly.
Liquid diversion failure: The toilet separates liquid and solid waste only when you’re seated correctly. Men must sit for all uses. Standing to urinate defeats the separation, saturates the medium, and causes smell fast. This is one of the most common first-month problems.
Urine bottle overfull: Empty the liquid bottle every 1–2 days. A full bottle can back up into the separation path.
If you’re troubleshooting a bathroom smell and aren’t sure whether it’s the composting toilet or something else, the RV smell issues category covers grey tank and plumbing vent sources that often get blamed on composting toilets.
Where Do You Empty It After Installation?
A composting toilet reduces black tank use, but it doesn’t remove waste responsibility. Before your first trip, understand where and how you’ll empty both chambers.
Urine bottle: Most urine bottles need emptying every 1–2 days, depending on the number of users. Empty it into a toilet, at a dump station, or at any approved wastewater disposal point. Do not dump urine where local regulations prohibit it. Rules vary significantly by location and land type. Check before you go.
Solids bin: The solids bin typically needs emptying every 3–6 weeks for full-time use by two people. The timing depends on use frequency and how well the medium is composting.
Most RVers bag the dried solid material and dispose of it in regular trash. Some campgrounds and public land rules specifically prohibit this. Check the rules for wherever you’re camping before you assume trash disposal is acceptable.
A few things to keep in mind:
- Disposal rules vary by state, country, and campground. What’s acceptable in one location may not be in another.
- “Composting toilet” does not mean the waste is fully composted by the time you empty it. In an RV unit with a 3–6 week cycle, the material is partially composted. Handle it accordingly.
- Do not dump solid waste on the ground at a campsite or in a public area.
Plan your disposal method before your first trip, not during it.
When to Hire a Professional
Most of this install is DIY-friendly. A few situations are better handled by an RV technician or experienced electrician.
Consider getting help if:
- You’re not comfortable identifying and connecting 12V circuits
- You need to drill through the roof, and you aren’t confident in the sealing process
- You can’t identify wiring, plumbing, or framing behind the wall before drilling
- You want to repurpose the black tank as a grey water tank (this involves rerouting plumbing)
- Your layout requires a custom vent route with multiple bends or tight clearances
- You find water damage or soft spots around the old toilet flange that need repair before mounting
- Your wet bath configuration makes sealing and waterproofing the install complex
Getting help on one step doesn’t mean you can’t do the rest yourself. For more complex RV toilet replacement scenarios, including professional vs. DIY situations, that category covers a wider range of installs.
You’re Ready to Use It
Before your first use, fill the solids bin with your composting medium. For a coconut coir brick: hydrate it with water, break it up completely, and fill the bin to just below the agitator. Spread it evenly. Turn the agitator handle to confirm it moves freely.
Run the fan for 30 minutes before first use. Check the exterior vent for airflow one more time.
Three habits that keep the system working long-term:
- Turn the agitator handle after every solid use
- Empty the liquid bottle every 1–2 days
- Keep the fan running at all times
No black tank use. Fewer dump station runs. No black tank chemicals.
For more on composting toilets, from how they work to long-term maintenance, browse the full composting toilet guides.
After Installation Troubleshooting
| Problem | Likely Cause | Fix |
|---|---|---|
| Bathroom smells like sewage | Fan off, vent leak, or poor airflow | Check fan power, hose clamps, vent cap, and sealant |
| Earthy smell only | Normal medium smell or medium too wet | Add dry coir and improve airflow |
| Urine smell | Bottle too full or urine path dirty | Empty bottle, clean urine area with vinegar and water |
| Fan not running | Loose wire, blown fuse, or bad connection | Check fuse, wire polarity, and 12V connection |
| Toilet shifts while driving | Mounting brackets loose or floor soft | Retighten brackets and inspect the subfloor |
| Moisture in solids bin | Poor airflow or urine contamination | Check vent path, fan, and sitting position |
| Bugs in solids bin | Missing or damaged vent screen | Add or replace bug screen at exterior cap |
| Water leak around vent hole | Wrong sealant or poor exterior seal | Reseal with correct RV sealant for surface type |
Frequently Asked Questions
How long does it take to install a composting toilet in an RV?
Most installs take 2–4 hours for someone comfortable with basic tools. A simple layout with a short wall vent run is closer to 2 hours. A tighter layout with limited electrical access or a long vent path can take up to 4 hours. Having all your materials ready before you start prevents the job from stretching into a second day.
Do you need a plumber to install a composting toilet in an RV?
No. The install involves capping one cold water line, bolting the toilet to the floor, routing a small vent hose, and connecting a low-draw 12V fan. None of those tasks require a licensed plumber. If you’re not comfortable with 12V wiring, have someone with electrical experience handle that step.
What size hole do you drill for a composting toilet vent in an RV?
A 2″–2.5″ hole is standard for most composting toilet vent hoses. Check your specific model’s installation manual before drilling. Always seal the exterior penetration with the correct RV sealant for your surface: self-leveling lap sealant for the roof, non-sag sealant for side walls.
Can you keep the RV black tank after installing a composting toilet?
Yes. The best approach for most RVers is to cap the black tank inlet with a 3″ gripper plug and leave the tank in place. This keeps the install reversible. Some full-timers repurpose the black tank for additional grey water storage, but that requires extra plumbing and a permanent commitment to the composting toilet.
What composting medium should you use in an RV composting toilet?
Coconut coir (coco coir) is my preferred option for RV use. Most manufacturers allow peat moss or coconut coir, but coconut coir is easier to store in a small space, produces less exterior odor, and is cleaner to handle. To prep it: hydrate a 9-liter brick with water, break it up completely, and fill the solids bin to just below the agitator. Do not use cat litter or regular soil.
Do you have to remove the black tank to install a composting toilet in an RV?
No. Most RVers leave the black tank in place and cap the inlet with a 3″ gripper plug. Removing the tank is only necessary if you want to use the space for storage or convert it to a grey water tank. Leaving it in place is the simplest and most reversible approach.
Can you switch back to a regular RV toilet later?
Yes, if you kept the black tank, left the water line capped but intact, and didn’t permanently seal the floor opening. Pull the gripper plug, reconnect the water line, remount the original toilet, and the system works again. This is one of the main reasons to leave the black tank in place instead of removing it.
Can you vent a composting toilet into the old black tank vent?
Sometimes, but it is an advanced modification. A dedicated side wall or roof vent is safer for beginners. If you want to tie into the existing vent stack, the connection must be above the tank and must maintain an upward airflow path. Never vent the composting toilet directly into the black tank itself.
What happens to the old RV toilet water line?
Cap it with a 1/2″ PEX cap or SharkBite cap. Leave it accessible so the install stays reversible. Don’t cut it short or bury it inside the wall. If you ever want to reinstall a standard RV toilet, you’ll need that line intact.