
TL;DR: Most RV toilet problems trace back to one small, replaceable component rather than the toilet itself. This guide explains what every main RV toilet part does, which symptom points to which part, and when it makes more sense to replace the whole unit. It covers both Dometic and Thetford toilets. Check your model number before ordering anything.
Your RV toilet is giving you trouble, and you are not sure which RV toilet parts are actually at fault. The bowl empties on its own overnight. Water trickles in after the flush. There is a smell you cannot track down.
In most cases, one inexpensive part has given out. RV toilets are built around a short list of replaceable components, and once you know what each part does, diagnosing a failure takes about five minutes and a flashlight. Small seal and valve repairs are usually much cheaper than replacing the whole toilet. A basic seal kit often costs far less than a new RV toilet, but the exact price depends on brand and model.
One thing to keep in mind before you start: not every toilet symptom is a toilet problem. A sewer smell can come from a blocked roof vent pipe. Gurgling and bubbling often point to a black tank or vent issue rather than any toilet part. Knowing that up front saves you from replacing parts that do not need replacing.
What Are the Main RV Toilet Parts?
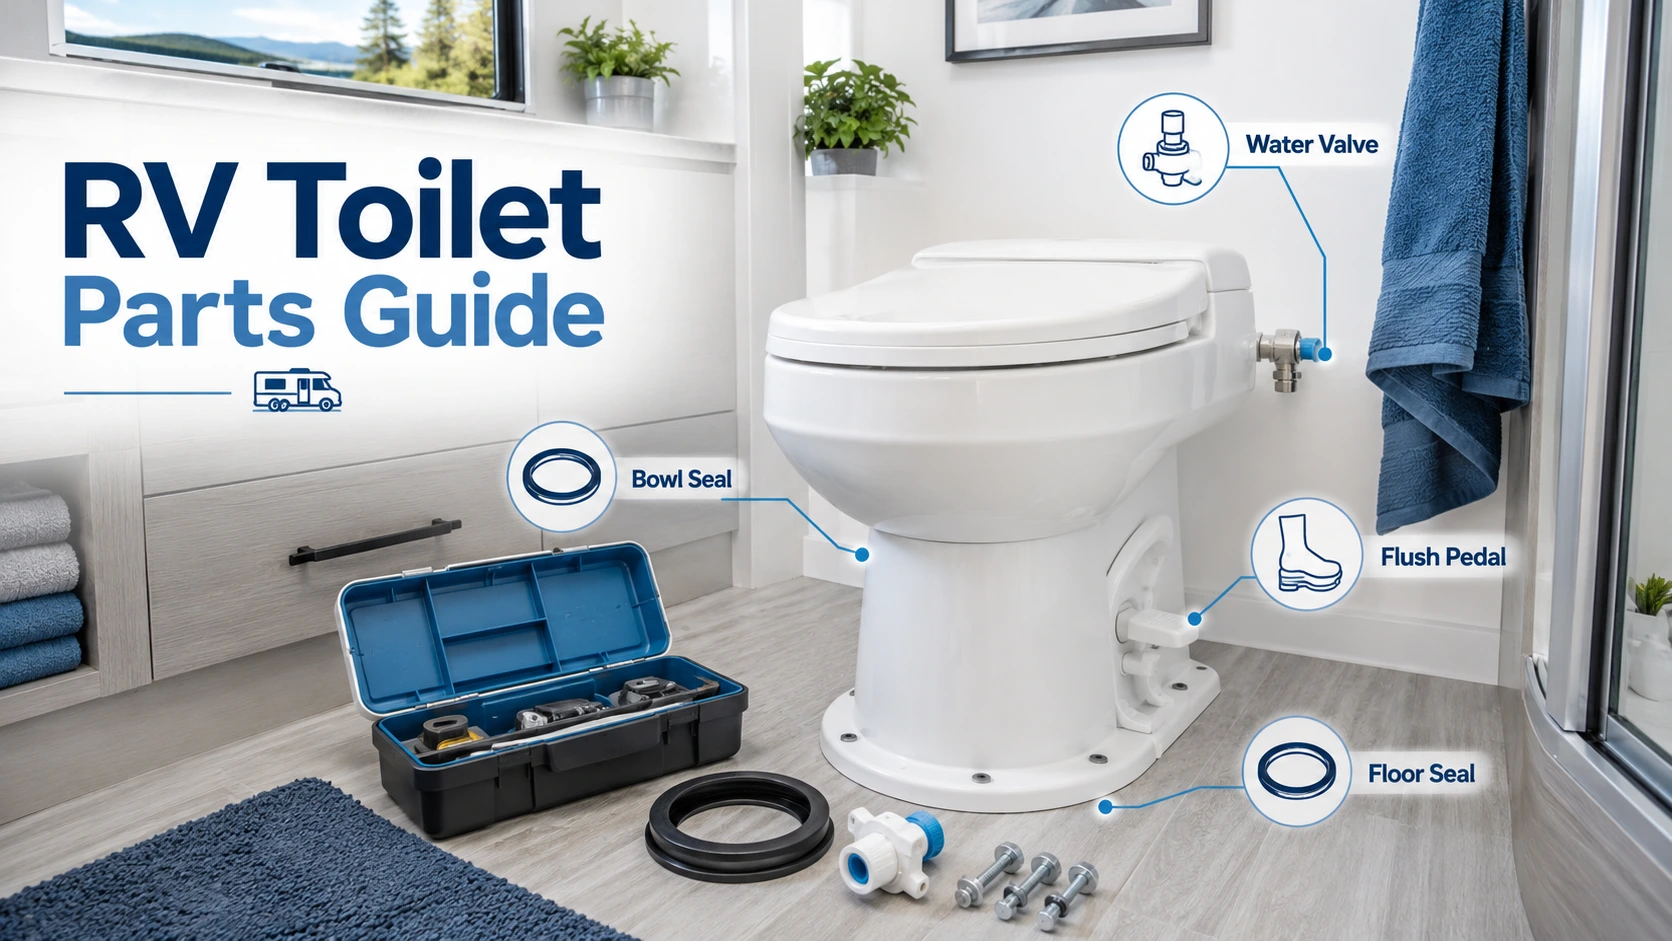
An RV toilet has roughly 10 to 12 main components. The three that fail most often are the water valve, the bowl seal, and the floor flange seal. Most other parts fail less frequently but are still sold as individual replacement kits for both Dometic and Thetford models.
Here is every main part and what it does:
| Part | What it does | Common failure symptom |
|---|---|---|
| Flush pedal or lever | Opens the water valve and flush mechanism | Feels loose, sticky, or will not spring back |
| Water valve | Controls water flow from the supply line into the bowl | Water drips or runs continuously after flushing |
| Vacuum breaker | Prevents toilet water from back-siphoning into the fresh water system | Water leaks behind the toilet near the wall |
| Flush ball or blade | Opens and closes the drain at the bowl base | Bowl drains overnight; slow drainage |
| Bowl seal (waste ball seal) | Creates a watertight ring around the flush ball | Bowl drains overnight; persistent sewer smell |
| Floor flange seal | Rubber gasket between the toilet base and the RV floor | Water at the base; odors near the floor |
| Mounting bolts | Hold the toilet to the floor flange | Toilet rocks or wobbles |
| Flush nozzle | Directs water into the bowl during flushing | Weak or uneven flush pattern |
| Hand sprayer (optional) | Rinses the bowl manually without a full flush | Leaks at the sprayer connection point |
| Seat and lid | Hygiene barrier and comfort | Cracked hinges or loose fit |
RV parts retailers commonly group water valves, vacuum breakers, ball seal kits, floor seals, flush pedals, and seats under common RV toilet repairs. That makes these the first parts worth checking when the symptom matches.
RV Toilet Parts Diagram: How the System Works
Understanding how the parts connect makes any diagnosis faster. Here is the flow from water in to waste out:
1. Fresh water enters. A supply line connects your RV’s water system to the water valve at the back of the toilet.
2. The water valve opens. Pressing the flush pedal activates the water valve. Water flows through the vacuum breaker and into the bowl via the flush nozzle.
3. The vacuum breaker protects the system. This small device sits between the water valve and the bowl. It stops toilet water from flowing backward into your freshwater lines under any pressure drop.
4. The pedal opens the flush ball. Pressing the pedal further opens the flush ball at the base of the bowl, dropping waste directly into the black holding tank below.
5. The bowl seal holds water in the bowl. When the flush ball closes again, the rubber bowl seal forms a watertight barrier. It also blocks black tank gases from rising through the toilet.
6. The floor flange seal keeps the base contained. At the bottom, a rubber gasket seals the toilet to the RV floor flange, preventing odors from escaping around the toilet’s footprint.
Each of these parts can fail independently. A failed bowl seal at step 5 has nothing to do with the water valve at step 2. Identifying the right part first matters.
Which RV Toilet Part Do You Need for Each Problem?
Match your symptom to the most likely failed part before ordering anything. Most RV toilet symptoms point directly to one component. Getting the right part the first time is faster and cheaper than working through a list.
| Symptom | Most likely part | What to check first |
|---|---|---|
| Bowl empties overnight | Bowl seal (waste ball seal) | Clean and lubricate; replace if cracked |
| Water leaks behind the toilet | Water valve or vacuum breaker | Check hose connections and valve body |
| Water pools at the floor | Floor flange seal or loose mounting bolts | Check if the toilet rocks; inspect the base gasket |
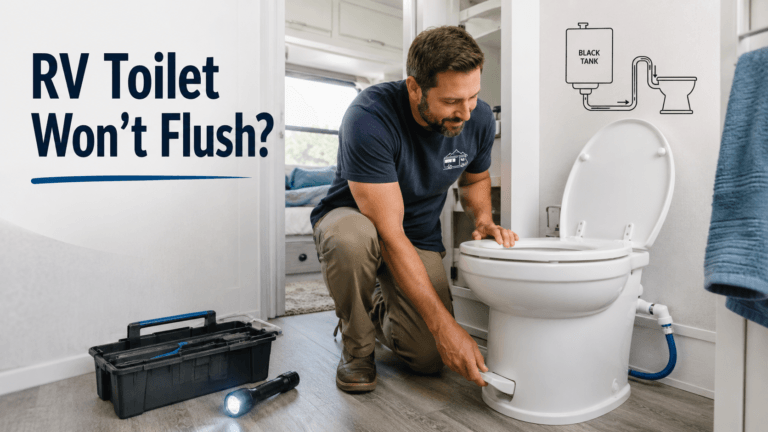
| Flush pedal loose or sticky | Pedal assembly or return spring | Clean the pedal mechanism; inspect the cable |
| Weak or slow flush | Water valve, flush nozzle, or low water pressure | Check supply pressure and flush nozzle for buildup |
| Persistent sewer smell | Bowl seal, floor flange seal, or blocked roof vent | Fill bowl with water; check the roof vent cap |
| Water keeps running after flushing | Water valve stuck open | Replace the water valve |
| Toilet bubbles when the black tank fills | Black tank vent issue, not a toilet part | Inspect and clear the roof vent cap |
If your Dometic bowl drains overnight, our guide on Dometic toilet not holding water covers the full diagnosis, including how to tell a failed seal from a scratched flush ball. For a persistent sewer smell, see our RV toilet smell guide for every possible source, including vent issues and black tank buildup.
Water Valve, Vacuum Breaker, and Flush Pedal Parts
These three parts share the same water supply line and work together every time you flush. A problem with any one of them can look like a problem with the others, so it helps to understand what each one actually controls.
Water valve
The water valve is a rubber-seated component that opens when you press the flush pedal and closes when you release it. When it fails, water either stops flowing into the bowl entirely or keeps trickling in after you let go of the pedal. A stuck-open water valve is the most common reason an RV toilet runs continuously. Replacement kits are model-specific: Thetford Aqua-Magic V uses part #31705, while Thetford Style Plus and Style Lite use part #34100. Dometic 300/310/320 toilets use part #385311641. For a full water valve replacement walkthrough, see our guide on replacing the RV toilet water valve.
Vacuum breaker
The vacuum breaker mounts between the water valve and the bowl. Its job is to prevent back-siphoning. When it cracks or fails, water typically drips behind the toilet rather than into the bowl. It is often sold as part of the same repair kit as the water valve. On Thetford Style II, Style Plus, and Style Lite models, vacuum breakers are sold as a standalone kit under part #34122 for compatible models.
Flush pedal and return spring
The pedal connects to both the water valve and the flush ball mechanism. If it feels loose, spongy, or stops returning on its own, the return spring or pedal cable has usually worn out. Thetford sells a combined repair kit for Aqua-Magic V pedal cable, waste ball seal, and flange seal under part #31711. For a complete pedal repair guide, see our post on how to fix an RV toilet foot pedal.
What Is the Difference Between the Bowl Seal, Flush Ball, and Floor Seal?
The bowl seal, flush ball, and floor flange seal are three separate parts that each cause a completely different type of failure. Ordering the wrong one is the most common parts mistake RV owners make. The bowl seal causes a dry bowl. The floor seal causes base leaks. The flush ball itself rarely fails unless it has been scratched.
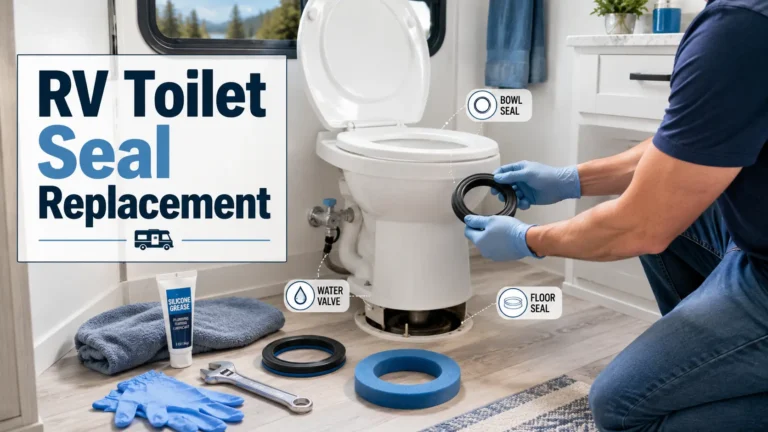
Bowl seal
The bowl seal is the rubber ring that wraps around the flush ball and holds water in the bowl. When it dries out, cracks, or hardens, the bowl drains on its own and sewer odors enter the RV. This is the most frequently replaced RV toilet part. Dometic 300/310/320 models use part #385311658. Thetford waste ball seals vary by model. Some Aqua-Magic toilets use seal kits such as #34120, while others use #42141. Always match the seal to your exact toilet series before ordering.
Flush ball
The flush ball is a separate component from the seal. If the ball’s surface is scratched or pitted from abrasive cleaners or stiff brushes, even a brand-new seal will fail immediately because the rough edge cuts into the rubber as the ball rotates. Inspect the ball’s surface after every seal replacement. Both Thetford and Dometic sell waste ball and drive arm replacement kits if the ball itself is damaged.
Floor flange seal
The floor flange seal sits between the base of the toilet and the RV floor. It has no role in holding water inside the bowl. Water or odors at floor level, not inside the bowl, is the sign of a flange seal failure. Both brands typically include the flange seal in their standard repair kits. For a full diagnosis and repair, see our guide on RV toilet leaking at base.
Dometic vs. Thetford RV Toilet Parts
Parts from Dometic and Thetford are not interchangeable. Even within the same brand, parts are often model-specific. Ordering by brand name alone is a reliable way to get the wrong part and start the repair twice.
Dometic. The 300, 310, 311, 320, and 321 series share several common parts, including the flush ball seal (#385311658) and the water valve (#385311641). The older 200 series and the 500 series use different kits entirely. Before ordering, confirm your model number from the label on the back of the toilet near the base. Check a Dometic-compatible parts listing or the manufacturer’s part number before buying.
Thetford. The Aqua-Magic lineup covers several distinct series: the V, Style II, Style Plus, Style Lite, and Residence. Parts from the Aqua-Magic V are not necessarily compatible with the Style II, and the Residence uses its own water valve assembly. If your label has worn off, Thetford’s support page can help you identify the model from a photo or physical description. Their authorized service line is also available at 1-800-521-3032. If you own a Thetford model, our full Thetford camper toilet parts guide breaks down the common parts by model.
To confirm the right part before ordering:
- Find the model number on the label at the back or base of your toilet.
- Search that model number on Amazon or the manufacturer’s parts page.
- Compare the shape of the old part to the replacement before you install anything.
Parts described as “universal” for RV toilets deserve extra caution. Seals, valves, and pedal assemblies typically need an exact fit to seat and function correctly.
Should You Repair the Part or Replace the Whole RV Toilet?
Repair the part when one component has clearly failed, and the toilet body is undamaged. Replace the whole toilet when multiple parts are failing at once, the base or bowl is cracked, or the cost of parts is approaching the cost of a new unit. In most cases, a single part repair is the right call.
Repair makes sense when:
- One part has a clear failure symptom, such as a leaking valve, an empty bowl, or a loose pedal
- The bowl and base show no cracks or structural damage
- The replacement part costs under $25
- The toilet is otherwise functional and comfortable
Replacement makes more sense when:
- Two or more parts have failed within the same season
- The plastic bowl or base is cracked, especially from freeze damage
- Parts for your specific model are discontinued or difficult to find
- The repair cost has reached 40 to 50 percent of the price of a new toilet
If you are not sure where the toilet stands, our full guide on how to repair an RV toilet walks through every common failure type from start to finish, including when it makes sense to remove the toilet entirely versus repair it in place.
The Bottom Line
Most RV toilet failures come down to one of five parts: the water valve, the bowl seal, the vacuum breaker, the flush pedal assembly, or the floor flange seal. Identifying the symptom first points you to the right part almost every time.
Before you order anything, pull the model number from the label on the back or base of your toilet. Parts are brand-specific and often model-specific. Buying the wrong seal or valve means starting the repair over.
Bowl drains overnight: start with the bowl seal. Water running after a flush: start with the water valve. Water at the base: check the flange seal and mounting bolts. Follow the symptom, not a guess. If more than one part has failed or the toilet is cracked, compare RV toilet replacement options before spending money on another repair.
Frequently Asked Questions
Are RV toilet parts universal?
Most RV toilet parts are not universal. Seals, water valves, and pedal assemblies are typically brand-specific and often model-specific within the same brand. A Dometic flush ball seal will not fit a Thetford toilet, and parts for the Dometic 310 may not be compatible with the 320. Some seats and lids come in generic sizes, but for any part that affects function, always verify the part number against your specific model.
How do I know which RV toilet part I need?
Match your symptom to the most likely failed part. A bowl that drains overnight points to the bowl seal. Water that keeps running after a flush points to the water valve. A leak or odors at the base point to the floor flange seal or loose mounting bolts. If you are unsure, use the troubleshooting table in this guide or search your toilet’s model number on Amazon or the manufacturer’s site for model-specific parts diagrams.
What part makes an RV toilet stop holding water?
The bowl seal is the part that keeps water in the bowl. It surrounds the flush ball and creates a watertight barrier when the ball is closed. When it dries out, hardens, or cracks, the bowl drains on its own, and sewer odors enter the RV. Try cleaning and lubricating the seal first. If the bowl still drains, replace it. Dometic 300/310/320 models use part #385311658. Thetford Aqua-Magic models use part #34120 or #42141, depending on the model.
Why is my RV toilet leaking at the base?
A leak at the toilet base typically points to the floor flange seal, also called the base gasket or closet flange seal. This is a completely separate part from the bowl seal and is only responsible for sealing the toilet to the RV floor. A rocking or loose toilet can also cause base leaks by compressing the flange gasket unevenly. See our guide on RV toilet leaking at base for the full repair process.
Is it cheaper to repair or replace an RV toilet?
Repair is almost always cheaper for a single failed part. Most RV toilet replacement parts cost between $8 and $25. A new Dometic or Thetford toilet typically runs $150 to $500 or more, depending on the model. Full replacement makes sense when the bowl or base is cracked, when multiple parts have failed in the same season, or when original replacement parts for your model are no longer available.

This guide breaks down the parts really well. Did you include tips on troubleshooting common issues too?