TL;DR: An RV composting toilet fan not working is almost always a power problem, not a dead motor. Check the fuse, the connector, and the 12V voltage before you assume the worst. If the fan spins but it’s still not pulling air, the vent hose or insect screen is usually the real issue, not the fan. A grinding or clicking sound means worn bearings, not wiring. Most replacement fans cost $10 to $40 and take under 30 minutes to install.
You reach for the lid, brace for the usual faint earthy smell, and instead you get nothing. No hum. No breeze when you hold your hand near the bowl. Your composting toilet fan has stopped working, and now you’re wondering how bad this actually is.
Here’s the good news: composting toilet fan problems are rarely as serious as they feel in the moment. These are small, low-draw 12V fans, the same basic design as a computer cooling fan. Most failures trace back to power, not the motor itself.
This guide walks through every cause in the order most likely to be your actual problem. If you’ve already worked through fan checks while diagnosing a smell issue, this digs deeper: actual amp draw by brand, fuse sizing, multimeter tests, and what a real replacement costs. We’ll also cover how to tell a dead fan from a weak one, since they look identical from the bathroom but need completely different fixes. If the fan turns out to be fine, our full composting toilet smell diagnosis covers the other usual suspects.
Why Is a Composting Toilet Fan Not Working?
A composting toilet fan usually fails for one of six reasons: a blown fuse, a loose connector, no 12V power reaching the unit, reversed polarity, a blocked vent path, or worn bearings in the motor. Check the fuse first. Composting toilet fan fuse problems cause more “dead fan” calls than anything else.
Here are the six causes, roughly in order of how often they show up:
Blown fuse. The most common reason for a composting toilet fan with no power at all.
Loose connector. The single-pin or barrel plug between the fan and the wiring harness has worked loose or corroded.
No 12V power, or a bad power source. The battery, converter, or transformer feeding the fan isn’t delivering voltage.
Reversed polarity or wrong fan direction. The wires are swapped, so the fan either won’t spin or pushes air the wrong way.
Blocked vent hose, exterior vent cap, or insect screen. The fan itself is fine, but air can’t actually get through.
Worn bearings or a dead fan motor. The fan has simply reached the end of its life.
The table below helps you match your exact symptom to the right cause before you read every section in detail.
Quick Symptom Check
Match your fan symptom to the most likely cause before you start taking anything apart.
Fan makes no sound at all
Most likely cause: Blown fuse or no power reaching the unit
First check: Fuse and 12V connector
Fan was working, then suddenly stopped
Most likely cause: Blown fuse, tripped breaker, or a wire that worked loose
First check: Fuse first, then wiring along the run
Fan spins but seems to blow the wrong way, or won’t start despite good voltage
Most likely cause: Reversed polarity at the connector
First check: Positive and negative wires at the plug
Fan runs but the bowl still smells
Most likely cause: Blocked vent or insect screen, not the fan
First check: Airflow at the exterior vent outlet
Fan spins slower than it used to
Most likely cause: Dust on the blades or early bearing wear
First check: Clean the blades, then test by hand
Fan grinds, clicks, or buzzes
Most likely cause: Worn bearings or a dead motor
First check: Spin the blade by hand with power off
This matches what Nature’s Head’s own troubleshooting guidance tells owners to check first: voltage, polarity, the fuse, and whether the single-pin connector is actually seated. ShopTinyHouses breaks fan failure into roughly the same two buckets: power issues like a disconnected battery or blown fuse, and ordinary wear and tear on a motor that runs for hours every day. Other manufacturer support guides describe the same basic order of operations: confirm the insect screens are clear first, and only suspect a faulty fan once you’ve confirmed there’s still no airflow at the exhaust vent with clean screens.
Can You Use a Composting Toilet If the Fan Is Not Working?
Yes, for a short time, but it’s not a long-term fix. You can keep using the toilet in an emergency while you wait on a part or find time to check the wiring, as long as you manage moisture and odor by hand in the meantime.
Without the fan, you lose the steady airflow that normally pulls moisture and odor out of the bin. A few habits keep things manageable until the fan is fixed:
Keep the lid closed between uses. This slows odor escape and limits how much extra humidity gets in.
Empty the urine bottle more often than usual. Liquid that sits longer without airflow tends to smell faster.
Add a little dry coconut coir if the medium starts feeling damp. This helps absorb the extra moisture the fan would normally pull out.
Check the bin more often for wetness or odor. Without the fan, problems show up faster than you’re used to.
Fix the fan as soon as you reasonably can. A day or two without it usually isn’t a big deal. Weeks without it, especially in humid weather, is when mold and stronger odor become real risks.
Don’t treat “the toilet still works without the fan” as a reason to put off the repair. Composting depends on airflow, not just the compost medium itself. Skipping ventilation for too long turns a simple fan fix into a wet, smelly bin you’ll need to empty and restart.
How Do You Check Power to a Composting Toilet Fan?
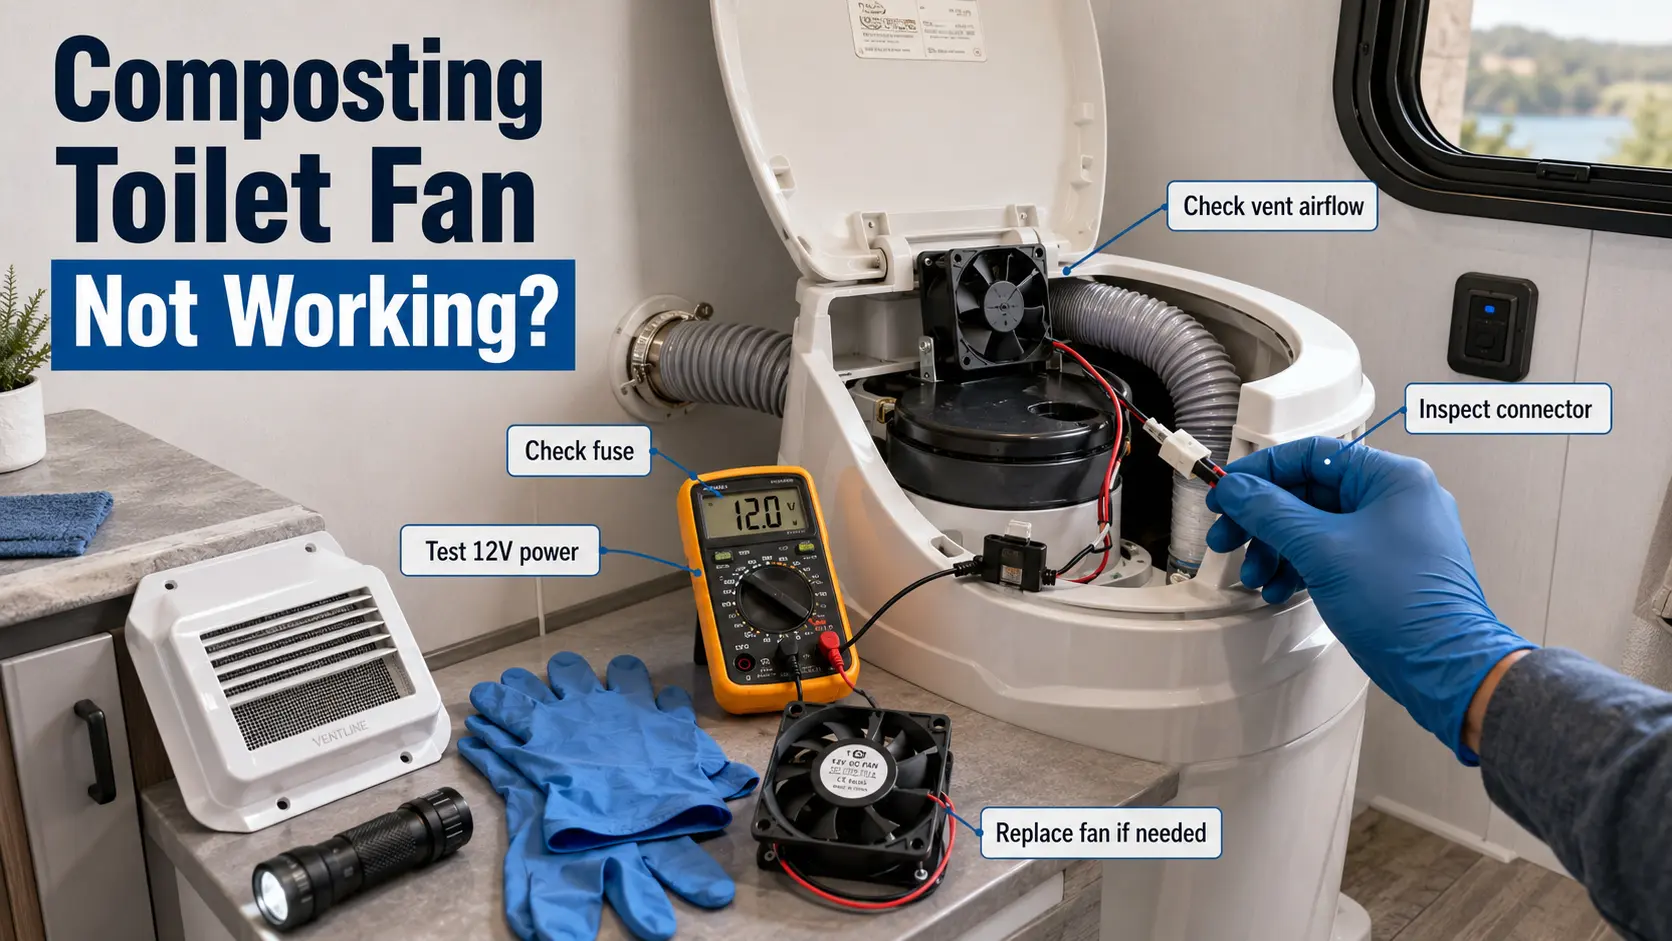
A 12V composting toilet fan not running almost always comes down to power, not the motor. Check the fuse first, then the connector, then the actual voltage at the fan’s plug. A composting toilet fan with no power at all is usually one of these three things, not a failed motor, and working through them in order saves you from buying a replacement you didn’t need.
- Find and check the fuse. Composting toilet fans run on small inline fuses, often 1 amp. A blown fuse looks burnt or has a broken filament visible through the housing. Swap it for one of the same rating. Never go higher “just to be safe.” Ari Herman’s off-grid installation guide specifically recommends a 1-amp inline fuse to protect the fan motor, since these fans draw so little current that a bigger fuse defeats the purpose of having one.
- Check the connector. Most units use a single-pin or barrel connector between the fan and the wiring harness. Unplug it, look for corrosion or bent pins, and reseat it firmly. On Nature’s Head units, this single-pin connection is one of the first things the manufacturer tells owners to verify.
- Test voltage at the plug. With a multimeter set to DC volts, touch the leads to the connector while the system is powered. You should read close to 12V. If you’re getting nothing, or something far off, the fault is upstream: the battery, the transformer (if you’re running 110V to 12V power), or the wiring between them, not the fan.
- Check polarity if the fan stays silent despite good voltage. Nature’s Head’s troubleshooting page specifically flags reversed positive and negative wires as a real cause of a fan that won’t start even with power present.
If all three check out and the fan still won’t spin, the motor itself has likely failed, and you’re looking at a replacement (more on that below).
For wiring this correctly from scratch, our guide on installing a composting toilet in an RV covers the original 12V fan wiring step in more detail.
Brand-Specific Fan Checks: Nature’s Head, Air Head, OGO, and Separett
A Nature’s Head fan not working, or an Air Head toilet fan not working, almost always traces back to the same basic checks above. Each brand still has its own small quirks worth knowing before you start.
| Brand / Model | First Fan Checks | Notes |
|---|---|---|
| Nature’s Head | 12V voltage at the plug, positive/negative polarity, the fuse, the single-pin connector, and that air is actually blowing outward | Reversed polarity is a known cause of a fan that won’t start even with power present |
| Air Head | Whether the fan is running continuously as designed, the power adapter or 12V feed, vent blockage, and the connector | Very low draw; check your model manual before sizing a fuse, battery, or solar setup |
| OGO | That the 40mm replacement fan fits and seats correctly, the connector, low CFM airflow, and fan direction | Moves less air by design, so weaker-feeling airflow isn’t automatically a fault |
| Separett (Villa/Tiny) | Continuous fan operation, the full vent path, and whether another fan in the room is competing for airflow | Running a second fan in the same bathroom can pull air the wrong way through the vent |
If your model isn’t listed here, the same general order still applies: fuse, connector, voltage, then airflow.
blocked insect screen, dust-caked blades, or a fan worn down enough to spin without creating real suction.
Two quick tests tell you which side of the problem you’re on:
- Paper strip test at the bowl. Hold a thin strip of paper near the bowl opening with the lid open. A working fan pulls it gently downward. If it just floats, the fan isn’t creating enough negative pressure, even though it’s spinning.
- Hand test at the exterior vent. Hold your hand at the outside vent outlet. You should feel a faint, steady stream of air. Nothing there usually points to a blocked screen or a kinked hose, not the fan itself.
Insect screens at the exterior vent cap are the single most overlooked cause of this exact symptom. Wasps and spiders build nests inside vent covers more often than most RV owners expect, and a packed screen will choke airflow even with a perfectly healthy fan spinning behind it.
Dust on the fan blades is the second most common cause. Use a dry brush or canned air to clean them. Don’t use liquid anywhere near the fan housing.
If the screen is clear, the blades are clean, and airflow is still weak, the fan may simply be wearing out. Small DC fans lose RPM gradually as bearings age, long before they stop completely. A fan spinning at 60% of its rated speed still spins. It just won’t move enough air to do its job.
A weak fan shows up the same way a moisture problem does, since lost airflow lets humidity build up in the bin. If your bin feels consistently damp on top of a weak fan, our guide on why a composting toilet gets too wet covers the moisture side while you sort out the fan.
Is It a Dead Fan, a Weak Fan, or a Blocked Vent?
Composting toilet fan problems usually sort into one of five patterns once you’ve run a basic test. Match your exact result to the table below before you decide what to fix.
Dead Fan vs Weak Fan vs Blocked Vent
Match your test result to what it usually means, then start with the first fix below.
No sound and no airflow
What it usually means: No power, a loose connector, a blown fuse, or a dead motor
First fix: Check the fuse, connector, and 12V voltage
Fan spins but no airflow outside
What it usually means: Blocked screen, kinked hose, or wrong fan direction
First fix: Clean the vent cap, inspect the hose, check airflow direction
Fan grinds or clicks
What it usually means: Dust, debris, or worn bearings
First fix: Clean the blades first, then replace if it’s still rough
Composting toilet fan running but still smells
What it usually means: Airflow conflict, wet medium, a urine issue, or a blocked vent
First fix: Check the vent, urine diverter, compost moisture, and any other fans in the room
Fan stops after driving
What it usually means: Loose connector or a vibration issue
First fix: Reseat and secure the connector
Testing the Fan With a Multimeter
⚠️ Before You Touch the Fan Wiring
- Turn off the toilet’s fan power first.
- Disconnect shore power, or switch off the related 12V circuit, before touching any connections.
- Don’t replace a 1-amp fuse with a bigger one, even temporarily.
- Keep water, cleaner, and spray well away from the fan housing.
- Take a photo of the wiring before you disconnect anything.
- Stop and get help if any wiring looks melted, feels hot, looks brittle, or smells burnt.
If you’ve confirmed power is reaching the fan and it still won’t spin, a multimeter tells you whether the problem is electrical or mechanical in about five minutes.
What you need: a basic multimeter and the fan unplugged from the toilet’s wiring harness.
- Set the multimeter to resistance (ohms). Touch the leads to the fan’s two terminals. You should get a measurable reading, not infinite resistance. A reading of infinite resistance, or “open,” means the winding inside the motor has failed, and the fan needs replacing.
- Spin the blade by hand with the power off. It should coast freely for a second or two. Catching, stopping dead, or feeling rough points to worn or seized bearings rather than an electrical fault.
- Reconnect power and listen. With the fan plugged back in, grinding or squealing noises typically point to worn bearings or mechanical damage rather than an electrical problem, even if the resistance reading came back normal.
- Check current draw if you want to confirm it matches spec. Connect the multimeter in series with the fan and power source, then read the current draw directly and compare it to your model’s rated amperage (numbers for common brands are below). A fan pulling noticeably more or less current than spec is a sign something inside has changed.
The general rule for small 12V fans like these: if the fan runs at normal speed without abnormal noise, the problem is almost always something external like wiring or the power source. If it won’t start, runs slowly, or grinds, the fault is internal, meaning the bearings, blades, or windings.
Why Is the Fan Making a Grinding, Clicking, or Buzzing Noise?
A grinding, clicking, or buzzing composting toilet fan almost always means worn bearings, not a wiring problem, and the noise typically gets louder over time rather than going away on its own.
These fans are small DC motors, similar in design to the cooling fans inside a laptop or desktop computer, and they fail the same way. Bearings wear down from years of constant or near-constant running, and the symptom shows up as noise long before the fan actually stops spinning.
Before assuming the worst, rule out the easy explanations:
- Dust buildup can mimic bearing failure. A fan caked in dust can throw the blades slightly off balance and create a grinding sound that clears up completely after cleaning. Use compressed air and hold the blades still while you blow it out, so you don’t over-spin the motor.
- Something touching the blades. A loose wire or a bit of debris brushing against a spinning blade can sound exactly like a mechanical fault. Check visually with the lid open and the fan running.
- The spin test tells you the rest. With power off, give the blade a gentle nudge by hand. Smooth, even movement usually means the bearings are healthy, while stiffness, grinding, or uneven resistance points to bearing wear or internal friction, not something a quick cleaning will fix.
If cleaning doesn’t help and the spin test feels rough, the bearings have likely worn out. At that point, replacing the whole fan is almost always cheaper and faster than repairing a sealed bearing on a $15 motor.
When to Replace the Fan
A composting toilet fan replacement makes sense once you’ve ruled out the easy fixes above. Look for:
- No spin at all, even with correct voltage confirmed at the plug
- Rough or stiff movement when you spin the blade by hand with power off
- Grinding or clicking that continues after cleaning
- Weak airflow even though the vent, hose, and screen are all clear
- The fan stopping on and off, even after the connector and fuse have both checked out fine
If you’re seeing any of these and you’ve already worked through the checks earlier in this guide, replacing the fan is the next step.
Replacing a Composting Toilet Fan: Cost, Parts, and Wiring
A composting toilet fan replacement is usually a 10 to 30 minute job, since these fans are small, cheap, and fairly standardized across brands.
What these fans actually draw. Knowing your model’s specs helps you confirm a replacement is correct and wire it safely:
| Brand/Model | Typical Draw | Notes |
|---|---|---|
| Nature’s Head | 0.07A instant, about 1.68 Ah per day | Single-pin connector |
| Air Head | Very low draw; check your model manual for the exact rating | Standard barrel connector |
| Sun-Mar | 1.42W, moves roughly 7 CFM | Optional on some models |
| OGO | 40mm x 40mm x 10mm replacement fan, low CFM, runs quiet | Direct manufacturer replacement |
Air Head’s 12V fan is very low draw. Official guidance commonly lists figures around 0.06 amps and about 1.44 amp-hours per day, but published numbers vary by version, so check your specific model’s manual before sizing a battery, fuse, or solar setup.
These are tiny loads either way. Even the highest-draw fan on this list won’t meaningfully dent a typical RV battery bank.
Buying a replacement. Manufacturer replacement fans from Nature’s Head, OGO, or Separett are built to bolt straight into the existing mount and connector, no rewiring needed. Generic 12V computer-style fans in matching sizes (40mm, 60mm, or 80mm depending on your model) work too and tend to be cheaper, usually $10 to $25 versus $20 to $40 for an official part, though you may need to adapt the connector yourself.
A generic fan should only replace the original if the voltage, physical size, connector, polarity, airflow direction, and airflow rating all match what your toilet needs. If you’re not confident checking all of that yourself, a manufacturer replacement part is the safer choice, even at the higher price.
Wiring it correctly if you’re starting from scratch. If you’re rewiring while you replace the fan, or adding one to a non-electric setup, a 1-amp inline fuse protects the motor, and 18 AWG wire is sufficient for runs under 10 feet (step up to 16 AWG for longer runs). Wire the fan to your battery, not directly to a solar panel, since panel voltage fluctuates and the fan needs a steady supply.
When to contact the manufacturer instead. If your unit is still under warranty, or the fan looks fine but the toilet still isn’t venting correctly, it’s worth reaching out before buying parts. Nature’s Head, for example, will send a free replacement fan directly once you’ve confirmed power is reaching the unit and it still won’t run.
If the fan has failed more than once, or you’re replacing several components on an aging unit, it might be worth comparing current models before sinking more money into repairs. Our best composting toilet for RV roundup breaks down which units hold up best long term.
How to Prevent Fan Failure Going Forward
A few habits keep most fans running for years without trouble:
- Keep the fan powered continuously if your model calls for it. Constant low-draw operation is normal by design and won’t meaningfully affect your battery.
- Check the fuse rating whenever you touch the wiring. It’s easy to accidentally swap in a fuse with the wrong amperage during other repairs.
- Clean the exterior insect screen every few months. This single step prevents the most common “fan seems dead” call that isn’t actually about the fan.
- Inspect connections after long drives. Vibration loosens single-pin and barrel connectors over time, especially on rougher roads.
- Don’t run a second fan in the same bathroom. Separett specifically advises against running any other fan in the same room as the Villa model, since competing airflow can pull air the wrong direction through the toilet’s own vent.
- Listen for early noise changes. A fan that starts buzzing slightly before it ever grinds is giving you a warning. Catching it early means a $15 part instead of a moisture problem in the bin from lost airflow.
For the rest of the smell-prevention routine beyond just the fan, including the urine bottle, vent hose, and compost medium, our full guide to composting toilet smells covers the complete checklist.
Conclusion
Most “dead” composting toilet fans turn out to be a blown fuse or a loose connector, not a failed motor. Work through the power checks first: fuse, connector, voltage. If the fan spins but airflow is still weak, look at the insect screen and vent hose before you blame the fan itself.
Grinding or clicking almost always means worn bearings, and at that point, replacing the fan (typically $10 to $40 and under half an hour of work) is the practical fix. Once your fan is confirmed working, or freshly replaced, keep the screen clean and check connections after rough drives. That’s most of what keeps this part trouble-free for years.
If your fan checks out fine and the smell is still there, our complete composting toilet smell diagnosis walks through every other cause.
Frequently Asked Questions
How much does it cost to replace a composting toilet fan?
Most replacement fans cost between $10 and $40. Manufacturer-specific parts from Nature’s Head, OGO, or Separett tend to run $20 to $40, while generic 12V computer-style fans in a matching size cost less but may need a connector adapted to fit.
Can I run a composting toilet without a fan?
You can, but odor control gets noticeably harder without one. The fan creates the negative pressure that pulls air down into the bowl and out through the vent hose, which is core to how composting toilets work in an RV in the first place. Without it, you’re relying entirely on passive airflow, which works better in some climates and installations than others.
What size fuse does a composting toilet fan need?
Most manufacturers and installers recommend a 1-amp inline fuse, since these fans draw well under that even at full speed. A bigger fuse won’t blow when it should, which defeats the purpose of having one.
Why does my composting toilet fan turn off by itself?
This usually points to a loose connector shifting under vibration, especially while driving, or a power source (battery or transformer) that’s dropping out intermittently. Check the connector first, then test voltage at the source over a few minutes to see if it stays stable.
Is it normal for a composting toilet fan to be loud?
No. A healthy composting toilet fan should be quiet enough that you barely notice it running. Buzzing, grinding, or clicking signals dust buildup or worn bearings, not normal operation, and it’s worth checking before the noise gets worse.