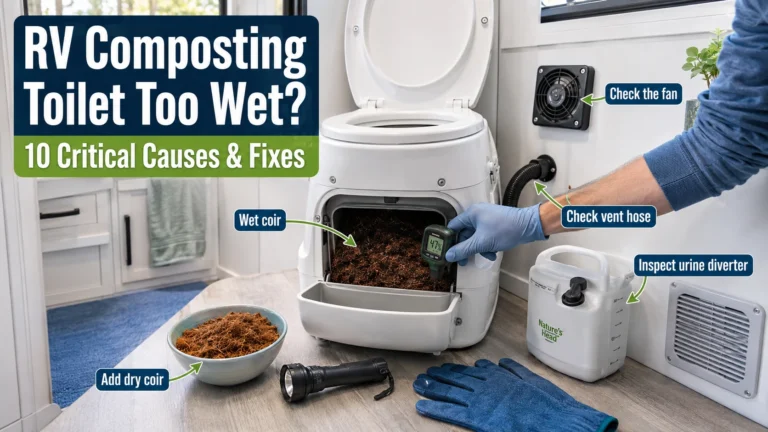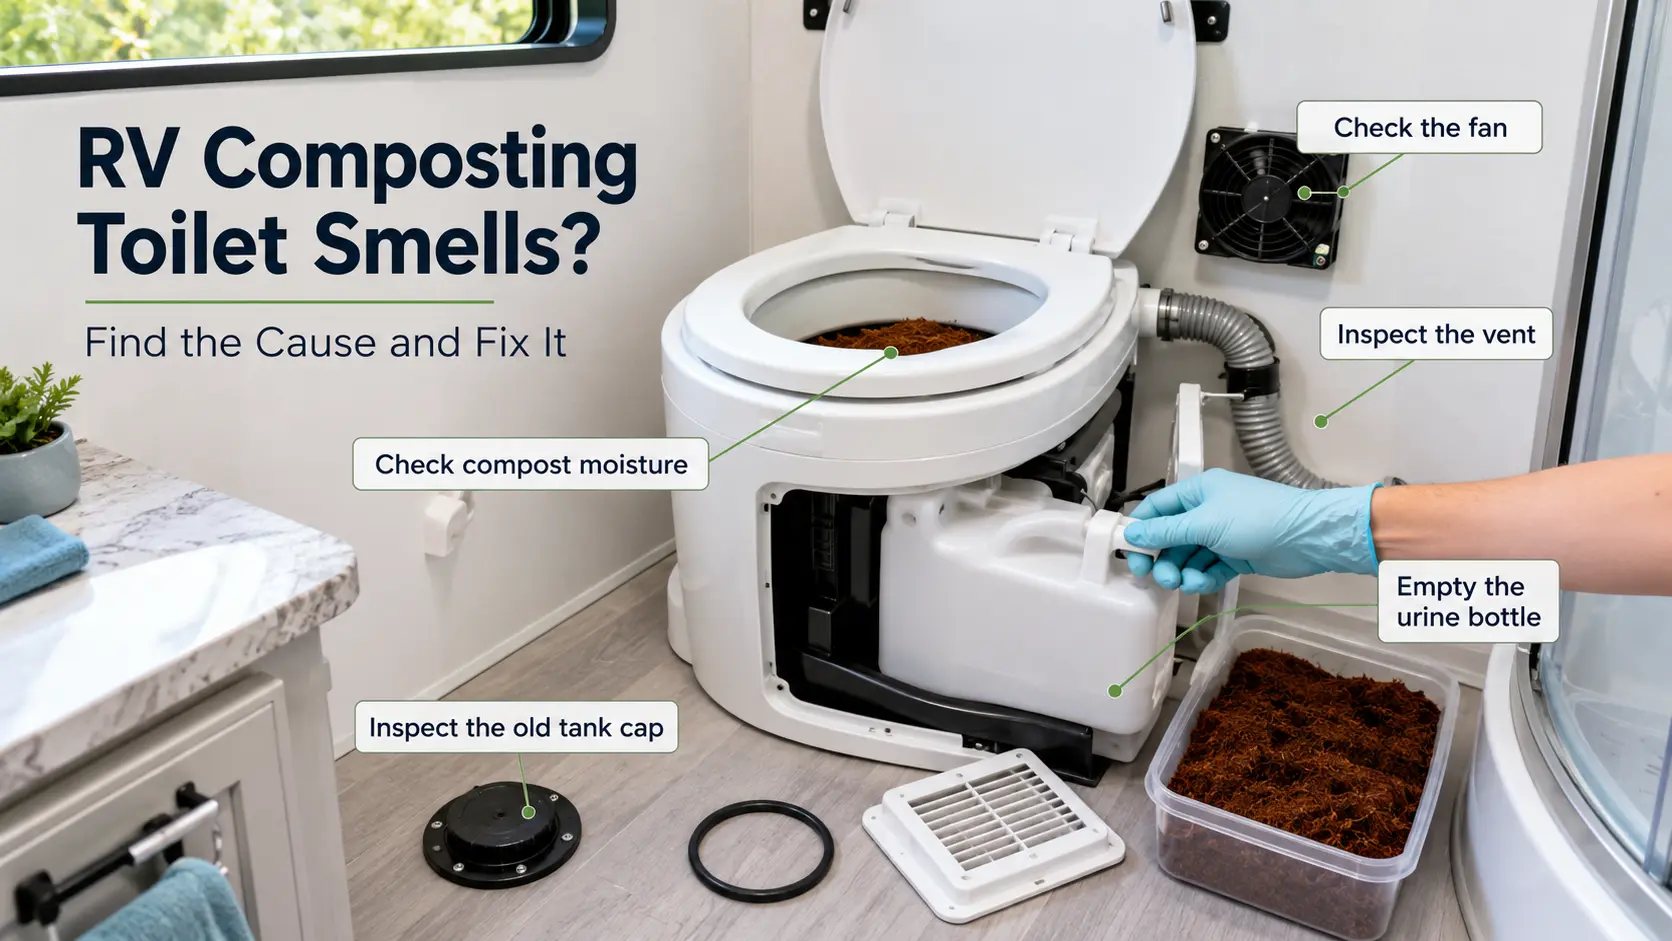
An RV composting toilet that is set up correctly produces, at most, a faint earthy smell. If yours smells like ammonia, sewage, or anything sharp, the cause is almost always traceable: the fan is failing, the urine bottle is overfull, the vent is blocked, urine has reached the solids bin, the compost medium needs attention, or the old black-tank connection was not sealed correctly. This guide walks through every cause with a diagnosis table and step-by-step checklist so you can find and fix your specific problem.
You switched to a composting toilet partly to escape the smell problem. So standing in a still-smelly RV bathroom is genuinely frustrating.
Here is the reality: RV composting toilet smells almost always have one specific, fixable cause. A working system produces, at most, a faint earthy smell when you open the lid. Anything sharper is a signal, not a mystery.
Most odor problems can be diagnosed quickly, and many can be fixed in under an hour. Some issues, including fan replacement, rewiring, vent rerouting, or black-tank connection repair, may take longer or need professional help. This guide covers every cause, so you know exactly what you are dealing with.
Does an RV Composting Toilet Actually Smell? (What’s Normal vs. What Isn’t)
A working RV composting toilet smells like soil at most. The fan creates a gentle negative pressure that pulls air downward into the bowl and pushes it out through the vent hose to the outside of the RV. That constant airflow keeps odor moving away from the bathroom.
Nature’s Head confirms that a properly functioning unit produces nothing worse than a slight earthy smell. That is what normal looks like.
If you’re getting anything sharper than that inside the RV, something specific has failed or needs adjustment. The sections below cover every known cause, in the order most likely to matter for an RV setup.
Not sure which model to switch to, or whether a composting toilet is right for your rig? Check our guide to the best composting toilet for RV first.
Smell Diagnosis: Use Your Nose to Find the Cause
Before working through the full guide, use this table to narrow down the most likely problem.
| Smell or Symptom | Most Likely Cause | First Thing to Check |
|---|---|---|
| Sharp ammonia smell | Urine bottle overfull or urine sitting too long | Empty and rinse the urine bottle |
| Sewage or fecal smell | Fan failure, or urine in the solids bin | Check fan power and airflow |
| Musty or damp smell | Excess moisture in the solids bin | Compost medium moisture level |
| Rotten egg or sour smell | Anaerobic breakdown from too much moisture | Compost medium moisture; check for urine contamination |
| Smell only while driving | Urine bottle too full; loose vent or bottle connection | Empty urine bottle before travel; inspect connections |
| Smell near the toilet base or floor | Failed bowl gasket, loose mounting, or old black-tank cap | Gaskets and floor connection |
| Smell outside near the vent | Often normal at low levels; may mean the vent is near a window or air intake | Vent outlet position relative to windows and vents |
| Odor with slow urine drainage | Blocked or kinked drain hose on drain-line models | Inspect the drain hose for kinks or blockage |
| Odor only when the fan stops | Fan-dependent negative pressure is lost | Restore fan power; check the fuse and 12V wiring |
| Odor stronger when agitating | Solids bin full, too wet, or contaminated with urine | Compost medium moisture and fill level |
Is Your Fan Running? (Fan and Electrical Power)
The fan is the most critical part of the odor control system. It creates the negative pressure that directs air downward into the bowl and out through the vent hose. When the fan stops or weakens, that negative pressure is lost and odors can collect inside the toilet or escape into the RV.
Nature’s Head’s troubleshooting guidance notes that the fan and vent working together are essential to keeping odors outside. Because the fan runs quietly, it is easy to miss when it stops or slows.
Work through these steps in order before assuming the fan needs replacing.
- Confirm the fan is spinning. Hold a thin strip of paper near the bowl opening with the lid open. It should be pulled gently downward. If it floats freely or lifts upward, the fan is not creating adequate suction.
- Check the 12V power source. Verify the circuit is live, and the connection to the fan is secure.
- Inspect the fuse. A blown fuse is a common cause of sudden fan failure and takes less than a minute to check.
- Inspect wiring and connectors. Look for corrosion, loose plugs, or damaged insulation along the cable run.
- Clean the fan blades and screens. Dust and debris reduce airflow. Use a dry brush or canned air. Do not use liquids near the fan housing.
- Check airflow at the exterior vent. Hold your hand at the outside outlet. A working fan produces a faint, constant stream of air.
- Inspect the full vent hose before concluding the fan has failed. A kinked or blocked hose causes the same symptoms as a weak fan.
- Replace the fan only after confirming that power is reaching it and the vent hose is clear. Replacement time and difficulty vary by model and installation.
For help tracing 12V wiring on your specific installation, see our guide on how to install a composting toilet in your RV.
Is the Vent Hose Blocked, Kinked, Leaking, or Installed Incorrectly?
The vent hose carries air and odor from the toilet to the outside. A problem anywhere along its length can cause smell to back up into the RV, even when the fan is running correctly.
Kinked or crushed sections are common where the hose bends around tight corners, especially if the installation has shifted. Run your hand along the full hose and feel for any spot that collapses or narrows.
Loose or disconnected joints at the toilet body, at any intermediate connectors, or at the wall or roof exit allow unfiltered air to bypass the fan’s negative pressure. Check every joint by hand and push them firmly together.
A damaged hose with cracks or small holes allows odor to leak before it reaches the outside. Flex the hose slightly and look for splits, especially near connectors.
Blocked insect screens at the exterior vent outlet are a common and overlooked cause of reduced airflow. Wasps, spiders, and mud daubers frequently build nests inside vent covers. Remove the cap and inspect or replace the screen.
Dust and debris inside the hose, especially near the exterior outlet, can accumulate over time and reduce airflow.
Too many bends or an excessively long vent run increase resistance and forces the fan to work beyond its design capacity. Check your model’s installation specifications for maximum hose length and the number of permitted bends.
Condensation inside the hose, particularly in cold climates, can accumulate and partially block airflow. Route the vent according to your toilet manufacturer’s instructions. Keep the run as short and straight as possible, avoid crushed sections and unnecessary bends, and do not allow deep sags where condensation can collect. A sidewall vent may slope slightly toward the exterior, while a roof vent will naturally rise. In cold climates, insulating the vent path may help reduce condensation.
Rainwater entering the vent cap can wet interior components and add moisture to the solids bin. Check the vent cap orientation and fit after heavy rain.
Vent outlet location matters. If the outlet is positioned near an open window, roof vent, or the RV’s fresh-air intake, odor that exits outside can be pulled directly back in. Repositioning the outlet or changing the cap direction may be necessary. Wind at highway speeds can also push air backward through a forward-facing outlet. If this appears to be a factor, use a manufacturer-approved exterior vent, directional cowl, or wind-protected cover. Avoid adding improvised elbows or screens that may restrict airflow.
The Urine Bottle: Overfull, Dirty, or Draining Slowly?
The urine bottle is the most common source of RV composting toilet odor, and the fix is usually the simplest.
Urine that sits in a warm, enclosed space begins to break down and release ammonia-like odors. The rate depends on temperature, hydration levels, medications, and other individual factors, so there is no single timeline that applies to everyone.
The most important rule is to empty the bottle before it overfills, rather than following a rigid schedule. Most models include a fill indicator or specify a capacity level in the manual. Use that as your guide.
After emptying, many manufacturers allow rinsing the urine container with warm water and diluted white vinegar to remove residue and reduce odor. Dilution ratios, frequency, and whether any liquid should remain in the bottle between uses vary by model. Check your manufacturer’s instructions before settling on a cleaning routine. The principle is that a lower-pH rinse limits the ammonia-forming process in any residual urine, but the correct method depends on your specific toilet.
A few additional steps consistently help. Clean the diverter funnel and drain channel regularly, since residue builds up there and contributes to ammonia odor at the bowl. Keep the lid closed between uses. Empty the bottle before any driving trip.
Is the Urine Drain Hose Blocked or Sending Odor Backward?
Some composting toilets, including certain OGO and Separett models, route urine through a drain hose to an external container or collection point rather than a removable bottle. These systems have a different set of odor causes.
A kinked drain hose is the most common problem. Even a partial kink restricts flow and allows urine to pool. Run your hand along the full length and check for tight bends or compressed sections.
Urine residue and mineral deposits can gradually narrow the drain hose or urine channel over time. Clean or flush the line only with a method and cleaner approved for your toilet model.
Poor downward slope prevents gravity drainage. The hose must slope continuously downward from the toilet to the collection point with no low spots where liquid can sit.
Loose fittings or a cracked hose allow urine odor to escape into the bathroom without the liquid being visible.
An unvented or poorly vented external container can develop pressure and push odor backward through the drain line.
Do not connect a composting toilet urine drain to the RV’s gray tank unless the toilet manufacturer’s installation documentation specifically permits it for your configuration. An incorrect connection can allow gray-tank gases to travel backward into the toilet and the bathroom.
What Happens When Urine Gets Into the Solids Bin?
When urine reaches the solids compartment, it raises the moisture level sharply. This disrupts the oxygen-rich aerobic conditions that the composting process depends on. Wet, compacted material can shift toward anaerobic breakdown, which produces ammonia-like, sewage-like, sour, or rotten odors depending on how far the process has progressed.
The Throne Composting Toilet identifies urine contamination as the most common cause of a true sewage smell in a diverting toilet.
Common causes include a blocked urine drain channel, toilet paper covering the drain holes, an overfull urine bottle, a misaligned diverter, user body position, or movement while driving. Inspect and clean the urine holes and drain channel before assuming the toilet design or user position is the problem.
Sitting usually makes urine separation easier. Some models allow standing use when the solids opening remains closed, so follow the instructions for your exact toilet. Children, guests, and anyone unfamiliar with the system may need a quick explanation before first use.
How to check: open the solids compartment and look at the compost medium. If it appears wet, clumped, or soggy rather than loose and slightly damp, urine has likely reached it. The smell often gets noticeably stronger when you agitate the handle.
If only a small amount of liquid entered the chamber, follow the manufacturer’s instructions for restoring the moisture balance. This may involve increasing ventilation, agitating the existing medium, or adding a small amount of approved dry material. If the medium is saturated, strongly odorous, or no longer mixes properly, empty and restart the chamber according to your manual. Waterless Toilet Shop explains that disrupting the carbon-to-nitrogen balance by adding excess liquid is what pushes the process into the anaerobic zone that causes foul odors.
For RVers who decide that the diverter system is not working for their household, our guide to the best porcelain RV toilet covers standard alternatives.
Is the Compost Medium Too Wet, Too Dry, or the Wrong Amount?
The compost medium in the solids bin, whether coconut coir, sphagnum peat moss, or another approved material, plays a central role in odor control. It acts as a physical filter, absorbs moisture, supports aerobic bacteria, and helps cover waste to limit odors from rising.
Different toilet designs manage the medium differently. Agitating toilets such as the Nature’s Head, Air Head, and OGO typically begin with a measured starting amount of medium. The medium breaks down gradually through use. These systems do not necessarily require a fresh scoop after every single use. Bucket-style or liner-style toilets often do require cover material to be added after each solid deposit. The correct routine and amount depend on your specific model, so follow the manufacturer’s guidance.
Signs that the compost medium needs attention:
Wet, soggy, or clumped medium usually means too much moisture has entered the bin, from urine contamination, condensation, cleaning water, or shower water.
Dry or slightly moist medium can be normal for many agitating toilets. However, material that becomes extremely dusty may be unpleasant to handle and can clog some fan screens. If the agitator becomes difficult to turn or dust appears to be reaching the vent system, check the preparation instructions for your model before adding water.
A handle that is hard to turn can mean the bin is full, the material has become too dense to mix, or the medium is too dry. Do not force the agitator, as this can damage the mechanism or crack the housing.
Loose, crumbly, and slightly moist material is the target condition for most agitating systems.
Too little starting medium leaves waste inadequately covered. Too much medium reduces the effective capacity of the bin and can make the handle difficult to turn before the bin is actually full.
Use the compost medium approved by the manufacturer for your model. Many systems accept coco coir or additive-free sphagnum peat moss, but preparation methods, hydration levels, and starting quantities vary by model and manufacturer. Do not substitute materials unless the manufacturer explicitly permits substitution.
Is the Solids Bin Full, Overloaded, or Too Compacted?
A full or overloaded solids bin is a reliable source of smell, even when the fan is working correctly. Once the bin is past its useful capacity, waste stays near the top of the chamber, the medium can no longer mix effectively, and odor has a shorter path to the air inside the RV.
Warning signs that the bin needs emptying:
The agitator becomes hard or impossible to turn. Waste is visible near the top of the chamber. The medium no longer mixes when you turn the handle. Odor appears despite a working fan and clean urine bottle. The model’s recommended capacity interval has been reached.
Do not force the agitator if it meets significant resistance. Forcing it can damage the mechanism or crack the housing.
Emptying and restart procedures vary by model. Some manufacturers recommend leaving a small amount of existing medium in the bottom of the bin to help restart the aerobic process more quickly. Others recommend a complete empty and fresh start. Follow your model’s manual for the correct procedure.
Check the Urine Bottle, Gaskets, and Bowl Seals
A small air leak anywhere in the toilet housing can bypass the fan’s negative pressure system and allow odor into the RV. Even a minor gap at the bottle connection, bowl gasket, or chamber lid gives odor an escape path that the fan cannot counteract.
What to inspect:
The urine bottle must be fully seated. A bottle that is slightly off-center or not pushed in all the way may not seal the connection correctly, allowing air to bypass the fan’s draw.
Inspect the urine bottle O-ring or seal for cracks, deformation, or debris on the sealing surface.
Check the bowl gasket, which is the seal between the bowl and the top of the toilet housing. A damaged or improperly seated gasket allows odor to escape around the bowl rim.
Check the solids chamber lid. If the lid does not close flat and seal tightly, odor can escape through the gap, especially when the lid is not the primary path for the fan’s airflow.
Inspect the fan housing gasket. A gap between the fan unit and the toilet body is a common source of small leaks that are easy to overlook.
Inspect the vent hose connector at the toilet body. A loose or cracked fitting here allows odor to escape before it reaches the exterior.
Check the urine diverter alignment. If the diverter has shifted or is not seated flat, gaps at the bowl can change how air flows through the system and allow odors past the diverter.
Why Does the Composting Toilet Smell Only While Driving?
Driving-related odor has its own set of causes, most of which can be addressed before each trip.
A urine bottle that is close to full will slosh and shift during travel, potentially overflowing or creating a gap in the bottle seal. Empty the urine bottle before driving, not after you arrive at the destination.
A bottle that is not fully seated can shift under vibration and open a gap in the connection. Check the bottle fit before pulling out.
Wind pressure at highway speeds can push air backward through the exterior vent outlet, particularly if the outlet faces forward or has no directional cap. If this appears to be a factor, check whether a manufacturer-approved directional cowl or wind-protected vent cover is available for your model.
An open roof vent or window near the toilet area can pull odor from the exterior vent back inside the RV while moving. Test by closing roof vents and windows near the bathroom and driving a short distance to see whether the smell changes.
Vent hose connections that seem secure at rest can work loose under vibration. Check every hose joint before long trips.
For toilets that drain urine through a hose to an external container, check that container and its connections before travel. A container that is full or not secured can spill or vent odor while driving.
If your RV previously had a standard toilet, the old black-tank cap at the floor inlet can shift under road vibration. If a driving-related smell started after switching to a composting toilet, inspect the floor cap.
Did Shower Water, Rain, or Condensation Enter the Toilet?
Excess water in the solids bin sharply reduces the oxygen available to aerobic bacteria, promotes anaerobic conditions, and produces odor quickly. This problem is especially common in wet-bath RV installations where the toilet sits in the same space as the shower.
If your toilet is in a wet-bath, check whether the lid was open or the bowl was exposed during showering. Many wet-bath composting toilet installations require a specific lid position or a protective cover during shower use. If your model came with a wet-bath cover accessory, use it every time.
A failed or cracked bowl seal allows shower water to run directly into the solids chamber.
Rain can enter through an exterior vent cap that lacks a proper cap, faces upward, or whose seal has deteriorated. Inspect the cap after heavy rain if odor increases suddenly.
Condensation can accumulate inside a long or uninsulated vent hose in cold climates, where warm, humid air from the bin meets a cold hose surface and deposits moisture at low points. Confirm the hose slopes continuously toward the exterior exit.
Cleaning water used inside the bowl can reach the solids chamber if the solids opening is exposed during cleaning. Check your manual for the correct cleaning procedure for your model.
Address the water source before continuing to use the toilet. If only a small amount of water entered the bin, follow the manufacturer’s recovery instructions. If the medium is saturated, strongly odorous, or no longer mixes correctly, empty and restart the chamber according to the manual.
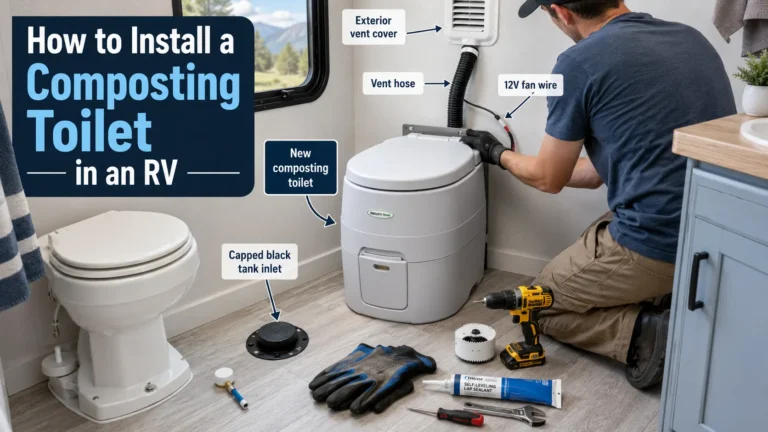
The Smell Nobody Expects: The Old Black Tank Connection
This is the cause most RVers never check. It can produce genuine sewage smell months after the composting toilet has been installed and working correctly.
When you switch from a standard RV toilet, the old black-tank inlet pipe under the bathroom floor must be closed. That closure prevents gas from the now-empty black tank from venting backward into the bathroom. If the plug is loose, cracked, or was not installed correctly, that is exactly what happens. The composting toilet itself can be performing perfectly while the smell comes from a completely separate source.
The pipe must be closed using a correctly sized mechanical plug: a rubber test plug, a gripper plug, or a permanent plumbing cap, installed and tightened according to the plug manufacturer’s instructions. Surface sealant alone must not be relied on to contain tank gases.
Safety steps when inspecting the floor connection:
Wear disposable gloves. Open windows and a roof vent to ventilate the RV before you begin. Avoid breathing directly over the open pipe. Clean any visible residual waste from around the fitting before reinstalling the toilet.
To inspect, lift or remove the toilet to access the floor connection. The plug should be firm with no movement and no gap around its edge. If it has shifted, replace it with the correct size mechanical plug installed per its instructions.
While you have access, confirm that the old black-tank roof vent is not blocked. If the black tank remains in the RV and still contains residue, also check that its roof vent is open. A blocked vent may contribute to pressure or odor problems. However, do not assume the roof vent is the cause until the floor plug, surrounding flange, and any remaining tank residue have been inspected first.
For full detail on capping the black-tank inlet correctly, see our guide on how to install a composting toilet in your RV. If you’re also dealing with residual odor from the old tank itself, the RV toilet smell after dumping guide covers how to clean and treat a tank that has been sitting idle.
How to Prevent RV Composting Toilet Smells
Once the current problem is resolved, a consistent routine keeps odor away.
Frequently Asked Questions
Why does my RV composting toilet smell worse in hot weather?
Heat accelerates the biological processes that produce odor. Urine breaks down faster, and evaporation from the solids bin increases, concentrating any existing odors. In warm conditions, check and empty the urine bottle more frequently than your usual routine. Confirm the fan is running correctly, since the ventilation that keeps things odor-free needs to keep pace with a faster breakdown rate. If the toilet is in a consistently hot area of the RV, improving overall bathroom airflow can also help.
Can I use essential oils, bleach, or deodorizers in an RV composting toilet?
Avoid essential oils, chemical deodorizers, bleach, antibacterial soaps, holding-tank chemicals, alcohol-based cleaners, and strong disinfectants unless the toilet manufacturer explicitly permits them for your model. These products can kill the aerobic bacteria that make composting work, making odors worse over time. For the urine bottle, rinsing with warm water and diluted white vinegar is commonly accepted, but check your model’s manual for the correct dilution ratio and procedure before making it a routine.
How often should I empty the urine bottle in an RV composting toilet?
Empty the bottle before it reaches full capacity, and before any driving trip. The correct interval depends on the number of users, the bottle’s capacity, and the ambient temperature. Use the fill indicator on your toilet if it has one, and follow your manufacturer’s guidance for your specific unit. In hot weather, you will likely need to empty more often than in cooler conditions.
Why does my composting toilet smell when I open the lid?
A brief earthy or soil-like smell when you open the lid is normal. A strong, sewage-like, or sharp ammonia smell when opening the lid usually means the fan has stopped, the solids bin is too wet, there is urine contamination in the medium, or the bin is past capacity. Work through the fan check first, then check the moisture level and fill level of the compost medium.
What do I do if my RV composting toilet still smells after trying everything?
Return to the diagnosis table and the 10-minute checklist and work through each step carefully. If you have confirmed the fan, urine bottle, vent hose, compost medium, and gaskets are all working correctly, the most likely remaining causes are the old black-tank connection and the vent outlet location. If the smell is sewage-like and comes from the floor area or appears only while driving, focus on the floor inlet cap. If odor appears outside near the vent and seems to come back inside, check whether the outlet is positioned near a window or fresh-air intake. Our RV toilet smell after dumping guide can help if you suspect the old black-tank system is still contributing.