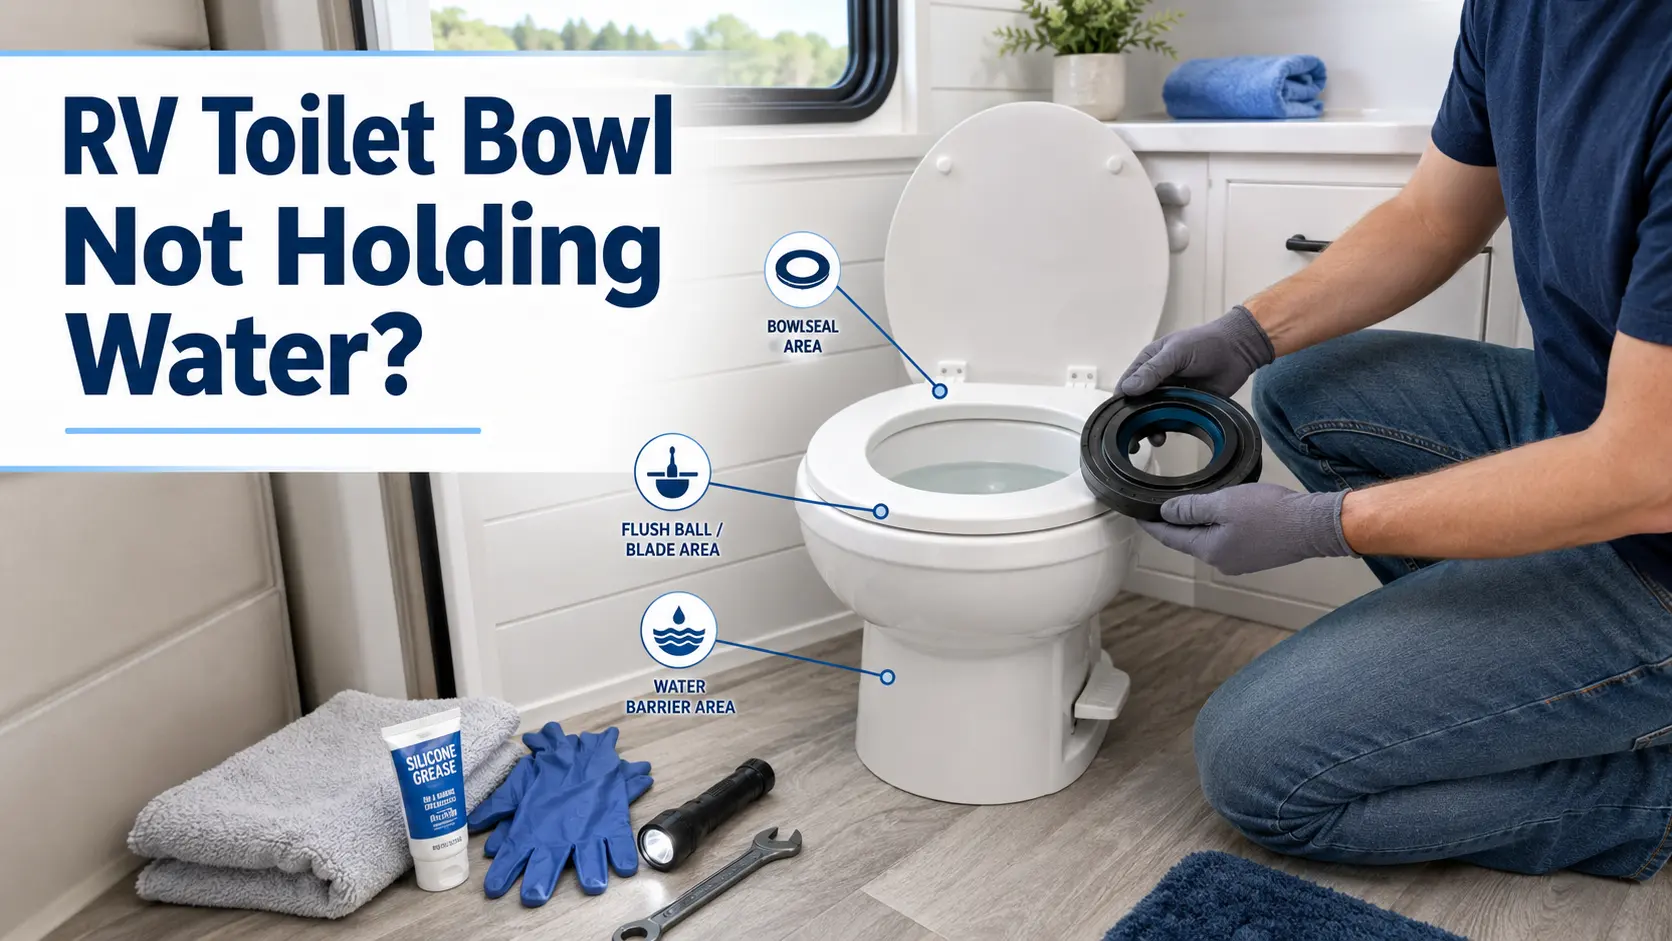
An RV toilet bowl that won’t hold water almost always has a blade seal problem. The seal could be dirty, dried out, worn, or not closing fully. Start by cleaning and lubricating the seal before buying anything. If that doesn’t work, a replacement seal (usually inexpensive, depending on your model) fixes it in about an hour. This guide covers every cause in order so you stop guessing and start fixing.
You fill the bowl before bed. An hour later, it’s dry.
That’s not just annoying. When your RV toilet bowl won’t hold water, there’s nothing blocking odors from the black tank. Your whole RV starts to smell, and it won’t stop until the bowl holds water again.
The good news: this is one of the most common RV toilet problems. In most cases, you don’t need any parts. You need to clean and lubricate the blade seal. This guide walks through every cause in order, from the quickest fix to the most involved, so you know exactly what to do at each step.
What Causes an RV Toilet Bowl to Not Hold Water?
The water-holding seal at the bottom of your RV toilet bowl is no longer forming a watertight barrier. It could be dirty, dried out, cracked, or not closing fully. In most cases, cleaning and lubricating the seal fixes the problem right away. If it doesn’t, a replacement seal will.
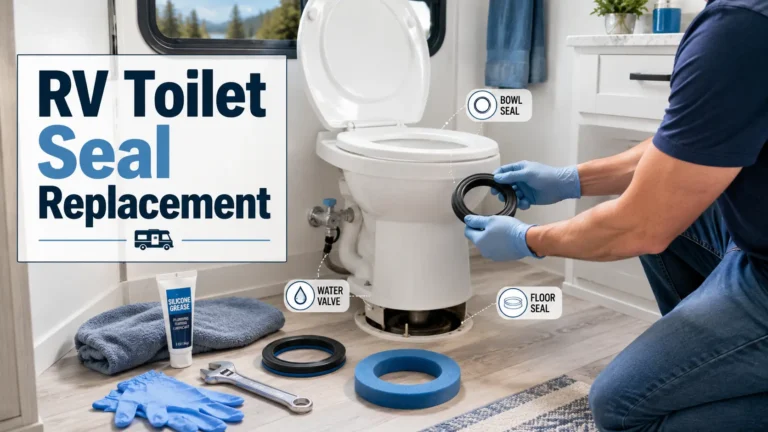
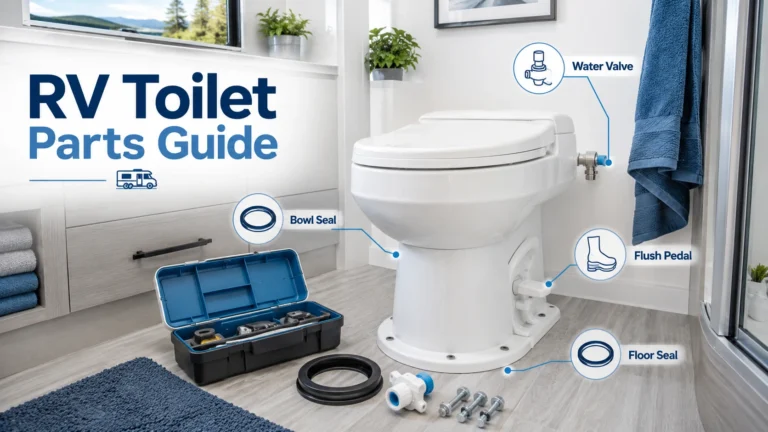
You’ll see this part called different names depending on the toilet brand and design: blade seal, flush ball seal, and bowl seal all refer to the same component. This guide uses “blade seal” throughout, but the fixes apply regardless of what your manual calls it.
This seal is one of the most common failure points on an RV toilet. It sits at the bottom of the bowl and creates the water barrier that blocks odors from the black tank below. Without it, you get a dry bowl and a smelly coach.
Quick Diagnosis: How Fast Is the Water Disappearing?
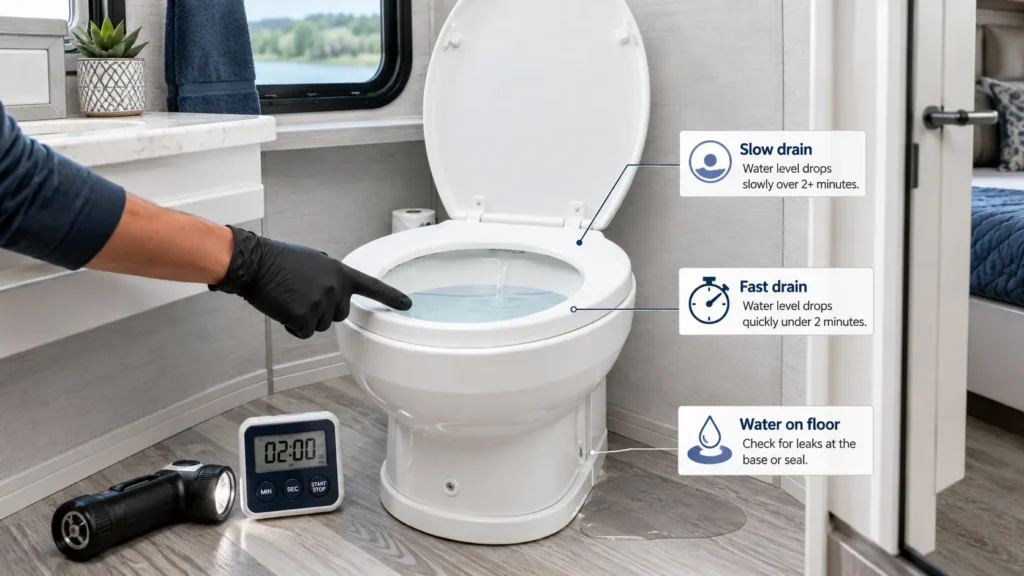
Fill the bowl with water and watch it. How fast it drains tells you which cause you’re dealing with before you touch anything.
Drains slowly over 30 to 60 minutes: Debris is stuck in the seal groove, or the seal is slightly dry. Start with cleaning and lubricating.
Drains in under 10 minutes: The seal is dried out and hardened, or it’s worn out. More likely if the RV has been sitting in storage.
Never fills, or drains almost immediately: The flush ball isn’t closing fully. The blade may be cracked, scratched, or deformed from the wrong lubricant.
Water on the floor, not just a dry bowl: That’s a floor flange gasket failure, not a blade seal issue. See the complete RV toilet repair guide for base leaks.
Before you start: Turn off your water pump and disconnect from city water. Have rubber gloves, a soft cloth, and warm water ready. Don’t use metal tools, abrasive scrubbers, bleach, or any petroleum-based product near the seal. These cause more damage than the original problem.
Cause 1: Debris Stuck in the Seal Groove
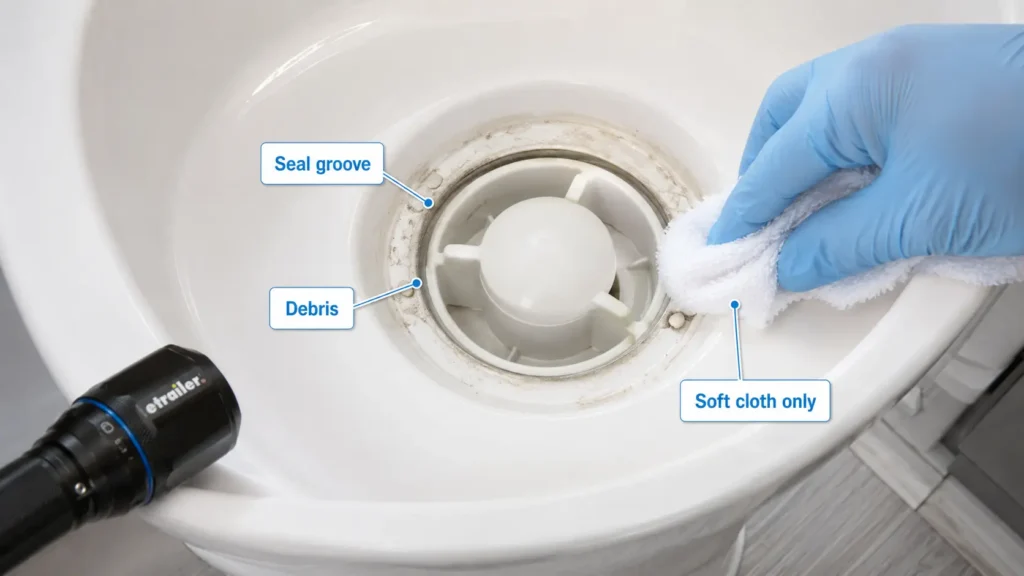
A small piece of toilet paper, mineral scale, or waste residue caught in the seal groove is enough to prevent the blade from closing fully. This is the most common cause of an RV toilet bowl not holding water, and it costs nothing to fix. Clean the seal before you buy anything.
Here’s how:
- Put on rubber gloves.
- Fill the bowl with a few inches of water.
- Run your finger around the entire blade seal groove, feeling for grit or buildup.
- Wipe the seal surface clean with a soft, damp cloth. Don’t use bleach, harsh cleaners, or abrasive pads.
- Refill the bowl and wait 30 minutes.
If the bowl holds water after cleaning, you’re done.
Use only RV-safe products around the seal. Standard household bathroom cleaners break down rubber over time. If you need a cleaning product, look for one labeled safe for RV toilet seals.
Cause 2: Dry or Hardened Seal After Storage
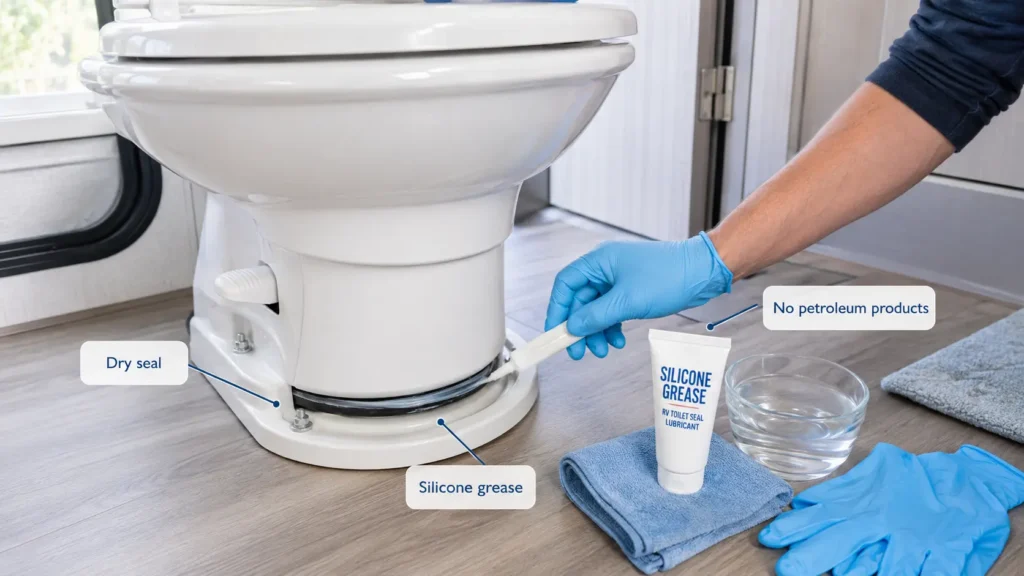
RV toilet seals are rubber. Rubber needs moisture to stay flexible. When an RV sits unused for weeks or months, especially in dry or cold conditions, the blade seal dries out and hardens. A hardened seal can’t compress enough to form a watertight contact with the flush ball.
This is the most common cause at the start of camping season, right after winterizing, or when buying a used RV that’s been sitting on a dealer lot.
To fix a dry seal:
- Pour 2 to 3 cups of hot (not boiling) water into the bowl. Let it sit for 10 to 15 minutes. Heat makes rubber pliable again.
- Apply RV toilet seal lubricant around the entire seal. Thetford Seal Lube and Conditioner or plumber’s silicone grease both work.
- Work the foot pedal back and forth several times to spread the lubricant evenly.
- Refill the bowl and check after 30 minutes.
If you just de-winterized your RV and the bowl won’t hold water, this is almost certainly why. See our guide on how to use an RV toilet after winterizing for the full process.
Cause 3: Worn or Damaged Bowl Seal
Even with regular lubrication, RV toilet seals wear out. Most last 4 to 6 years with proper care. A seal that’s cracked, torn, or permanently stiff won’t hold water no matter how much lubricant you add.
Signs the seal is past saving:
- Visible cracks or tears in the rubber
- The seal feels stiff and won’t soften after soaking in hot water
- You’ve cleaned and lubricated it multiple times with no lasting improvement
- The bowl holds water for a few days, then starts leaking again
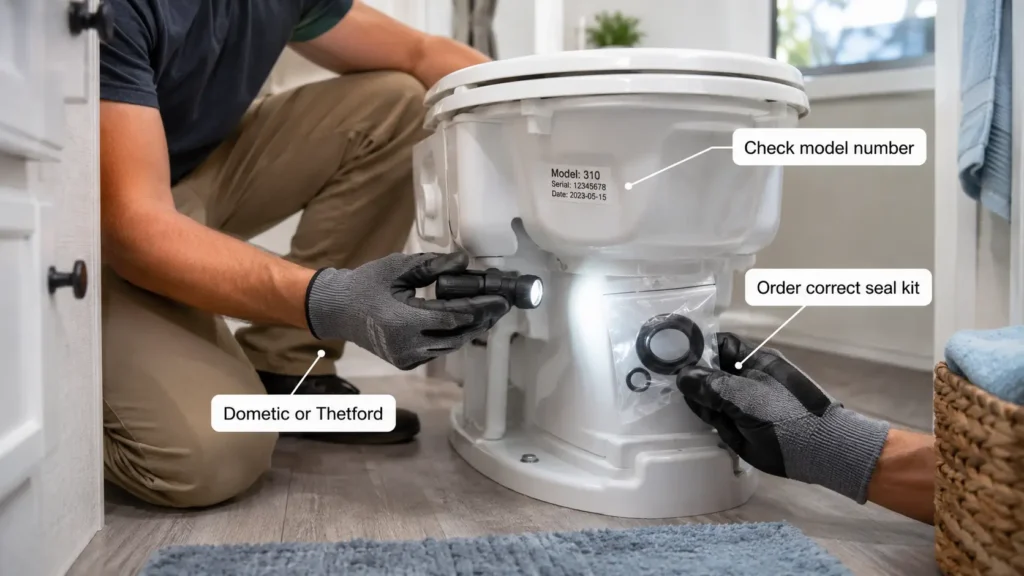
At this point, replace the seal. Parts are usually inexpensive (often under $30, depending on your model), and the job takes about an hour. Full step-by-step instructions are in our RV toilet seal replacement guide.
Before ordering, find your toilet’s model number. Check the underside of the seat, the rear of the base, or a label near the water supply line. Thetford and Dometic both make models that look identical but use completely different seal kits. Order by model number, not brand alone.
Cause 4: Flush Ball or Blade Not Closing Properly
If the flush ball or blade doesn’t return to its fully closed position after flushing, water drains straight through to the black tank regardless of seal condition. Watch the ball closely after flushing. It should snap shut completely with no visible gap.
There are three reasons this happens:
Scratched or nicked flush ball surface. A scratch acts like a channel. Water runs along it even when the ball looks closed. This usually comes from using abrasive scrubbers inside the bowl. If the ball is visibly scratched, the flush valve assembly needs replacing, not just the seal.
Petroleum-based lubricants. Vaseline, WD-40, and cooking spray cause rubber to swell and deform over time. A swollen seal or ball can’t close or seat properly. If you or a previous owner used these products, replace the seal and start fresh with the correct lubricant.
Debris in the ball housing. With the toilet removed, inspect the housing and rinse it clean. A small piece of grit can prevent full closure.
For a full breakdown of RV toilet parts and how each one fails, see the RV toilet parts guide.
Still Not Holding Water After Replacing the Seal?
This comes up constantly in RV forums. You replaced the seal. The bowl still drains. Here’s what to check.
Wrong seal ordered. If you ordered by brand name instead of model number, the seal may not fit the bowl geometry. Even a slight mismatch prevents a proper seal. Order by model number only.
Overtightened base bolts. This is a known issue on Thetford toilets. Overtightening the two base bolts can warp the toilet base slightly, which misaligns the seal groove. Try loosening the bolts slightly and testing again.
Hairline crack in the bowl. Fill the dry bowl with water and inspect the inner surface carefully. Hold a flashlight at an angle and look for a thin dark line. A hairline crack is easy to miss but impossible to seal. If the bowl is cracked, no seal replacement will help.
Recurring seal failures. Some RV owners report replacing the seal multiple times within a year, only to have it fail again. User reports on RV forums suggest this can happen when the seal material and bowl geometry aren’t a great match on certain models. If you’re on your third seal in under a year, contact the manufacturer directly before buying another replacement. There may be a warranty option, a revised part number, or a known fix specific to your model.
Dometic vs Thetford: What’s Different?
These two brands cover most of the RV toilets on the road. The seal replacement process varies by model, so always check your toilet’s manual before starting.
Thetford Aqua-Magic series: On many Thetford models, the blade seal is accessed from underneath, which means removing the toilet to replace it. Some newer models may allow different access, so check your specific model’s manual first. The official Thetford seal kit typically includes a lubricant packet inside the box. Don’t throw it out.
Dometic toilets: Seal access and replacement method vary by model. Some Dometic models allow seal replacement through the bowl opening without removing the toilet, while others require full removal. Before ordering any parts or starting any repair, check the manual for your specific model number. Dometic manufactures several toilet models that look nearly identical but use different seal kits. Ordering the wrong kit is one of the most common and frustrating mistakes.
If you don’t have your manual, Dometic and Thetford both offer downloadable PDF manuals on their official support pages. Always use your exact model number when searching.
What Products Should You Never Use on an RV Toilet Seal?
The wrong lubricant is one of the main reasons RV toilet seals fail ahead of schedule. Using petroleum-based products on an RV toilet seal causes the rubber to swell, deform, and break down faster than normal wear alone.
Never use:
- Vaseline or petroleum jelly: Petroleum degrades rubber over time
- WD-40: petroleum-based, same problem
- Cooking spray: leaves residue, not designed for rubber seals
- Bleach or harsh bathroom cleaners: dry out and crack rubber
Use instead:
- RV toilet seal lubricant (Thetford brand or equivalent)
- Plumber’s silicone grease (non-petroleum)
The rule is simple. If it has petroleum in it, keep it away from the seal.
When Should You Replace Your RV Toilet Seal?
Replace the blade seal when cleaning and lubricating no longer keeps the bowl holding water, when the seal is visibly cracked or torn, when the bowl holds water briefly then starts leaking again within days, or when you haven’t replaced it in 4 to 5 years.
Parts are usually inexpensive depending on your model. Budget about an hour for the job. Full instructions are in the RV toilet seal replacement guide.
When to Replace the Whole Toilet
Most bowl-not-holding-water problems are solved with an inexpensive replacement seal. But replace the entire toilet when:
- The bowl itself is cracked
- Multiple components are failing at the same time
- You’ve replaced the seal multiple times and it keeps failing within months
- The toilet is 10 or more years old and repairs aren’t lasting
- Repair cost is approaching 50% of what a new toilet costs
Entry-level replacement toilets start around $100 and go up depending on the brand and model. Professional installation adds labor cost on top. In some cases that’s still cheaper than chasing recurring failures on an old unit.
A dry RV toilet bowl is almost always a seal problem. Start by cleaning and lubricating. That fixes it more often than you’d think. If it doesn’t, replace the seal.
Two mistakes cause more unnecessary replacements than anything else: using petroleum-based products on the seal, and ordering parts by brand name instead of model number. Avoid both and you’ll have far fewer problems.
For a full walkthrough of every common RV toilet issue, start with the complete RV toilet repair guide.
Frequently Asked Questions
Why does my RV toilet bowl not hold water after winterizing?
The blade seal dried out while the RV was in storage. Rubber loses flexibility without moisture. Pour hot water into the bowl and let it sit for 10 to 15 minutes, then apply RV seal lubricant. This restores flexibility in most cases without any parts replacement needed.
How long should an RV toilet seal last?
With lubrication every 6 months, a blade seal typically lasts 4 to 6 years. In hard water areas or with frequent use, inspect it every 3 years. Once the bowl stops holding water, replace the seal promptly. A dry seal wears out much faster once it starts leaking.
Can I use Vaseline on my RV toilet seal?
No. Vaseline is petroleum-based and degrades rubber over time. It may seem to work briefly, but it causes the seal to swell and fail faster. Use RV-specific seal lubricant or plumber’s silicone grease instead.
My RV toilet still won’t hold water after I replaced the seal. What now?
Check three things. First, confirm you ordered the seal by model number, not brand. Second, check if the base bolts are overtightened, which can warp the toilet base on Thetford models. Third, inspect the bowl for a hairline crack using a flashlight held at an angle. A cracked bowl can’t be sealed.
How do I know if the flush ball is the problem or the seal?
Watch the flush ball close after flushing. If it seats fully with no gap, the ball is fine, and the issue is the seal. If there’s a visible gap or the ball surface is scratched, the flush valve assembly needs replacing. Scratches act like channels and let water drain through even when the ball looks closed.