TL;DR: An RV composting toilet that’s too wet has several common causes: urine in the solids bin, over-watered coir at setup, a weak or failed fan, high ambient humidity, shower water in a wet bath, or rain entering through the exterior vent. For mild cases, add dry coir and confirm the fan is running. A soupy bin with strong odor needs a full empty and restart. This guide covers all major causes, a quick rescue decision table, and model-specific notes.
An RV composting toilet that’s too wet is a common maintenance problem owners run into. You lift the lid, turn the handle, and find a soggy mess instead of the dark, earthy crumble you expected.
You likely switched to a composting toilet to get away from black tank headaches. No more Dometic RV toilet base leaks, no more failed tank sensors, no more chemicals. But composting toilets have their own maintenance challenge, and moisture is the main one.
Here is the reality: a wet solids bin almost always has a specific, fixable cause. In most cases you can rescue it without emptying the whole unit.
This guide covers the common causes of an RV composting toilet getting too wet, how to diagnose your specific situation, and what to do about it today.
Why Is My RV Composting Toilet Too Wet?
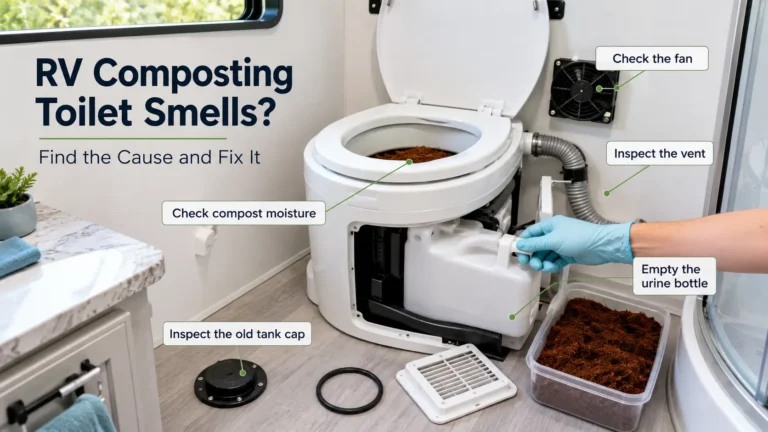
An RV composting toilet gets too wet when moisture enters the solids bin faster than the fan and coir can remove it. Common sources include urine contaminating the solids side, over-watered coir, a fan that isn’t running, ambient humidity, and RV-specific issues like shower water or rain getting into the exterior vent. Identifying the specific source is the first step toward fixing it.
A healthy solids bin should feel like slightly moist soil, not wet mud. Nature’s Head confirms that the ideal state is dry or slightly moist compost, and that an overly wet bin leads directly to odor problems. When the bin gets too wet, aerobic bacteria lose access to oxygen and composting stalls. The result is a sludge-like mix that smells bad and fills up faster than expected.
The good news is that the cause is usually identifiable within a few minutes.
Quick Fix: Should You Rescue It or Empty It?
Before going through every cause in detail, check the bin and use this table to decide what to do right now. Minor wetness can be corrected in place. A soupy, anaerobic bin cannot.
| What You’re Seeing | What It Likely Means | First Step |
|---|---|---|
| Damp and clumpy, no strong odor | Slightly too much moisture, still manageable | Add dry coir in small handfuls; check fan is running |
| Wet with ammonia smell | Urine likely getting into the solids bin | Check urine diverter and urine drain path |
| Soupy texture or visible liquid | Bin is past the rescue point | Empty and restart |
| Handle hard or impossible to turn | Bin overfull, compacted, or too wet | Check fill level; empty if needed |
| Wet after rain or travel | Rainwater or condensation through vent | Inspect exterior vent cap and hose connection |
If you’re in the first or second row, work through the fixes below. If you’re in the third row, skip straight to the empty and restart section.
Common Causes of a Wet Composting Toilet in an RV
1. Urine Getting Into the Solids Bin
This is a common cause of both wetness and bad smell. Supersize Life’s long-term composting toilet review found that if you started with dry compost and a smell developed, the solids tank is almost certainly contaminated with urine.
Urine contains high levels of nitrogen. Nitrogen feeds anaerobic bacteria, which produce foul, sulfurous odors. Freeranging Designs explains that wet, anaerobic conditions are precisely what causes the rotten smell associated with a poorly functioning composting toilet.
Common reasons urine ends up in the solids bin:
- Wrong body positioning (sitting too far back on the seat)
- A clogged or incorrectly seated urine diverter
- The trap door left open during urination
- A small bowl design that lets urine splash over the divider
Fix the positioning first. Then inspect the diverter for clogs or misalignment.
2. Over-Watered Coir at Setup
Compressed coir bricks need rehydrating before use, and most people add too much water. Wild Oak Trail’s coir preparation guide is clear: squeeze a handful and you want a few drops to come out, not a stream. If it’s dripping freely, the coir is too wet before you’ve even started.
Coir is supposed to absorb moisture from waste. Starting with saturated coir removes that buffer from day one.
3. A Fan That Isn’t Keeping Up
The fan evaporates moisture from the solids bin continuously through the vent hose. If the fan stops, slows down, or the vent hose is kinked or blocked, moisture builds up with nowhere to go.
Nature’s Head recommends running the fan continuously whenever the toilet is in regular use, particularly in humid environments. The fan can be unplugged during extended periods of non-use when there is a risk that the medium may dry out too much over several weeks without any moisture input from waste. For everyday use, it should stay on.
4. High Ambient Humidity
The FitRV documented this problem during RV travel: in very high-humidity states, their emptying cycle dropped from nearly 10 days down to just 3 days. In 98% humidity, the toilet never fully dried out.
The fan can only evaporate moisture when the outside air is drier than the inside of the bin. In very humid climates, that equation reverses. This is an adaptation problem, not a product failure.
5. Shower Water Entering in a Wet Bath
RVs with a wet bath setup (shower and toilet sharing the same space) can direct shower spray and floor runoff into the toilet bowl and down into the solids bin. If your RV composting toilet is in a wet bath, moisture from the shower is a source worth investigating. For other ways water and condensation cause problems in shared bathroom setups, see our composting toilet smells guide.
Keep the toilet lid fully closed during showering. Check whether your installation includes a seal around the base to prevent floor water from reaching the bin.
6. Rainwater Entering Through the Exterior Vent
The exterior vent is where the fan exhausts air from the bin. If the vent cap is damaged, missing, or installed in a position that collects rain (for example, facing upward on a flat surface), water can flow back through the hose and directly into the bin.
Inspect the exterior vent cap after heavy rain or when traveling through wet weather. The cap should face downward or have a design that deflects water away from the opening. Check the hose itself for visible moisture after rain.
7. Too Much Toilet Paper in the Solids Bin
Toilet paper takes up volume, holds moisture, and can wrap around the agitator. Some owners keep all toilet paper out of the solids bin and dispose of it separately. If moisture is already a problem, removing toilet paper from the bin is one of the faster ways to reduce both bulk and moisture retention.
8. Solids Bin Overfilled or Compacted
Nature’s Head notes that when the agitator handle becomes difficult to turn, there is more solid waste than compost material in the bin. That’s the time to empty.
An overfull or heavily compacted bin also traps moisture. Air can’t circulate through a packed bin, so the fan becomes less effective at evaporation. Regular agitator turns after each use prevent compaction from building up.
9. Diarrhea or High-Liquid Waste
Illness-related waste is significantly wetter than normal solid waste. A single episode can introduce a large amount of liquid into the solids bin, especially if the urine diverter isn’t perfectly positioned in the moment.
If this happens, add dry coir immediately after and turn the agitator. Don’t wait. The faster you introduce dry carbon material, the better the chance of keeping the bin aerobic.
10. Stored Coir That Has Already Absorbed Humidity
The Boat Galley notes that coir bricks should be stored in sealed containers away from moisture, because coir absorbs ambient humidity when left open. A brick stored unsealed in a humid RV bathroom may already be partially saturated before you add any water to it.
If your replacement coir feels spongy or crumbles into damp powder without any water added, it has already absorbed enough ambient moisture. Use it with little to no additional water, then do the squeeze test before loading.
How Do You Fix a Composting Toilet That Is Too Wet?
For mild cases, add small handfuls of dry coconut coir, turn the agitator after each addition, and verify the fan is running with an unobstructed vent. This usually stabilizes a wet bin within 24 to 48 hours. For severe cases with liquid pooling or strong anaerobic odor, a full empty and restart is the faster and more reliable option.
Here is the step-by-step rescue sequence:
Step 1: Do the squeeze test. Put on a nitrile glove and grab a handful from the bin. Squeeze firmly. A few drops is normal. A steady stream means it’s too wet. Liquid running freely means the bin is past the rescue point.
Step 2: Add dry coir in small handfuls. Don’t tip in a full brick at once. Add one or two handfuls of dry coir and turn the agitator handle 5 to 6 times. Wait a few hours and check the texture again. Repeat until the moisture drops.
Step 3: Verify the fan is running. Hold your hand at the exterior vent opening. You should feel a constant, light airflow. If you feel nothing, the fan has stopped or the vent is blocked. Check the 12V connection and the fuse before assuming the motor has failed.
Step 4: Check the urine diverter. Open the toilet and look for urine residue on the solids side of the diverter. If it’s there, urine has been crossing over. Adjust your sitting position going forward and clean the diverter with a vinegar spray.
Step 5: Increase airflow around the toilet. CompoCloset recommends opening windows in the RV bathroom to bring in fresh air. Even a small increase in surrounding airflow helps the fan do its job.
If the bin is liquid enough to pour, skip these steps and go straight to a full empty and restart.
For a smell alongside the moisture problem, the RV composting toilet smells guide covers the diagnostic steps for every odor type in detail.
How Much Water Should You Add to Coconut Coir?
For a standard compressed coir brick, the target is the texture of a well-wrung sponge: damp throughout, but not wet mud, and not dripping when squeezed. Start with less water than you think you need. You can always add a small amount more. Adding too much at once is the harder problem to fix.
Preparation steps:
- 1 Add water gradually, in small amounts. Do not pour it all in at once.
- 2 Seal the bag or close the bucket and let the coir absorb for at least 30 minutes before opening.
- 3 Break up any dry pockets by hand and check the texture throughout.
- 4 Do the squeeze test: squeeze a tight handful and only a few drops should appear. Dripping freely means it’s too wet. Let it drain or mix in some dry coir before loading it into the bin.
- 5 Store any extra prepared coir in an airtight container for the next use. Loose, unsealed coir absorbs humidity from the air.
The Boat Galley notes that coir swells as it absorbs moisture from waste over the course of a cycle. Fill the solids bin to just below the agitator bar rather than flush with it. Starting slightly lower prevents the handle from jamming and the bin from compacting mid-cycle.
Prepare your coir the day before first use if you can. That extra time lets it equilibrate so you can spot and correct any over-watering before waste goes in.
When to Empty the Bin and Start Over
If the coir is liquid enough to pour, adding dry coir won’t fix it. At that point the bin needs to come out.
Otherworld Travels documented exactly this scenario: liquid appeared in the back of the solids tank by week two. They added dry coir as recommended. The next morning the bin had gone fully anaerobic with a strong smell. The rescue approach hadn’t worked and they had to do a full empty.
The signs that you’re past the rescue point:
- ✕ Strong anaerobic smell that doesn’t improve after adding dry coir
- ✕ Visible liquid pooling inside the bin
- ✕ Soupy, unstructured texture throughout
- ✕ Mold patches forming around the bin edges or walls
How to handle a full empty safely:
- 1 Put on gloves and a mask.
- 2 Take the toilet outside or to a well-ventilated area.
- 3 Remove the solids bin following your model’s instructions.
- 4 Seal the contents in a bag and dispose of it in the trash. Do not dump it at an RV dump station or on the ground.
- 5 Rinse the empty bin with a vinegar and water solution and let it air dry completely before reloading.
- 6 Start fresh with correctly prepared coir and verify the fan is running before use.
Does a Wet Composting Toilet Mean the Fan Has Failed?
Not always. But a fan that has failed or slowed down is a common cause of moisture buildup in the solids bin, and it’s one of the easiest things to check. The fan creates a continuous stream of air that draws moisture out of the bin and pushes it through the vent hose to the outside of the RV. Without it, moisture has nowhere to go.
Nature’s Head recommends running the fan continuously whenever the toilet is in regular use, especially in humid environments. The fan can be unplugged during extended non-use periods where the medium may dry out too much without any input from waste, but for everyday use it should stay on.
How to test the fan in three steps:
- Hold a strip of tissue near the bowl opening. It should flutter gently toward the bowl.
- Go outside and hold your hand at the exterior vent outlet. You should feel a steady, light stream of air.
- Listen for a faint hum from the fan housing on the side of the toilet.
If none of those signals are there, check the 12V connection and the fuse. A loose wire is more common than a failed motor.
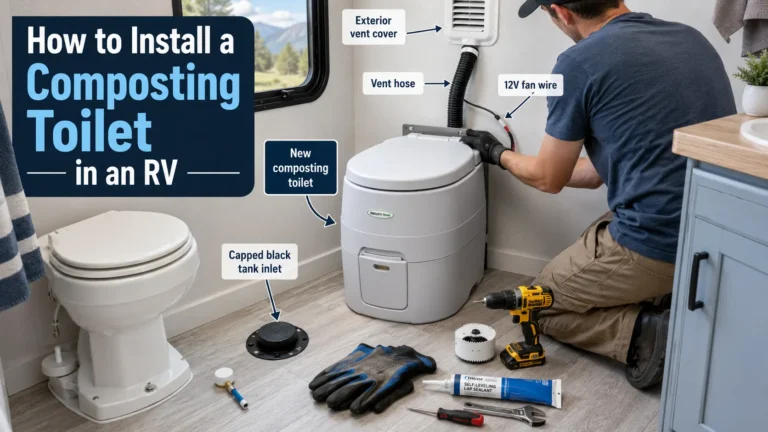
If the fan does need replacing, parts are available from your toilet’s manufacturer or through Amazon. For vent routing and fan wiring details, the composting toilet installation guide walks through the full process.
What Not to Do When a Composting Toilet Is Too Wet
Some common fixes make the problem worse. Avoid these.
Do not add a full dry coir brick at once. Dumping an entire brick into an already wet bin creates a dense, airless mass that the agitator can’t work through. Add coir in small increments and turn the agitator between additions.
Do not force a stuck agitator handle. If the handle is hard to turn, the bin is overfull, too compacted, or too wet. Forcing it can crack the housing or snap the agitator shaft. Empty the bin first.
Do not turn the fan off during regular use. The fan is the primary moisture management tool. Switching it off, even overnight, lets humidity build in the bin. The only exception is extended non-use where the medium may over-dry over several weeks without any moisture input from waste.
Do not use bleach or harsh chemical cleaners. Bleach kills the aerobic bacteria that do the composting work. If you need to clean the bowl, use a vinegar and water spray or a product approved by your toilet manufacturer. Check your manual before adding anything to the bin.
Do not dump solids at an RV dump station. RV dump stations are designed for liquid waste from black and gray tanks. Solid compost from a composting toilet goes in a sealed bag in the trash. Check local regulations in your area for any additional rules.
Do not ignore a clogged urine diverter. A clogged or misaligned diverter is one of the fastest ways to create a wet, smelly bin. Inspect it regularly and clean it with vinegar spray. A small buildup can redirect urine into the solids bin within a single use.
How Do You Prevent an RV Composting Toilet from Getting Too Wet?
The most effective prevention is running the fan continuously during regular use, preparing coir to the correct moisture level at the start of each cycle, and checking the bin texture every few days in warm or humid conditions. Those three habits prevent the majority of moisture problems.
Beyond those basics, a few RV-specific adjustments help in challenging conditions:
Shorten your emptying cycle in summer. If a two-person household normally runs a 6 to 8 week cycle, drop to 4 weeks during peak humid months. A less full bin is easier to keep dry.
Upgrade the fan in humid climates. The stock fans on most composting toilets are sized for average conditions. If you regularly camp in high-humidity areas, a higher-output replacement fan makes a real difference in evaporation rate.
Consider drying agents for persistent moisture issues. Some owners add a small amount of food-grade diatomaceous earth or PDZ (Sweet PDZ) to the solids bin to help absorb excess moisture. These are generally compostable and considered safe for composting applications by many users. That said, check your toilet manufacturer’s guidance before adding drying agents, since recommendations vary by model. Do not use pool-grade diatomaceous earth, which is chemically treated.
Keep toilet paper out of the bin when moisture is already a problem. Toilet paper holds moisture and adds bulk. Put it in a separate trash container until the bin stabilizes.
Inspect the exterior vent cover regularly. Check that the vent cap is intact, positioned correctly, and free of debris or insect blockages. A damaged or blocked vent reduces airflow and can let rain in.
If moisture problems persist regardless of what you try, it may be worth considering whether your current model has adequate fan strength and urine separation geometry for your climate. Our best composting toilet for RV guide covers the top models with notes on performance in different conditions.
If you’ve decided a composting toilet isn’t the right fit and want to return to a flush toilet, the best RV toilet replacement guide covers current Dometic and Thetford options with rough-in measurements.
Model-Specific Notes
Every composting toilet handles moisture a little differently. Always check your model’s manual for the exact fill level, fan setup, and cleaning rules. Here are general notes on common models.
Nature’s Head Uses coir or peat moss as the composting medium. Fill the solids bin to just below the horizontal agitator bar. The fan runs on 12V DC and should stay on during regular use. Nature’s Head recommends running the fan continuously in humid environments. The agitator handle getting hard to turn is the sign to empty.
Air Head Similar separation and function to the Nature’s Head, with a more compact footprint suited to smaller RV bathrooms. Uses coir or peat moss. The bin geometry is narrower, which affects how coir fills and how you position yourself during use. Check the Air Head manual for their specific fan and substrate guidance.
OGO Uses an electric motor to agitate the solids bin rather than a manual crank handle. The fill level, substrate amount, and agitation frequency differ from crank-handle models. Follow OGO’s specific guidance, since the powered agitator changes what works for moisture management.
Cuddy and Cuddy Lite (CompoCloset) These use a layering approach rather than a rotating drum. You add a scoop of coir after each use instead of preparing a full bin charge at the start of a cycle. CompoCloset’s moisture guide covers their specific recommendations. The Cuddy can be externally vented, which significantly improves moisture management in humid RV setups.
Conclusion
An RV composting toilet that’s too wet is almost always fixable. Check the urine diverter first. Then the fan. Then how you prepared the coir. In most cases, one of those three is the problem.
Three points worth keeping in mind:
- A few drops when squeezing coir is correct. A stream means it’s too wet.
- The fan should run continuously during regular use, especially in warm or humid conditions.
- Urine contamination is a leading cause of both wetness and bad smell in the solids bin.
If the bin has gone fully liquid, empty it and restart. A clean bin with correctly prepared coir and a working fan will be back to normal within a day.
Frequently Asked Questions
Can I add dry coconut coir to a wet composting toilet without emptying it?
Yes, for mild to moderate cases. Add small handfuls of dry coir and turn the agitator handle after each addition. Don’t add a full batch at once. If the bin is liquid enough to pour or has gone anaerobic with a strong sewage or sulfur smell, skip the rescue attempt and do a full empty and restart.
Why does my composting toilet get wet faster in hot weather?
Warmer temperatures speed up the composting process, which generates additional moisture as a byproduct. High ambient humidity also reduces the fan’s ability to evaporate moisture from the bin. Nature’s Head recommends running the fan continuously and checking compost moisture more frequently in warm or humid conditions.
How do I know if urine is getting into the solids bin?
The clearest signs are an ammonia or sewage smell alongside a wet bin, plus urine residue visible on the solids side of the diverter when you inspect it. Supersize Life found that if you started with dry coir and the bin became wet quickly without any fan issues, urine contamination is almost certainly the cause. Adjust your sitting position and clean the diverter with vinegar spray.
What’s the correct moisture level for coconut coir in a composting toilet?
The goal is the texture of a well-wrung sponge. Wild Oak Trail’s squeeze test gives a clear benchmark: squeeze a handful firmly and only a few drops should appear between your fingers. Dripping freely means too wet. No moisture at all means too dry. Both need correcting before the coir goes into the bin.
Can I use diatomaceous earth to dry out a wet composting toilet?
Some owners use food-grade diatomaceous earth to absorb excess moisture in the solids bin, and it’s generally considered compostable and safe for the decomposition process. That said, check your toilet manufacturer’s guidance before adding drying agents, since recommendations vary by model. Do not use pool-grade diatomaceous earth, which is chemically treated and not appropriate for composting.
Can rain make my RV composting toilet too wet?
Yes. If the exterior vent cap is damaged, missing, or positioned where water pools, rainwater can flow back down the vent hose and into the solids bin. Check the vent cap after heavy rain or after driving through wet weather. The cap should deflect water away from the opening, not collect it.