
If your RV toilet is flushing slowly, smelling worse than usual, or your black tank reads “Full” even after a recent dump — you may be dealing with an RV pyramid plug. Also called a poop pyramid or RV black tank pyramid clog, this is one of the most common and most dreaded problems in RV ownership. And almost every time, it comes down to one or two very fixable habits.
The good news is that you don’t need a plumber, a service appointment, or expensive tools to remove a pyramid plug from your RV black tank. With hot water, enzyme treatment, and an inexpensive tank wand, most RVers can dissolve a poop pyramid in their RV completely within 48–72 hours — from their driveway or campsite.
💵 Save $150–$300: A mobile RV technician charges $150–$300 to clear a pyramid plug. Every DIY method in this guide costs under $30 — and most cost nothing if you have dish soap and hot water at hand.
What You’ll Learn in This Guide
- What an RV pyramid plug (poop pyramid) is and exactly why it forms
- How to confirm you actually have one before starting any treatment
- 4 proven step-by-step methods to dissolve a poop pyramid in your RV
- RV pyramid plug vs. normal clog — use the right fix for your problem
- What NOT to do (mistakes that cause expensive damage)
- Simple habits to prevent an RV black tank pyramid clog from ever coming back
What Is a Pyramid Plug in an RV Tank?
A pyramid plug — also called a poop pyramid or RV pyramid clog — is a hardened, cone-shaped mass of solid waste and toilet paper that builds up directly beneath the toilet’s drop tube inside your RV black tank. Over time, this pile hardens into a dense obstruction that can grow large enough to block the toilet entirely and prevent the tank from draining.
What makes an RV pyramid plug different from a typical clog is its location: it forms inside the holding tank itself, not in the pipe. This is why plunging doesn’t help, and why the fix requires either chemical dissolution or physical agitation — or both.
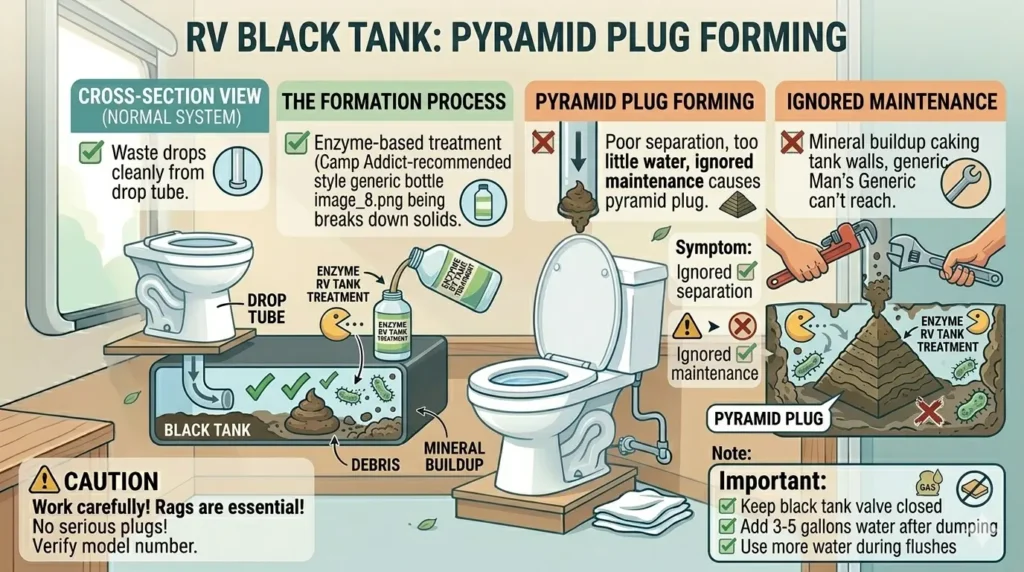
The pyramid shape forms because liquid drains out through the valve while solid waste stays in place and accumulates layer by layer. Without enough water to keep solids suspended, the pile dries, hardens, and eventually becomes nearly as solid as concrete.
Related: Not sure it’s a pyramid plug? Read our guide on How to Unclog an RV Toilet Without a Snake to compare symptoms before you treat anything.
How to Confirm You Actually Have a Pyramid Plug
Before pouring treatments into your tank, take 2 minutes to confirm a pyramid plug is what you’re dealing with — and not a simpler pipe clog or a sensor issue with a completely different fix.
- Open the toilet foot pedal fully and hold it down so you can see straight into the drop tube. Use a headlamp or flashlight for visibility.
- Shine your flashlight down the drop tube. Look for a solid dark mass at the base of the tube or just inside the tank opening. A visible mound of solid material confirms the pyramid.
- Try flushing with a full bowl of water. If water drains very slowly or backs up into the bowl, the blockage is inside the tank. If it drains normally but the sensor reads full, you likely have sensor probe coating — a different fix entirely.
- Check the dump valve briefly at a dump station. If only liquid flows out (or nothing at all), solid waste is trapped. If everything drains but the sensor still reads full afterward, it’s a sensor issue — not a pyramid plug.
⚠️ Pyramid Plug vs. Sensor Coating: A pyramid plug physically blocks waste flow. Sensor coating gives a false “Full” reading even after a clean dump. A true pyramid plug usually causes slow flushing AND a false full reading together.
RV Pyramid Plug vs. Normal RV Tank Clog — Know the Difference
Not every black tank problem is a pyramid plug. Using the wrong fix wastes time and can cause damage.
| Problem | Location | Main Symptom | Correct Solution |
|---|---|---|---|
| Pyramid plug (poop pyramid) | Inside tank, under toilet | Slow flush + tank won’t drain + false “Full” reading | Hot water, enzyme treatment, tank wand |
| Pipe clog | Drain pipe between toilet and tank | Water backs up in bowl; tank may read empty | RV-safe flexible wand or snake from the toilet |
| Sensor buildup (false full) | Tank wall — sensor probe area | Reads “Full” even after a successful clean dump | Tank sensor cleaner or enzyme soak |
| Dump valve obstruction | The gate valve itself | Valve hard to open or drains very slowly | Flush with water; inspect and clean valve assembly |
Signs You Have a Pyramid Plug in Your RV Black Tank
- Toilet flushes very slowly or gurgles — water takes 30+ seconds to drain or makes unusual sounds.
- Flush water backs up into the toilet bowl — it fills up instead of draining away.
- Tank sensor reads “Full” after you just dumped — solid waste is blocking the tank or coating the probes.
- Severe odor even with the toilet fully sealed — decomposing buildup releases gas back through the system.
- Only liquid drains when you open the dump valve — solids are trapped above the outlet.
- Visible solid mass when looking down the toilet drop tube — the pyramid has grown high enough to see with a flashlight.
Why Pyramid Plugs Happen in RV Black Tanks
Leaving the Black Tank Valve Open at a Campsite
This is the single most common cause. When you leave the valve open while hooked up to a full-hookup sewer, liquid drains away continuously — but solid waste stays behind. Without water to suspend them, the solids pile up and harden into the classic pyramid shape. The valve should stay closed until the tank is at least two-thirds full.
Not Using Enough Water Per Flush
RV toilets use far less water per flush than residential toilets. A quick tap of the pedal delivers very little water — not enough to keep solids suspended. Camping World recommends holding the flush pedal for 8–10 full seconds per use.
Related: Are you using the right toilet paper? Not all TP dissolves in RV tanks. See our full guide: What Toilet Paper Is Safe for RV Use.
Using Regular Household Toilet Paper
Standard TP doesn’t dissolve in a black tank. It mats together with solid waste and forms a fibrous mesh that traps solids and accelerates pyramid formation. Always use RV-safe, rapid-dissolve toilet paper.
Dumping the Tank Too Frequently
Counterintuitively, dumping before the tank is at least half full means there isn’t enough liquid pressure to flush everything out. Whatever remains on the tank floor starts your next pyramid.
Skipping Regular Tank Treatments
Without periodic enzyme treatments, waste accumulates in layers between trips. A consistent maintenance routine is far easier than breaking up a hardened plug after the fact.
How Much Water Should Be in an RV Black Tank?
- After every dump: Add at least 3–5 gallons of fresh water back before first use. This liquid base keeps solids suspended.
- During regular use: The tank bottom should always be covered with several inches of liquid. Dry solids harden almost immediately on contact with a dry tank floor.
- Before driving: If the tank has sat dry for a few days, add 1–2 gallons through the toilet before travel to prevent fresh waste from drying out in transit.
- When treating a plug: There must be at least 2–3 gallons in the tank for any enzyme or hot water treatment to work. A dry treatment sitting on hardened waste does almost nothing.
💡 Quick Rule: If you open the dump valve and only see dry, compacted solid waste with little liquid — that tank has been running too dry. Add water and enzyme treatment immediately, even if the sensor reads empty.
Tools and Supplies You May Need
- 🚿 RV Tank Wand — Flexible wand that inserts through the toilet to spray high-pressure water inside the tank. Best for stubborn, hardened plugs.
- 🧪 Enzyme Tank Treatment — Bacteria-based cleaner that dissolves organic waste and toilet paper. Best for moderate buildup and prevention.
- 💧 Hot Tap Water — Warm (not boiling) water to soften the plug. Have 4–6 gallons ready.
- 🧤 Nitrile Gloves (Long-Cuff) — Non-negotiable. Protect your hands and wrists during any tank procedure.
- 🥽 Safety Goggles — When using a tank wand, pressurized water can splash back. Protect your eyes.
- 😷 N95 Face Mask — Prevents inhaling gases and aerosols released during tank cleaning. Essential in enclosed spaces.
- 🧴 Dish Soap + Water Softener — 1 cup each mixed with hot water. A free DIY alternative to commercial enzyme treatments for mild to moderate plugs.
- 🪥 Flexible Toilet Rod — Last resort only. Use with extreme care to avoid damaging toilet seals.
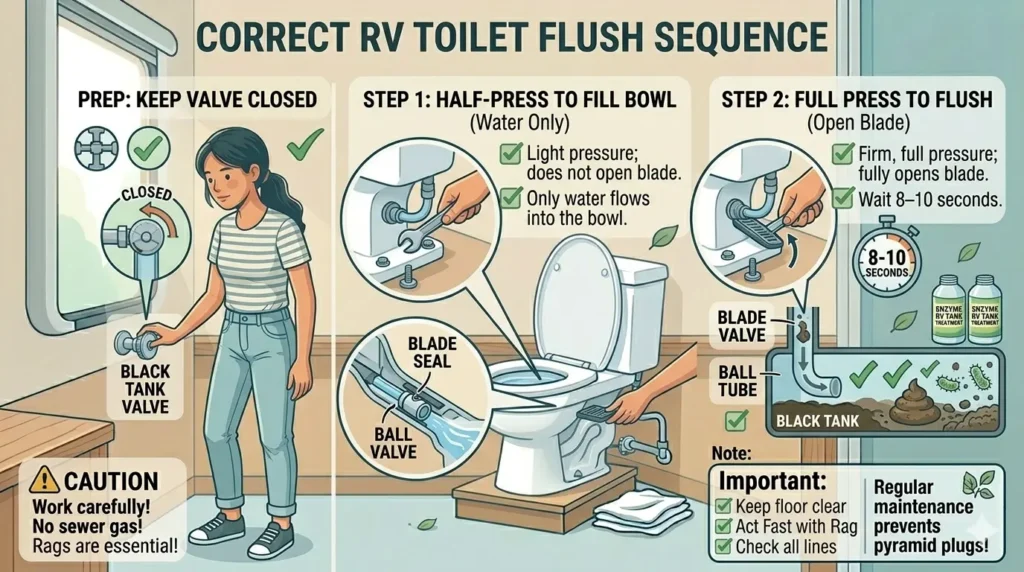
How to Flush an RV Toilet Properly (The Technique That Prevents Pyramid Plugs)
- Fill the bowl with water first. Press the pedal halfway to let water fill the bowl before any waste enters it. This cushion helps waste slide down cleanly.
- After use, press the pedal fully and hold for 8–10 seconds. A sustained flush delivers significantly more water, keeping solids suspended in the tank.
- After every solid deposit, flush a second time. Let the bowl refill and flush again. Two flushes per use dramatically reduces pyramid formation risk.
- Confirm the toilet seal closes completely after every flush. A partially open seal allows tank gases into the RV and causes water in the pipe to evaporate — accelerating waste hardening.
Related: Is your toilet pedal stiff, cracked, or not sealing fully? See our repair guide: How to Fix an RV Toilet Foot Pedal — a repair most RVers complete in under 30 minutes.
Method 1: Dissolve the Pyramid Plug With Hot Water and Dish Soap
This is your first line of attack and works well on plugs that haven’t fully hardened. It costs nothing if you have dish soap at home and requires no special equipment.
⚠️ Never Use Boiling Water. RV black tanks and connecting pipes are made of ABS plastic. Boiling water (212°F) can warp, crack, or soften pipe walls and toilet seals. Use hot tap water only — 120–140°F is the safe and effective range.
- Close the black tank dump valve completely. You need liquid to stay in the tank.
- Pour 1 cup of liquid dish soap (Dawn works great) and 1 cup of water softener (such as Calgon) into the toilet bowl, then flush it into the tank.
- Fill the toilet bowl with very hot tap water and flush it through. Repeat 4–6 times to add 4–6 gallons of hot water. Heat softens the solid mass; dish soap breaks down grease; water softener prevents mineral binding.
- Let it sit undisturbed for 48–72 hours. Do not use the toilet during this period. The longer it soaks, the more it penetrates the hardened mass.
- After the soak period, use the Drive and Slosh technique (see Method 4 below) before driving to a dump station.
- Open the dump valve and drain completely. Follow up with a full freshwater rinse through the black tank flush port or via a tank wand through the toilet.
💡 Pro Tip: Add a double dose of Unique RV Digest-It alongside the dish soap. The hot water activates the bacteria immediately and significantly speeds up the dissolving process.
Method 2: Use an Enzyme Tank Treatment
Enzyme treatments are excellent for moderate pyramid plugs and as a regular prevention tool. Products like Thetford Aqua-Kem and Unique Camping + Marine’s Digest-It use live bacterial cultures that digest organic waste and toilet paper from the inside out.
- Flush 2–3 gallons of water into the black tank to give the bacteria a liquid medium to work in.
- Add the enzyme treatment per manufacturer dosage. For a confirmed RV pyramid clog, use double the standard dose.
- Add 2 more gallons of warm water on top to activate the bacteria and help them spread.
- Close the valve and let it sit for 24–72 hours. The longer the better for hardened, established plugs.
- After the waiting period, drive to a dump station, drain fully, and rinse thoroughly. Repeat the treatment if needed.
ℹ️ Cold Weather Note: Enzyme bacteria go dormant below 50°F (10°C). Warm your RV interior to at least 60°F before adding treatment in cold weather — otherwise the bacteria won’t activate.
Method 3: Use an RV Tank Wand (Best for Stubborn Plugs)
If hot water and enzyme treatment haven’t fully cleared the RV pyramid plug, an RV tank wand is your most powerful tool. It inserts through the toilet into the tank and sprays pressurized water in 360° — physically breaking apart hardened waste that chemical treatments alone can’t reach.
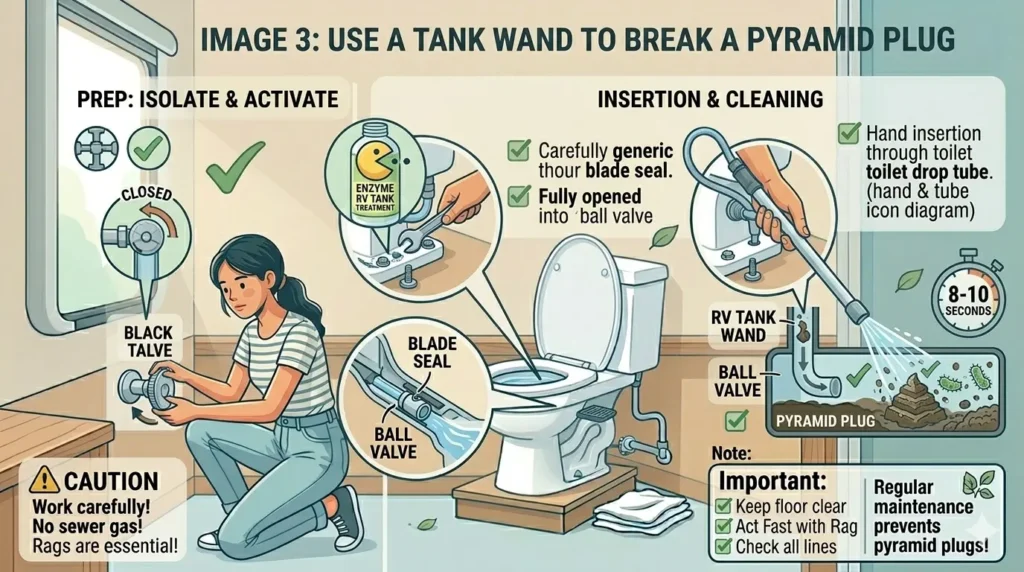
- Attach the tank wand to your garden hose and confirm the water is on.
- Put on gloves, safety goggles, and your face mask before proceeding — splashback from pressurized water in a waste tank is a genuine hazard.
- Open the toilet foot pedal fully to expose the drop tube opening.
- Insert the wand carefully through the toilet and down the drop tube into the tank. Move slowly — don’t force past resistance.
- Turn on the water and work the wand in slow circular motions, directing spray at the pyramid mass. Work systematically for 10–15 minutes.
- Withdraw the wand, close the toilet, and drive directly to a dump station to drain the loosened waste.
🚫 Never use a standard toilet plunger or household drain snake. A plunger can crack the toilet’s rubber seal. A rigid metal snake can puncture ABS tank walls or damage the dump valve assembly. Only use an RV-specific flexible tank wand.
Method 4: The “Drive and Slosh” Technique
This method amplifies the results of any other treatment — it is not a standalone fix. After hot water or enzyme treatments have had time to soften the plug, physical agitation dramatically accelerates results.
- After your hot water or enzyme soak period, fill the black tank at least halfway with additional fresh water through the toilet.
- Confirm the dump valve is fully closed before driving.
- Drive your RV for 15–20 minutes on a winding or bumpy road. The water sloshing inside acts like a washing machine — battering the softened waste mass from all sides.
- Go directly to a dump station while the contents are still in motion. Drain completely, then rinse.
What About the Ice Cube Method?
The popular ice cube method — filling the tank with bags of ice before driving — does help clean tank walls and sensor probes through abrasive action. However, it is not effective at breaking up a hardened pyramid plug. Ice melts quickly, loses mass, and can’t generate the sustained force needed to dislodge compacted solid waste. For RV pyramid plug removal, hot water + enzyme treatment + Drive and Slosh will consistently outperform ice. Save the ice method for routine sensor cleaning and wall maintenance between trips.
How Long Does It Take to Fix an RV Pyramid Plug?
| Method | Time to Work | Effort Level | Approx. Cost | Best For |
|---|---|---|---|---|
| Hot Water + Dish Soap | 48–72 hours | Low | ~$0 | Minor to moderate plugs |
| Enzyme Treatment | 24–72 hours | Low | $10–$20 | Moderate plugs, prevention |
| RV Tank Wand | Immediate (15–30 min) | Medium | $15–$30 one-time | Stubborn, hardened plugs |
| Drive and Slosh | Works while driving | Low | $0 | Always combine with other methods |
| Combined Approach | 48–72 hours total | Low–Medium | Under $30 | Severe or long-standing plugs |
What NOT to Do When Dealing With a Pyramid Plug
- ❌ Never use bleach or Drano. Bleach destroys beneficial bacteria and corrodes dump valve rubber seals. Unique Camping + Marine’s research shows bleach causes far more long-term damage than it resolves.
- ❌ Never use boiling water. Warps ABS pipes and can crack toilet bowl seals. Hot tap water only.
- ❌ Never use a standard toilet plunger. The pressure can displace or damage the toilet’s rubber seal.
- ❌ Never use a rigid metal household drain snake. Can puncture the tank wall or damage sensor probes.
- ❌ Never leave the black tank valve open at a hookup site. This is the root cause of almost every RV black tank pyramid clog — and completely avoidable.
- ❌ Don’t ignore the problem and keep flushing. Each flush deposits more waste on top of the plug, making it harder and larger.
- ❌ Don’t rely solely on the ice cube method. Useful for routine maintenance, but not effective for RV pyramid plug removal.
Real Mistakes RV Owners Make (And What Happens)
Mistake 1: Leaving the black tank valve open at a full-hookup site
By far the most commonly reported cause. It feels convenient — like a perpetually draining setup. But within 2–3 days, you have a forming pyramid. Close the valve. Always.
Mistake 2: Using regular household toilet paper to save money
Standard TP mats together inside the tank and creates a fibrous mesh that traps solids. RV-safe TP dissolves within minutes. The cost difference is pennies per roll — the repair cost can be hundreds of dollars.
Mistake 3: Pouring bleach into the tank to dissolve the clog
This reliably makes the situation worse. Bleach kills the bacterial ecosystem needed for breakdown and can harden some organic compounds rather than dissolving them. Dump valve seal replacements commonly follow bleach use.
Mistake 4: Waiting until the tank is fully blocked before acting
A minor pyramid plug caught early clears in 48 hours with dish soap and hot water. The same plug ignored for three weeks may require a tank wand, multiple treatments, and possibly professional cleaning. Early action is always the right call.
Mistake 5: Giving the pedal a quick tap instead of a full flush
A one-second flush delivers very little water. The RV Geeks consistently recommend a minimum 8–10 second sustained flush for solid waste — every single use.
When to Call an RV Service Technician
Most RV pyramid plug cases can be resolved with DIY methods. Call a professional if you experience any of the following:
- The tank is completely blocked after 72 hours of combined treatment and wand use. The plug may require professional hydro-jetting.
- Waste or liquid is backing up into the shower or other drains. This indicates a system-wide blockage beyond the black tank.
- The dump valve is stuck, leaking, or broken. A cracked or seized valve requires professional replacement to prevent sewage spills.
- You notice visible cracks in the tank itself. Structural damage cannot be addressed with DIY treatment.
- Tank sensors permanently read “Full” after multiple deep cleans. Sensor probes may need professional removal and replacement.
- You consistently smell sewage gases inside the RV. This could indicate a broken vent pipe, failed P-trap, or other system damage beyond the tank.
Mobile RV technicians typically charge $150–$300 for black tank cleaning and pyramid plug clearing. That’s appropriate for serious cases — but for the vast majority of plugs, the methods in this guide get you there for under $30.
How to Prevent a Pyramid Plug from Coming Back
Once you’ve cleared the plug, preventing its return requires nothing more than a consistent routine. The RV Geeks and Camping World both point to the same core habits as the foundation of long-term black tank health.
- ✓ Keep the dump valve CLOSED until the tank is at least two-thirds full — every trip, every time.
- ✓ Flush for 8–10 full seconds per use and add a second flush after solid deposits.
- ✓ Only use RV-safe, rapid-dissolve toilet paper. See our guide: What Toilet Paper Is Safe for RV Use.
- ✓ Add 3–5 gallons of fresh water immediately after every dump before using the toilet.
- ✓ Start every tank cycle with an enzyme treatment to maintain a bacteria baseline that continuously breaks down waste.
- ✓ Deep clean monthly — fill the tank, add enzyme treatment, Drive and Slosh, dump, rinse thoroughly.
- ✓ Rinse the tank after every dump using the built-in flush port or a tank wand through the toilet.
RV Black Tank Maintenance Checklist
| Task | Frequency | Why It Matters |
|---|---|---|
| Flush 8–10 seconds per use | Every use | Keeps solids suspended; prevents RV black tank pyramid clog |
| Add 3–5 gallons water after dumping | Every dump | Liquid base prevents next deposit from drying on the floor |
| Add enzyme treatment after dumping | Every dump | Breaks down waste before it can harden |
| Dump only when tank is 2/3+ full | Every trip | Hydraulic force carries solids completely out |
| Rinse tank after every dump | Every dump | Removes residue from walls and sensor probes |
| Deep clean: full soak + Drive and Slosh | Monthly | Resets tank condition; prevents long-term buildup |
| Inspect dump valve for leaks or stiffness | Monthly | Catches valve wear before it becomes a serious failure |
Best Products to Prevent and Dissolve RV Pyramid Plugs
- Unique RV Digest-It Tank Treatment — Top-rated enzyme formula. Highly effective at digesting solid waste without harming seals or pipes. (Editor’s Pick)
- Camco Flexible Tank Rinser Wand — Attaches to any garden hose. 360° spray nozzle reaches every corner of your black tank. (Best Tool)
- Scott Rapid-Dissolving Toilet Tissue — Most recommended RV-safe toilet paper. Dissolves 4x faster than standard tissue. (Best TP)
- Thetford Aqua-Kem Drops — Pre-measured pods. Combines deodorant and waste digester in one convenient drop-in. (Most Convenient)
Frequently Asked Questions
Can a pyramid plug permanently damage my RV black tank?
In most cases, no — the plug itself won’t damage the tank if treated in a reasonable timeframe. However, a long-ignored plug can harden until it cracks ABS tank walls during travel. More commonly, it permanently coats the sensor probes, causing a chronic false “Full” reading. Addressing it early prevents these secondary issues. Thetford’s holding tank care guide covers long-term tank health in detail.
Can I drive my RV with a pyramid plug in the tank?
Yes — in fact, the Drive and Slosh technique relies on driving with water in the tank to break up an RV black tank pyramid clog. However, if flush water is already backing up into the bowl, fill the tank and add treatment before driving to avoid making the situation messier.
Will bleach dissolve toilet paper in an RV black tank?
No — and bleach should never be used in an RV black tank. It kills the beneficial bacteria from enzyme treatments and degrades dump valve rubber seals over time. According to Unique Camping + Marine’s research, bleach consistently creates more long-term damage than it solves in RV sanitation systems.
Does hot water dissolve an RV poop pyramid?
Hot water softens solid waste effectively but works best when combined with dish soap, water softener, or an enzyme treatment. Combined with the Drive and Slosh method, it’s highly effective for most plugs. Always use hot tap water only (120–140°F) — boiling water damages ABS plastic pipes and toilet seals.
Does the ice cube method work for RV pyramid plug removal?
The ice cube method works well for routine tank wall cleaning and sensor probe maintenance, but it’s not reliably effective for removing a pyramid plug from an RV black tank. Ice melts quickly and can’t sustain the force needed against compacted solid waste. Use hot water and enzyme treatment for actual pyramid plug removal — reserve ice for maintenance.
What chemical is best for breaking down waste in an RV black tank?
The best option is an enzyme or bacteria-based treatment such as Unique RV Digest-It or Thetford Aqua-Kem. For a DIY emergency, 1 cup each of dish soap and water softener (like Calgon) mixed with hot water is safe, effective, and immediately available. Avoid bleach, Drano, and formaldehyde-based treatments entirely.
How long does it take to dissolve a poop pyramid in an RV?
Mild to moderate pyramid plugs typically show significant results within 24–48 hours of enzyme treatment and hot water. A fully hardened, long-standing plug may need 72 hours or more. Combining the soak with the Drive and Slosh method after the waiting period speeds results considerably. If the plug remains after 72 hours, follow up with a tank wand for direct physical agitation.
Final Thoughts
An RV black tank pyramid clog is one of the most common — and most completely preventable — problems in RV ownership. The fix doesn’t require a service appointment, special skills, or expensive tools. It requires patience, the right supplies, and letting chemistry do the heavy lifting.
Here’s your complete action plan:
- Confirm it’s a pyramid plug using the 4-step flashlight check.
- Start with hot water + dish soap — let it soak 48–72 hours.
- Add enzyme treatment for stronger dissolving power.
- Use the Drive and Slosh technique before heading to the dump station.
- For stubborn plugs, bring in the tank wand for direct physical agitation.
- After clearing it, commit to the prevention habits above — proper flushing, closed valve management, and enzyme treatment every tank cycle.
Have a question or a method that worked well for you? Drop it in the comments — the RV community learns best from each other’s real-world experience.
Hi, I’m Daniel Brooks. I research and write about RV toilet repair, black tank maintenance, and sanitation troubleshooting. I create practical guides that help RV owners fix problems quickly and prevent costly damage.