You flush, the bowl fills up — and ten minutes later it’s bone dry. If you own a Dometic RV toilet, this is probably the most common complaint you’ll hear at any campground from New England to British Columbia to the Scottish Highlands. It doesn’t matter if you’re a weekend warrior with a brand-new rig or a full-timer who’s been on the road for years: a toilet bowl that won’t hold water is frustrating, a little gross, and — if you ignore it — a recipe for a very smelly RV.
The good news? In most cases, you don’t need a plumber, a dealer, or a new toilet. You just need to understand what’s causing the problem and work through a short list of fixes in order. This guide walks you through exactly that — from the easiest 5-minute solution to a full seal replacement — so you can stop your rv toilet bowl from drying out and get back on the road.
⚡ Quick answer: A Dometic RV toilet loses water almost always because the flush ball seal (also called the bowl gasket) is dirty, dried out, misaligned, or worn. Start by cleaning and lubricating it. If that doesn’t work, reseat it. If it still leaks, replace it — rv toilet seal replacement cost runs $15–25 and takes about 30 minutes with no tools.
🔀 Troubleshooting Flowchart — Find Your Fix Fast
Follow the path that matches your situation. Most people solve this at step 1 or 2.
⏱ Quick Diagnosis — How Fast Is the Water Disappearing?
The speed at which your rv toilet bowl dries out is actually a clue to the cause:
Why Your Dometic RV Toilet Needs to Hold Water
That small pool of water sitting in your toilet bowl isn’t there just for appearances. It does three important jobs:
- Odor barrier: The water creates a seal between the toilet bowl and your black holding tank, blocking sewer gases from drifting into your living space. When the rv toilet bowl seal is leaking, those gases come straight through.
- Keeps the seal moist: The rubber flush ball seal needs moisture to stay pliable. A dry seal hardens, cracks, and fails faster — which is exactly why rv toilet water won’t stay in bowl after long storage.
- Reduces residue buildup: A dry bowl lets waste cling to surfaces, making cleaning harder and odors worse.
When the water disappears — especially quickly after flushing — your black tank is venting directly into your RV. That’s why this fix shouldn’t wait.
How the Dometic Flush Ball System Works (And Why It Fails)
Dometic 300, 310, and 320 series toilets use a flush ball valve system. When you press the foot pedal, a plastic ball rotates open to drop waste into the black tank. When you release the pedal, the ball rotates closed and a rubber seal — called the bowl seal or flush ball gasket — presses against the ball to create a watertight barrier.
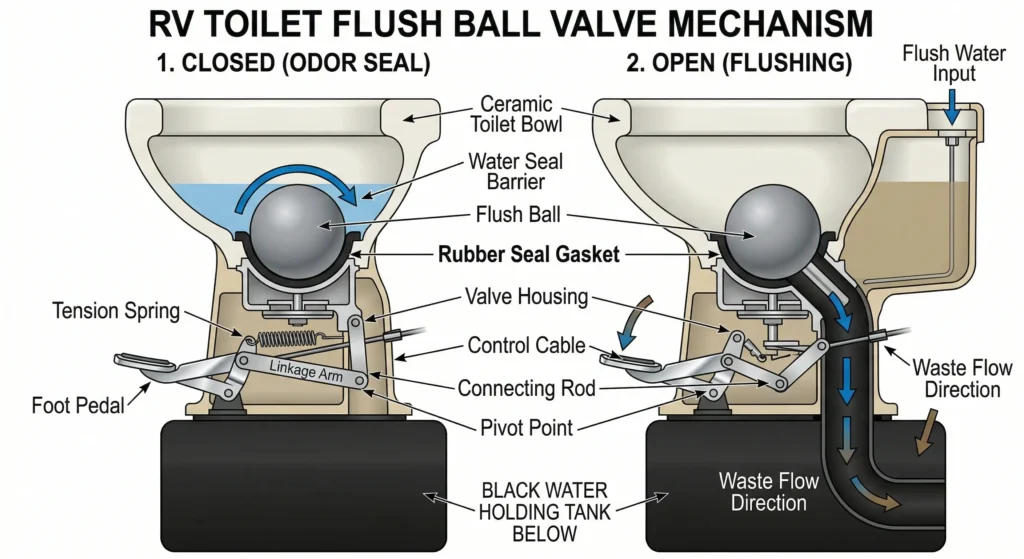
It’s a simple, reliable system — but the rubber seal is the weak point. Three things cause it to fail:
- Debris and limescale — A tiny piece of grit on the seal surface is enough to break the watertight contact and cause the rv toilet bowl seal to leak.
- Drying out — Long storage without water in the bowl stiffens the rubber, which is the most common reason why rv toilet bowl dries out after winterizing.
- Physical wear or damage — Bleach-based cleaners and years of use gradually degrade the rubber. This is the typical cause of a worn dometic flush ball seal problem in older units.
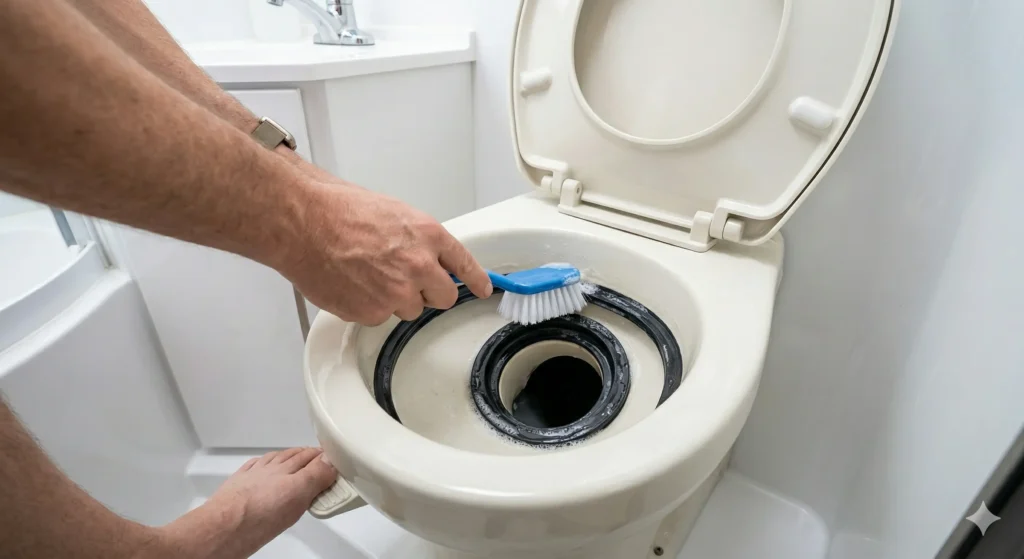
Fix #1 — Clean the Seal (Start Here)
Difficulty: Easy | Time: 10 minutes | Cost: $0
Before anything else, try cleaning the seal. A surprising number of Dometic owners find this alone solves the rv toilet bowl not retaining water problem permanently.
- Turn off the water supply to your toilet (water pump or city water connection).
- Press the foot pedal to flush and drain the bowl completely.
- Keep the foot pedal held down so the flush ball stays open.
- Pour a small amount of hot soapy water into the bowl — dish soap works well. Let it sit for 2–3 minutes.
- Using a soft toilet brush, gently scrub the rubber seal where it contacts the flush ball, working all the way around the edge. Pay attention to any visible buildup or discoloration.
- Flush a few times (with water on) to rinse, then fill the bowl and wait 15 minutes to see if it holds water.
Fix #2 — Lubricate the Seal
Difficulty: Easy | Time: 5–10 minutes | Cost: $5–10
If cleaning helped but rv toilet water won’t stay in bowl reliably, the seal needs lubrication. A dry or slightly hardened seal won’t press flat against the flush ball — a thin coat of the right lubricant can restore the airtight contact.

- With the water off and the bowl empty, open the flush ball by pressing the pedal and hold it open.
- Put on rubber gloves.
- Apply a small amount of plumber’s silicone grease to your fingertip.
- Run your finger around the entire circumference of the seal — top, sides, and underside where it contacts the flush ball.
- Release the pedal and let the flush ball close. Press and release it several times to distribute the grease evenly.
- Turn the water back on, fill the bowl, and test.
| ✅ Safe to Use | ❌ Never Use |
|---|---|
| Plumber’s silicone grease (best option) | Vaseline / Petroleum jelly |
| Dometic Seal Conditioner | WD-40 |
| Thetford Aqua-Magic Seal Lubricant | Bleach or bleach-based sprays |
| Olive oil or coconut oil (temporary) | Cooking spray (petroleum-based varieties) |
Plumber’s silicone grease is available at any hardware store (Home Depot, Bunnings, Canadian Tire) for around $5–8 a tube. One tube treats your toilet four or more times — keep one in your RV toolkit.
Fix #3 — Reseat the Gasket
Difficulty: Medium | Time: 15 minutes | Cost: $0
If cleaning and lubrication haven’t solved the problem, the seal may be sitting crooked in its groove. A misaligned seal won’t create even contact with the flush ball, leaving a gap that causes rv toilet bowl seal leaking. This is especially common after aggressive cleaning or rough travel.
- Turn off water, flush, and drain the bowl.
- With gloves on, open the flush ball and locate the rubber gasket in its groove around the opening.
- Press down firmly all the way around the seal, working it evenly back into the groove. Some owners find it easier to pull upward from underneath — reach in and pull the seal upward toward you to seat it in the groove properly.
- Close the flush ball.
- Immediately pour 2 cups of hot (not boiling) water into the bowl and let it sit for 5–10 minutes. The heat helps the rubber conform to the seating surface.
- Test for water retention. Repeat once if needed.
Fix #4 — Replace the Seal
Difficulty: Medium | Time: 20–30 minutes | Cost: $15–25
If you’ve cleaned, lubricated, and reseated the gasket and the rv toilet water won’t stay in bowl, the seal is physically worn out. The rv toilet seal replacement cost is low ($15–25) and it’s a genuine no-tool DIY job on Dometic 300-series toilets — no tools, no disconnecting water lines, no removing the toilet.
Step 1 — Identify your model and get the right seal
The model number is on a sticker underneath the toilet or in your RV owner’s manual. Use the table below:
| Dometic Model | Replacement Seal Part # | Notes |
|---|---|---|
| Dometic 300 | 385311658 | Plastic bowl, pops in/out by hand |
| Dometic 310 | 385311462 | Porcelain bowl, same mechanism |
| Dometic 320 | 385311462 | Same seal as 310 |
| Dometic SeaLand 210 | 385316140 | Older design, includes ball valve |
You can order replacement seals on Amazon, through Camping World, or directly from Dometic’s website. Most RV parts stores in the US, Canada, and Europe stock these.
Step 2 — Remove the old seal
- Turn off water supply. Flush to empty the bowl.
- Put on rubber gloves — this step matters.
- Press the foot pedal to open the flush ball and hold it open.
- Reach into the bowl opening and grab the rubber seal. Pull it upward to disengage it from the groove — it should come out with a gentle pull, no tools required.
- Wipe the groove clean of any debris or old lubricant.
Step 3 — Install the new seal
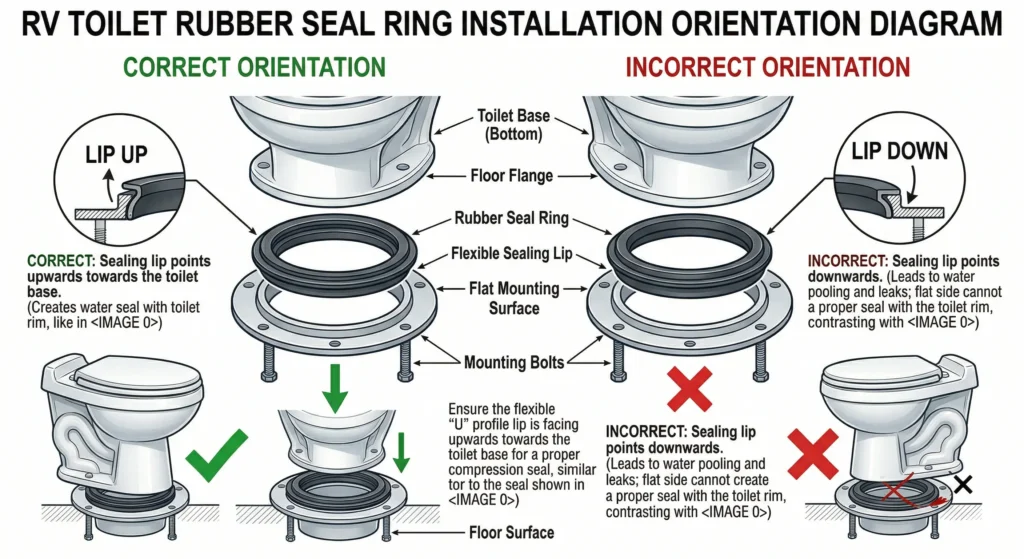
- Check which side of the new seal faces up (most have a small lip indicating orientation).
- With the flush ball still open and gloves on, lower the new seal into the opening and press it into the groove, working your way around evenly.
- Pull upward gently from underneath to confirm it’s locked in all the way around.
- Close the flush ball.
- Pour 2 cups of hot water into the bowl immediately to help the new dometic flush ball gasket conform and seat properly.
- Wait 30 minutes, then test water retention.
Fix #5 — Check for a Deformed or Defective Flush Ball
Difficulty: Medium | Time: 30–45 minutes | Cost: $25–45
Less common, but worth knowing: the plastic flush ball itself can warp from heat, get scratched from abrasive cleaners, or come from the factory slightly out of round. If you’ve replaced the seal and still have a dometic flush ball seal problem with no improvement, the ball — not the gasket — may be the culprit.
Etrailer’s technical team has documented this as a known issue with certain Dometic production runs. If you’re on your second or third seal with no lasting fix, replace the flush ball and seal together as a kit. Available on Amazon and RV parts stores for $25–45.
When to Replace the Toilet Entirely
If you’ve replaced the seal three or more times and the problem returns within weeks each time, the bowl shape itself may no longer provide a proper seating surface. At that point, a toilet replacement makes more sense than another round of rv toilet seal replacement cost.
Options worth considering: the Thetford Aqua-Magic Style II (a popular alternative with a different valve mechanism) or a more significant upgrade to a composting toilet, which eliminates the black tank system entirely.
👉 Read our guide on How Composting Toilets Work in an RV to understand whether that upgrade fits your setup.
Model-by-Model Quick Reference
| If you have a… | Most likely cause | Start with |
|---|---|---|
| Brand new Dometic (under 6 months) | Seal misaligned or minor defect | Fix #3 (reseat) → Dometic warranty |
| Dometic after long storage | Dried-out, hardened seal | Fix #1 (clean) + Fix #2 (lubricate) |
| Dometic used daily (full-timing) | Gradual wear + debris buildup | Fix #1 → Fix #2 → Fix #4 (replace) |
| Dometic in cold climate / post-winter | Seal stiffened by cold + dryness | Hot water soak → Fix #2 → Fix #3 |
| 3+ seal replacements, still leaking | Deformed flush ball or bowl | Fix #5 (flush ball) or new toilet |
Prevention: Keep Your Dometic Seal Healthy Long-Term
- Always leave water in the bowl when parked or in storage. Even an inch keeps the seal moist and prevents the rv toilet bowl from drying out.
- Lubricate every 3–6 months with silicone grease as routine maintenance — don’t wait for the rv toilet bowl seal to start leaking.
- Use RV-safe toilet paper and don’t flush anything that could scratch or lodge against the seal surface.
- Let the pedal snap shut. Release your foot quickly — the spring mechanism is designed for it. Easing it slowly often means the ball doesn’t fully seat.
- Avoid harsh cleaners. Use dish soap or an RV-specific enzyme cleaner like those from Unique Camping + Marine. Never use bleach.
- Cold climate users (Canadian winters, Scandinavian motorhome season, high-altitude US camping): add a small amount of RV antifreeze to the bowl before storage, or apply a thin coat of mineral oil over the seal to prevent it from hardening during freezing temperatures.
Related Problems Worth Checking
A toilet that won’t hold water is often the first symptom — but it can connect to other issues. If the seal fix didn’t fully solve things, these guides may help:
- 👉 Why Does My RV Toilet Smell? — if odors persist even after fixing the water seal
- 👉 RV Toilet Leaking at Base — if water is pooling around the toilet base, not just disappearing from the bowl
- 👉 How to Fix a Pyramid Plug in Your RV Black Tank — if your black tank isn’t draining correctly, which can cause back-pressure on the flush ball
- 👉 How to Repair an RV Toilet — complete overview of common RV toilet repairs beyond the seal
Frequently Asked Questions
Why does my Dometic RV toilet keep losing water?
The most common reason is a dirty, dried, or worn flush ball seal — the root cause behind most rv toilet bowl seal leaking reports. Start by cleaning and lubricating it. If that doesn’t hold, try reseating or replacing the gasket.
Can I use Vaseline on my Dometic toilet seal?
No. Petroleum-based products break down rubber over time and make the leaking worse. Use plumber’s silicone grease instead — it’s inert, water-resistant, and rubber-safe.
How much does Dometic RV toilet seal replacement cost?
Typically $15–25 for the seal itself. If you’re replacing the full flush ball kit, expect $25–45. Both are available on Amazon, at Camping World, and through Dometic directly. The rv toilet seal replacement cost is among the lowest repairs you’ll do on your RV.
How long does a Dometic toilet seal last?
Typically 2–5 years with normal use. Full-timers using the toilet daily may need replacement every 1–2 years. Regular lubrication significantly extends lifespan.
Do I need to remove the toilet to replace the seal?
No — not on Dometic 300, 310, or 320 series. The seal pops in and out by hand (with gloves). No tools, no disconnecting water lines, no lifting the toilet off the floor.
My brand new Dometic toilet is already not holding water. Is it defective?
It’s possible. Dometic has had documented issues with certain production batches where the flush ball seal has minor deformities. First try reseating the gasket (Fix #3 above). If that doesn’t solve it, contact Dometic’s warranty line — they typically send a replacement seal or arrange a technician visit at no cost.
Does this fix work for Dometic toilets in European motorhomes?
Yes. Dometic 300-series toilets are widely used across North America and Europe. Part numbers are the same, and replacement seals are available through European RV parts suppliers and Amazon EU (UK, Germany, France, Netherlands).
The Bottom Line
A Dometic RV toilet that won’t hold water is almost always fixable without professional help — and usually without buying anything. Work through the fixes in order: clean first, lubricate second, reseat third, replace only if needed. Most people stop the rv toilet bowl from drying out at step one or two.
The one thing that matters most going forward: don’t let the bowl go dry for long periods. A small amount of water — or silicone grease during winter storage — keeps the seal soft, pliable, and working the way it should. Ten seconds of prevention saves thirty minutes of repair.
If you found this guide helpful, take a look at our full RV Toilet Repair guide for a complete overview of common toilet issues and how to handle them yourself.
Hi, I’m Daniel Brooks. I research and write about RV toilet repair, black tank maintenance, and sanitation troubleshooting. I create practical guides that help RV owners fix problems quickly and prevent costly damage.