You’re two days into a camping trip. The toilet isn’t draining. And the only thing standing between you and a weekend-ruining disaster is whatever you happen to have on hand.
You’re not alone. RV toilet clogs are one of the most common problems weekend campers run into — and one of the most fixable, once you know what you’re actually dealing with.
Here’s the problem: most people try to treat an RV toilet like a home toilet. Wrong approach. Different system, different rules. The good news? You don’t need a snake to clear most clogs. You need the right method for the right type of blockage.
This guide walks you through exactly that — what’s causing the clog, how to fix it without specialized tools, when to call in help, and how to make sure it never happens again on a trip.
Your RV Toilet Isn’t Your Home Toilet — Here’s Why That Matters
Before you grab a plunger or pour in a bottle of Drano, understand this: RV plumbing and home plumbing are two completely different systems. Treating them the same way is the fastest route to a bigger, more expensive problem.
How a home toilet works vs. an RV toilet
A home toilet connects directly to a city sewer line or septic tank. Flush it, and the waste is gone. It uses around 1.6 gallons of water per flush and relies on a water trap and siphon system to clear the bowl.
An RV toilet works differently. According to Roadtrippers, an RV toilet empties not into a sewer line, but into a sealed black water tank mounted underneath the rig — where waste is stored until you dump it at a designated station. Most RV toilets use a foot pedal to open a valve at the bottom of the bowl, letting gravity do the work. Unique Camping + Marine notes that a standard 10-second flush in an RV toilet only delivers about half a gallon of water — less than a third of what a home toilet uses per flush.
Less water. A holding tank instead of a sewer line. A rubber valve seal at the base of the bowl instead of a trap. These differences change everything about how clogs form and how you fix them.
The black tank explained (and why it changes everything)
The black tank is the sealed container under your RV that holds all toilet waste until you empty it. Black tanks typically range from 15 to 50 gallons, depending on your rig. Unlike a home septic or sewer system, that tank isn’t draining continuously. It sits there, holding everything, until you physically dump it.
That design means water management is everything. Too little water and solid waste dries out, stacks up, and hardens. Mismanage the tank valve, and you end up with one of the worst clogs in RVing: the pyramid plug.
Why a regular plunger or Drano can do more harm than good
Here’s the catch: the tools that work on a home toilet can seriously damage an RV system. etrailer.com warns that caustic chemicals like Drano or bleach can damage tank seals and plumbing components. A standard plunger can put stress on the rubber valve seal at the bottom of the bowl — the only thing separating you from black tank fumes inside your living space.
Skip both. The methods below are safe for RV plumbing and don’t require any specialized tools.
First, Figure Out Where the Clog Is
Not all RV toilet clogs are the same. The fix depends entirely on where the blockage is. Spend two minutes diagnosing before you start throwing solutions at it.
Clog near the toilet bowl or valve
If water pools in the toilet bowl and drains slowly (or not at all) when you press the pedal, the blockage is likely in or just below the toilet itself. This is the easiest type to clear and usually responds to hot water or soap methods.
Pyramid plug in the black tank
Unique Camping + Marine describes a pyramid plug as a hardened mass of waste that builds up directly below the toilet’s drop tube when liquids drain out but solids are left behind. The RV Geeks explain that pyramid plugs are most common when the black tank valve is left open at a campground hookup — liquids drain continuously, solids stack up, dry out, and harden into a cone shape that eventually blocks the pipe entirely.
Signs you have a pyramid plug: nothing goes down the toilet, nothing comes out the sewer hose when dumping, and you know the valve was left open at some point.
Outlet or tank drain clog
If the toilet seems to flush fine but the tank won’t drain at all, the blockage is at the outlet valve or discharge pipe at the bottom of the tank. This is less common but trickier to deal with at the campsite.
Quick diagnostic checklist
- Water rises in the bowl and won’t drain → clog is near the toilet or valve
- Bowl drains but tank sensors read full and tank won’t empty → pyramid plug or compacted tank
- Tank won’t drain at all but toilet seems fine → outlet clog
- Gurgling sounds or slow drain → partial blockage, likely toilet paper buildup
How to Unclog an RV Toilet Without a Snake (Step-by-Step Methods)
Work through these in order. Start with the simplest, least invasive method and step it up only if needed.
Method 1 — Hot Water Soak
Start here. It’s the easiest and often enough for fresh, soft clogs.
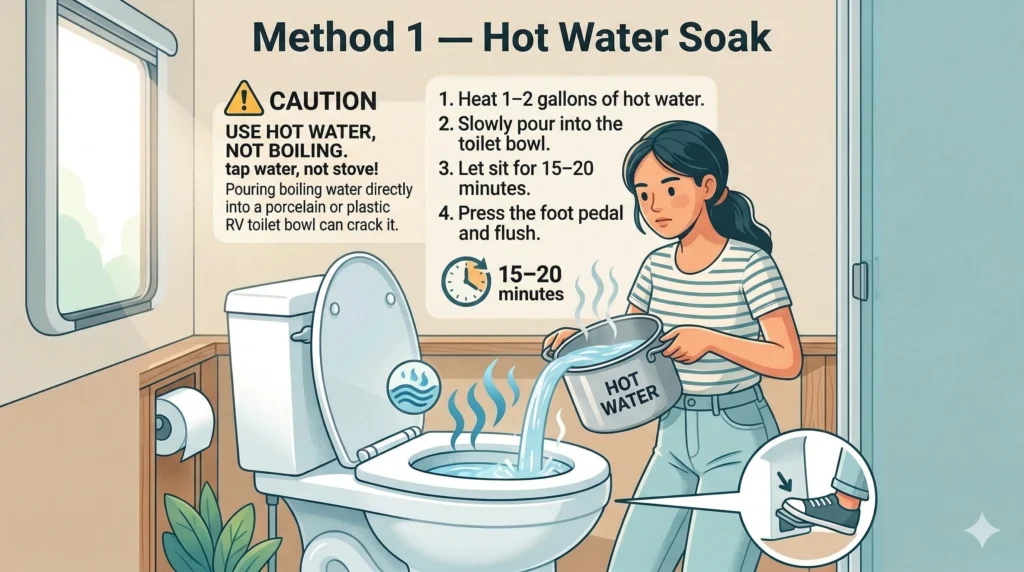
Happy Campers recommends adding 1–2 gallons of hot (not boiling) water to the bowl and letting it sit for 15–20 minutes before flushing. The heat softens hardened waste and toilet paper, giving it enough give to pass through the valve.
⚠️ Important: Use hot water, not boiling. Pouring boiling water directly into a porcelain or plastic RV toilet bowl can crack it. Heat your water to the hot tap temperature — not the stovetop.
Steps:
- Heat 1–2 gallons of hot (not boiling) water
- Slowly pour into the toilet bowl
- Let it sit for 15–20 minutes (longer if the clog is severe)
- Press the foot pedal and flush
- Repeat if needed
Method 2 — Dish Soap + Hot Water
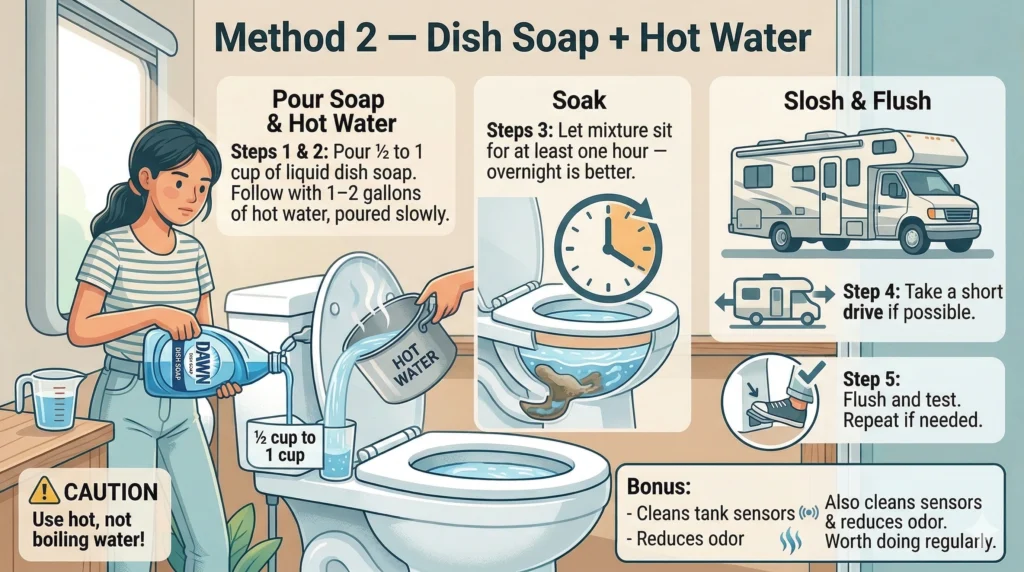
If hot water alone doesn’t do it, add dish soap. DoItYourselfRV explains that dish soap acts as a lubricant, helping solid waste and toilet paper slide more easily through the system while also breaking down grease and buildup.
Steps:
- Pour ½ to 1 cup of liquid dish soap (Blue Dawn works well) into the toilet bowl
- Follow with 1–2 gallons of hot water, poured slowly
- Let the mixture sit for at least one hour — overnight is better
- Take a short drive if possible. The sloshing motion helps the solution reach the blockage
- Flush and test. Repeat if needed
💡 Bonus: The dish soap + drive method also cleans tank sensors and reduces odor. Worth doing even when you don’t have a clog.
Method 3 — Baking Soda + Vinegar
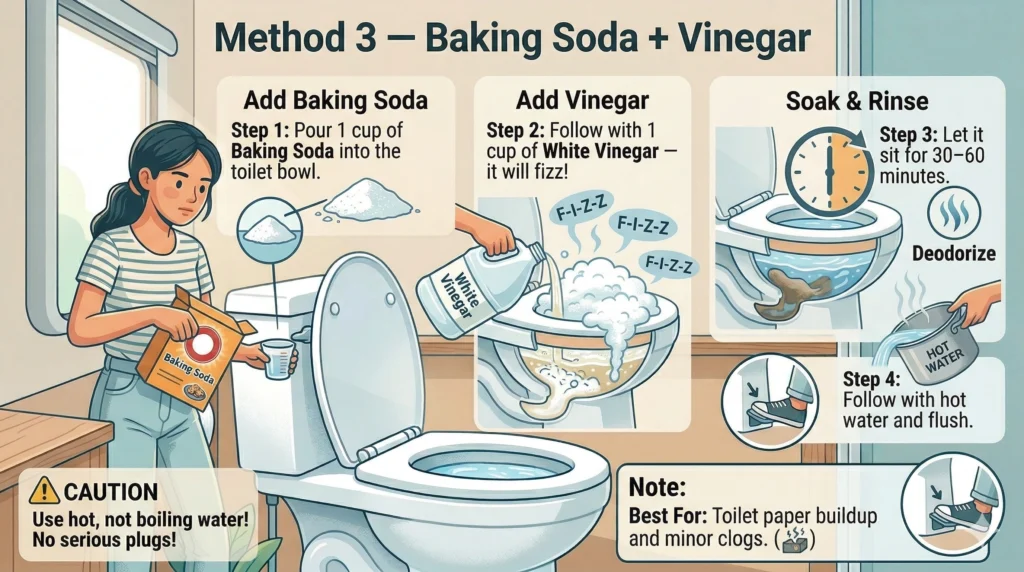
A gentler option for partial clogs or slow drains. etrailer lists baking soda and white vinegar as a popular DIY option for RV drains. The fizzing reaction can help break up soft blockages and deodorize the tank at the same time.
Steps:
- Pour 1 cup of baking soda into the toilet bowl
- Follow with 1 cup of white vinegar — it will fizz
- Let it sit for 30–60 minutes
- Follow with hot water and flush
This method works best on toilet paper buildup and minor clogs. For serious pyramid plugs, move to Methods 4 or 5.
Method 4 — Enzyme-Based RV Tank Treatment
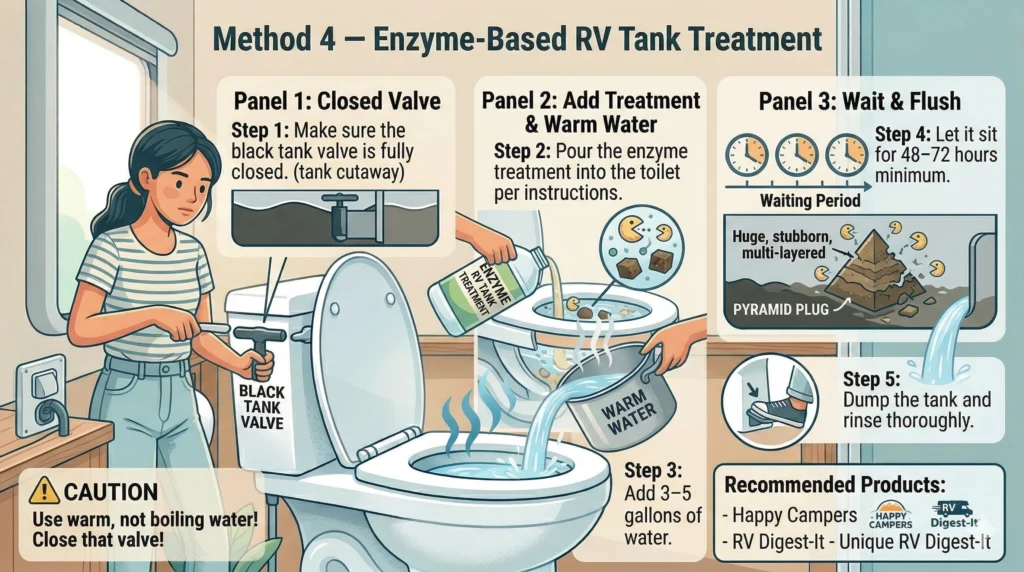
This is the smarter move for stubborn black tank clogs — especially pyramid plugs. Enzyme and bacteria-based treatments are designed to digest solid waste, breaking it down so it can be flushed out.
Camp Addict recommends closing the black tank valve, pouring an enzyme-based RV tank treatment into the toilet, and letting it sit for as long as possible — at minimum what the manufacturer recommends, but longer is better. For large pyramid plugs, Unique Camping + Marine advises allowing 48–72 hours for the treatment to fully break down the obstruction before attempting to dump the tank.
Steps:
- Make sure the black tank valve is fully closed
- Pour the enzyme treatment into the toilet per the product’s instructions
- Add 3–5 gallons of warm water to help the treatment reach the blockage
- Let it sit for 48–72 hours minimum
- Dump the tank and rinse thoroughly
💡 Products like Happy Campers, RV Digest-It, and Unique RV Digest-It are popular options widely available at RV supply stores and online.
Method 5 — The Ice + Drive Method (for black tank debris)
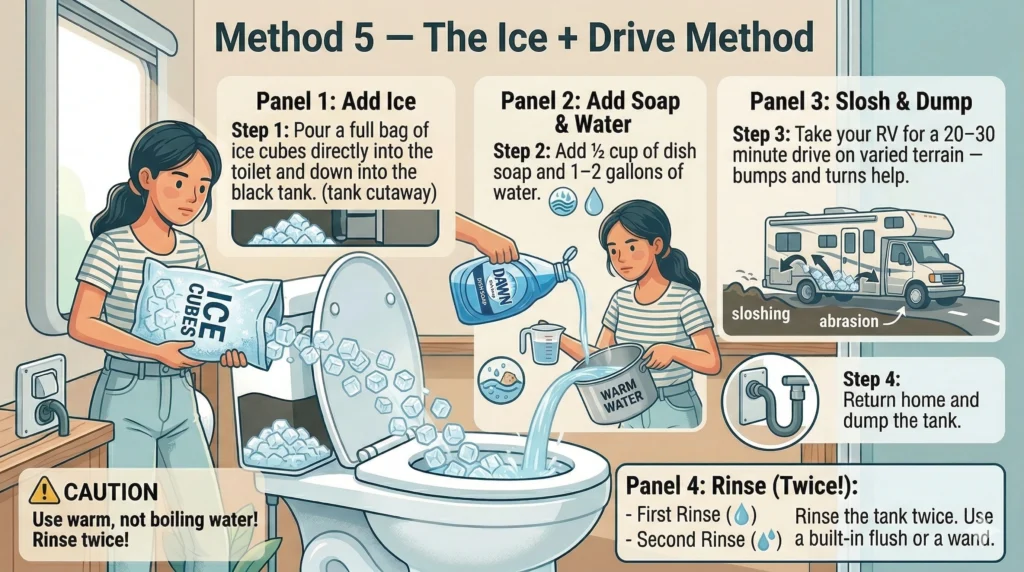
This one gets dismissed a lot because people misunderstand what it’s actually for. The RV Geeks clarify that ice cubes can’t solve pyramid plugs — but they work well on debris stuck to the floor or walls of a black tank, especially after storage.
Steps:
- Pour a full bag of ice cubes directly into the toilet and down into the black tank
- Add ½ cup of dish soap and 1–2 gallons of water
- Take your RV for a 20–30 minute drive on varied terrain — bumps and turns help
- Return home and dump the tank
- Rinse the tank twice
Think of the ice as a gentle abrasive that scours the tank walls as it slides around. Best used after long storage periods or when sensors are giving inaccurate readings.
Method 6 — Flexible Water Wand (the closest thing to a snake, and safe for RV plumbing)
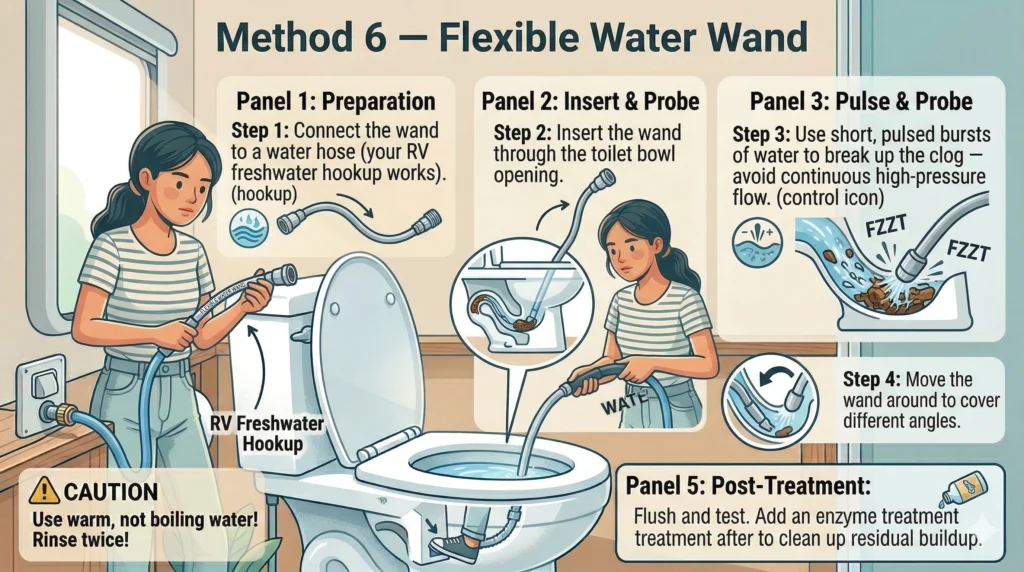
If the clog is stubborn and close to the toilet, a flexible water wand — sometimes called a tank rinse wand or toilet wand — is the most direct non-snake option. Happy Campers recommends inserting the wand through the toilet bowl and using pulse sprays to physically break up the obstruction.
Unlike a plumbing snake, a water wand is flexible, short, and designed for RV systems. It won’t damage seals or puncture the tank. The RV Geeks note that a standard plumbing snake is typically too long for most RV toilet systems anyway, since many RV toilets drop waste directly into the black tank just below.
Steps:
- Connect the wand to a water hose (your RV freshwater hookup works)
- Insert the wand through the toilet bowl opening
- Use short, pulsed bursts of water to break up the clog — avoid continuous high-pressure flow
- Move the wand around to cover different angles
- Flush and test. Add an enzyme treatment after to clean up residual buildup
When to Call a Professional
Most RV toilet clogs are fixable at the campsite with one of the methods above. But there are situations where DIY stops being the right move.
Signs the clog is beyond DIY
- You’ve tried multiple methods over 72 hours and nothing has moved
- There’s sewage backup coming up through other drains
- You can smell sewer gas inside the RV — beyond normal odors
- The toilet valve or seal appears damaged or is leaking
- The tank outlet valve won’t open or is physically stuck
- Visible damage to plumbing connections or the tank itself
Who to call — RV tech vs. standard plumber
This matters. A standard residential plumber knows home plumbing. They don’t necessarily know RV holding tank systems, dump valves, or how to work on a mobile rig. For anything involving the black tank, valve, or RV-specific toilet components, call a certified RV technician.
According to Happy Campers’ 2025 RV Repair Cost Index, mobile RV technicians typically charge a trip fee of $75–$200 before any work begins, plus labor on top. Some providers like Blue Moon Mobile RV charge $225/hour with a one-hour minimum, putting a typical service call in the $475+ range depending on your location. Some shops bill black and gray tank work at a premium rate due to sanitation requirements — so it’s worth getting a quote upfront.
The smarter play: resolve the clog using the DIY methods above, then use a professional for an annual black tank deep clean. Many RV technicians offer this as a preventative service, and it’s far cheaper than an emergency call mid-trip.
How to Prevent RV Toilet Clogs on Future Trips
Here’s the truth: most RV toilet clogs are completely avoidable. A few consistent habits will save you from ever reading this guide again.
What to flush (and what not to)
Unique Camping + Marine is clear on this: the only things that should go into your RV black tank are water, urine, feces, RV-safe toilet paper, and quality tank treatment. That’s the complete list.
Not “flushable” wipes. Not paper towels. Not feminine hygiene products. Not food scraps from the sink. These items don’t break down in a holding tank the same way they might in a municipal sewer system, and even products labeled “flushable” can clog your system.
Water habits that protect your black tank
Water is your best prevention tool. Unique Camping + Marine recommends holding the flush pedal down for at least 10 seconds each time you flush — that’s what it takes to actually move waste into the tank and keep solids below the waterline. Add a few inches of water to the bowl before use to help waste flow cleanly without sticking to the valve or walls.
Routine tank maintenance tips
- Add a tank treatment after every dump, even when nothing seems wrong
- Dump the tank when it’s at least two-thirds full — etrailer recommends waiting for the 2/3 mark so there’s enough water volume to flush solids out cleanly
- Rinse the tank thoroughly after dumping whenever possible
- Never store your RV with waste sitting in the tank
The #1 mistake weekend campers make
Leaving the black tank valve open while connected to a campground sewer hookup. It feels convenient — liquid drains away automatically and you never have to think about it. The catch: The RV Geeks call this one of RVing’s worst mistakes. When the valve is open, liquids run out continuously while solids stay behind and dry out. That’s exactly how pyramid plugs form. Keep the valve closed. Always. Only open it when you’re actively dumping a full tank.

Frequently Asked Questions
1. Can I use a regular plunger on an RV toilet?
You can, but it’s not recommended as a first step. The rubber valve seal at the bottom of an RV toilet bowl is more delicate than a home toilet’s components, and aggressive plunging can damage it. Roadtrippers notes that the toilet seal is an airtight barrier between you and the black tank — replace it immediately if it’s worn or cracked. Start with hot water and dish soap instead. If a plunger seems necessary, use gentle pressure only and check for seal damage afterward.
2. What’s the safest chemical to unclog an RV toilet?
Stick to enzyme-based RV tank treatments rather than chemical drain cleaners. etrailer specifically cautions against Drano, bleach, and other caustic household products, which can damage tank seals and internal plumbing components. Enzyme treatments like Happy Campers, RV Digest-It, or Unique Clear-It are designed to digest organic waste safely without harming RV materials. For minor clogs, Blue Dawn dish soap combined with hot water is a widely used and safe DIY option.
3. How do I know if I have a pyramid plug vs. a regular clog?
The clearest tell is whether you’ve had the black tank valve open at a campground hookup. Camp Addict identifies three signs of a pyramid plug: you left the valve open at some point, nothing (or very little) goes down the toilet anymore, and nothing comes out the sewer hose when you try to dump. A regular toilet-level clog usually just means water backs up in the bowl when you flush — the tank itself still drains normally when you dump it.
4. What’s the difference between RV toilet paper and regular toilet paper?
Roadtrippers explains that RV toilet paper is manufactured to dissolve quickly and completely in a black tank’s limited water volume, while regular household toilet paper is not. Standard TP can clump, stick to tank walls, and contribute to blockages over time. A quick test: put a few sheets in a jar of water, shake vigorously for 15 seconds — if it starts to break apart, it’s safe for an RV. If not, switch brands.
5. How often should I dump my black tank on a weekend trip?
Wait until the tank is at least two-thirds full before dumping. etrailer recommends the 2/3 rule because you need sufficient water volume in the tank to flush solids out cleanly — dumping a mostly empty tank leaves waste behind to dry and harden. For a typical weekend trip with one to two people, this usually means dumping once on the way out or immediately after returning home. Never leave waste sitting in the tank during storage.
Hi, I’m Daniel Brooks. I research and write about RV toilet repair, black tank maintenance, and sanitation troubleshooting. I create practical guides that help RV owners fix problems quickly and prevent costly damage.
3 thoughts on “How to Unclog an RV Toilet Without a Snake (Methods That Actually Work)”