You dump the tank. You drive away. And somehow, the smell is worse than before you pulled the valve.
Sound familiar? You’re not alone. This is one of the most common complaints in RVing, and the frustrating part is that most of the advice out there treats the symptom instead of the cause.
This guide covers exactly why the smell spikes after dumping, how to diagnose which specific problem you’re dealing with, and what to do about it — for good.
Why Does Your RV Toilet Smell Worse After Dumping?
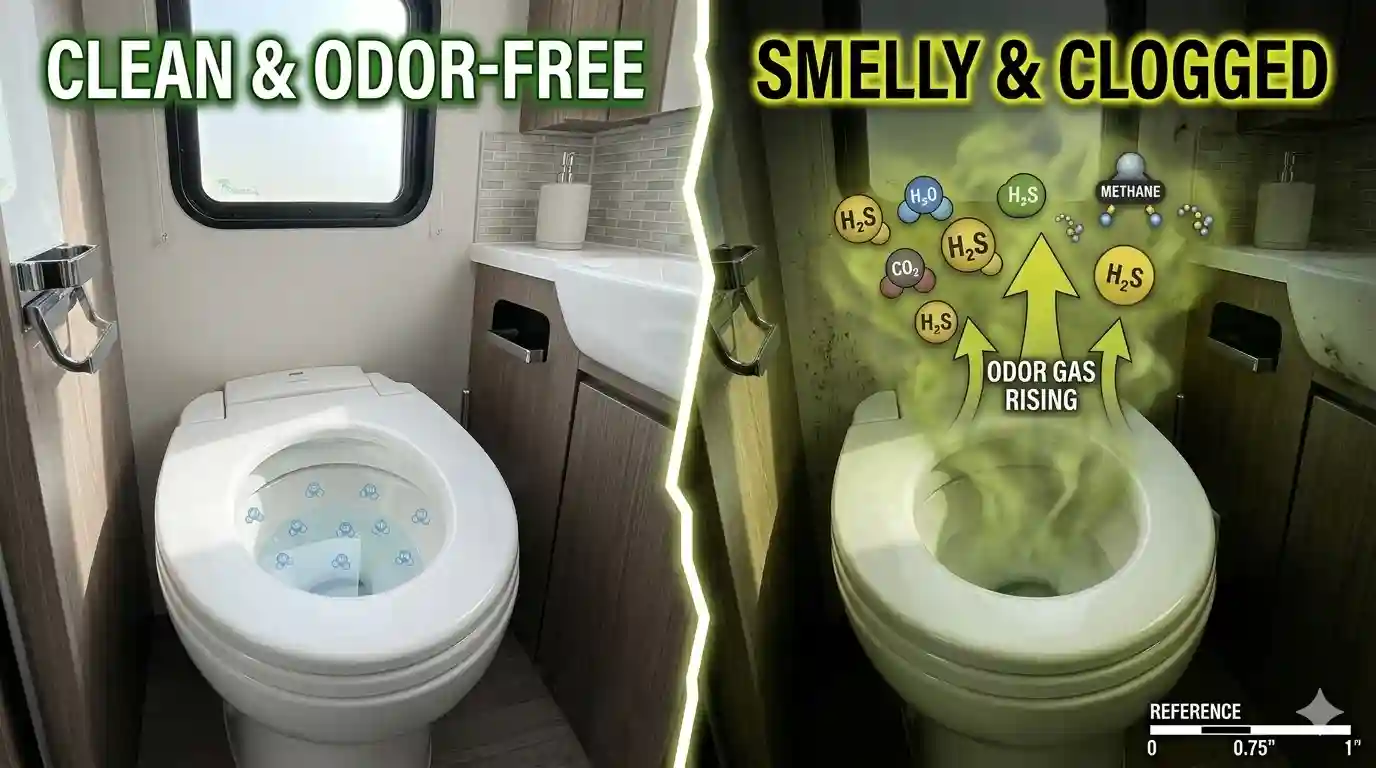
Here’s the part most people don’t understand: when your tank is full, the liquid waste actually suppresses odor to some degree. The gases being produced are dissolved in the liquid and covered by it.
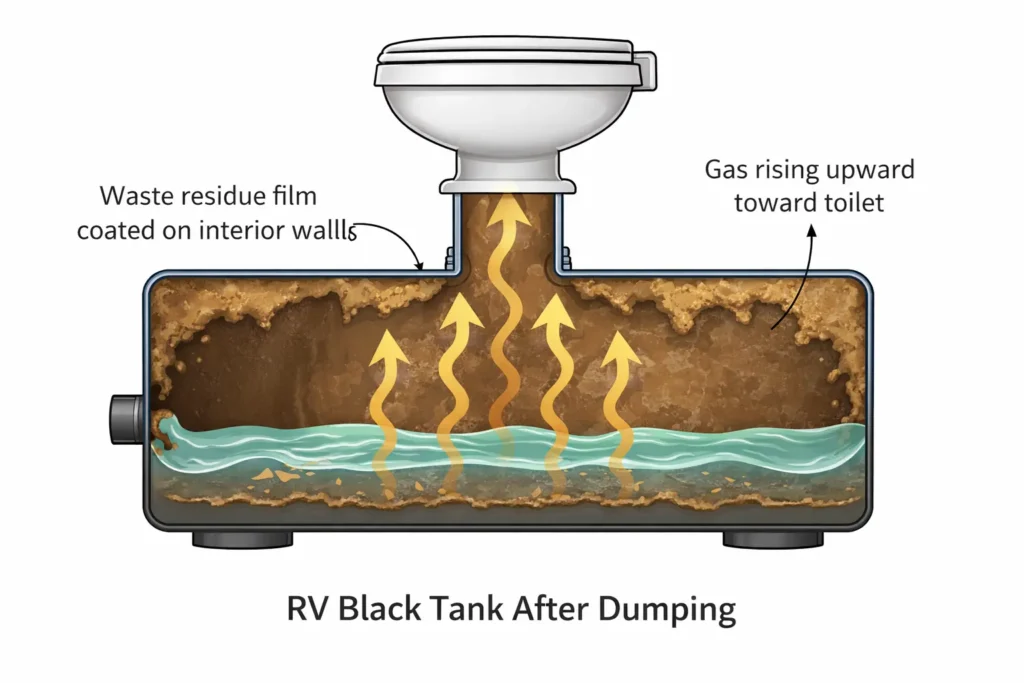
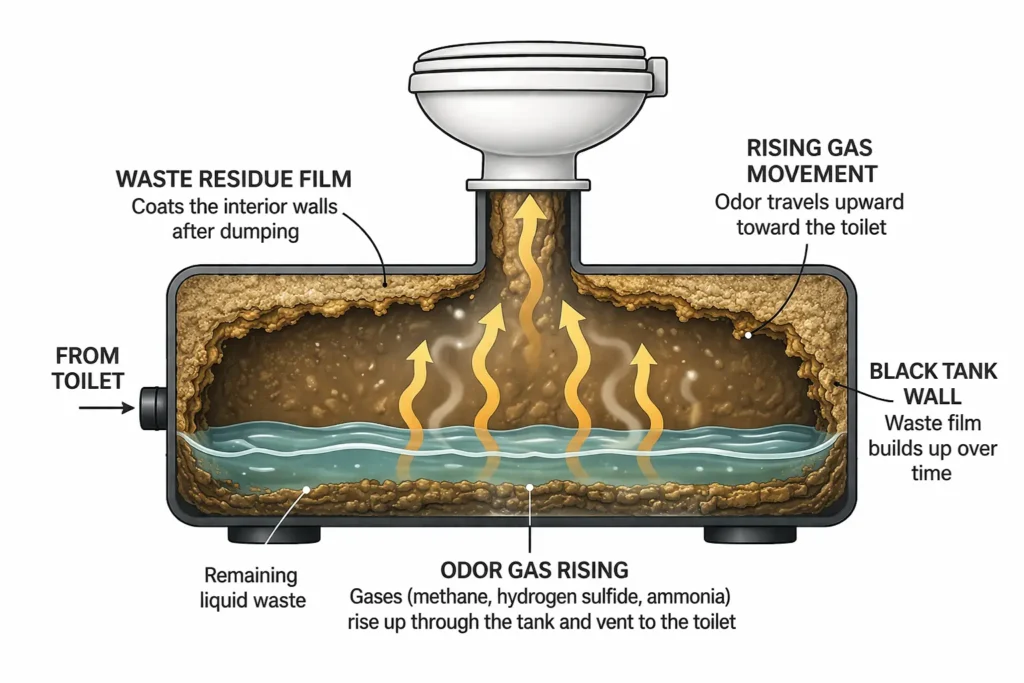
The moment you drain the tank, that liquid layer is gone. What’s left? A coating of dried waste residue clinging to every surface of the tank walls. That residue sits exposed to air, off-gasses rapidly, and pushes concentrated odor straight up through your toilet and vent system.
RVers sometimes call this “rebound odor.” It’s not random — it’s predictable, and it’s fixable once you understand what’s driving it.
The Real Science Behind the Smell
What Actually Creates the Odor — Anaerobic vs. Aerobic Bacteria
Your black tank is a living ecosystem. The problem isn’t bacteria in general — it’s the type of bacteria that’s winning inside your tank.
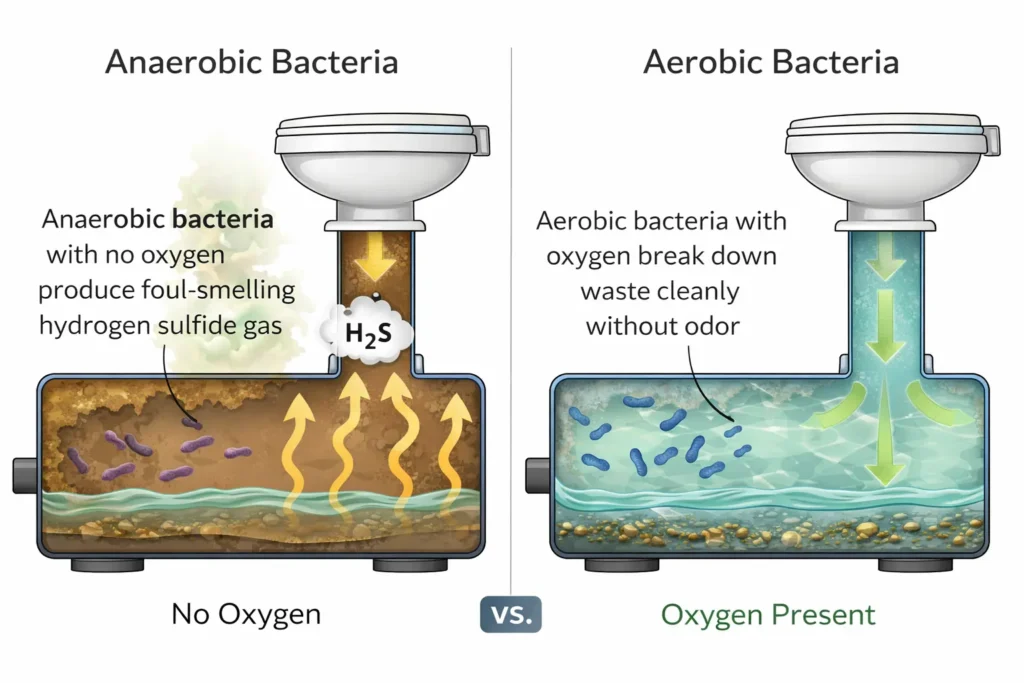
Anaerobic bacteria — the “bad” kind — thrive in oxygen-deprived environments. When they break down waste, they release volatile sulfur compounds including hydrogen sulfide (H₂S) and methyl mercaptan.
Those are the gases responsible for the rotten egg and sewer odors that send you outside to unhook the hose as fast as possible.
Aerobic bacteria — the kind introduced by enzyme and bacteria-based treatments — need oxygen to function. When aerobic bacteria are present and active, they break down waste and produce carbon dioxide and water instead of sulfur gases. The tank smells dramatically better as a result.
The goal of good tank management is simple: keep aerobic bacteria in control and starve out the anaerobic population.
Why Dumping Day Is the Worst Day for Odor
Three things happen at once when you dump that create a perfect odor event:
First, the liquid leaves and takes its odor-suppressing layer with it. Second, dried residue on the tank walls — sometimes called “wall film” — is now fully exposed to air and off-gassing rapidly. Third, pulling the dump valve briefly disrupts the pressure in your vent system, which can push tank gases back into the living space instead of out through the roof.
That’s not bad luck. That’s physics. And understanding it tells you exactly where to intervene.
6 Reasons Your RV Toilet Smells After Dumping (And How to Diagnose Each One)
1. Tank Wall Residue — The “Rebound Odor” Problem
What’s happening: Every time you dump without a proper rinse cycle, a thin film of waste stays behind on the tank walls. Over multiple dump cycles, this film thickens. Once the liquid level drops, it’s exposed and volatile.
How to diagnose it: The smell hits immediately after dumping and fades somewhat once you refill with fresh water and treatment. If this is your pattern, wall residue is the primary driver.
The fix: Commit to a full backflush rinse at every dump station. Fill the tank, let it slosh, drain, and repeat until the water runs clear. Then add your tank treatment immediately — not after you’ve driven two hours down the road.
2. A Clogged or Blocked Vent Pipe
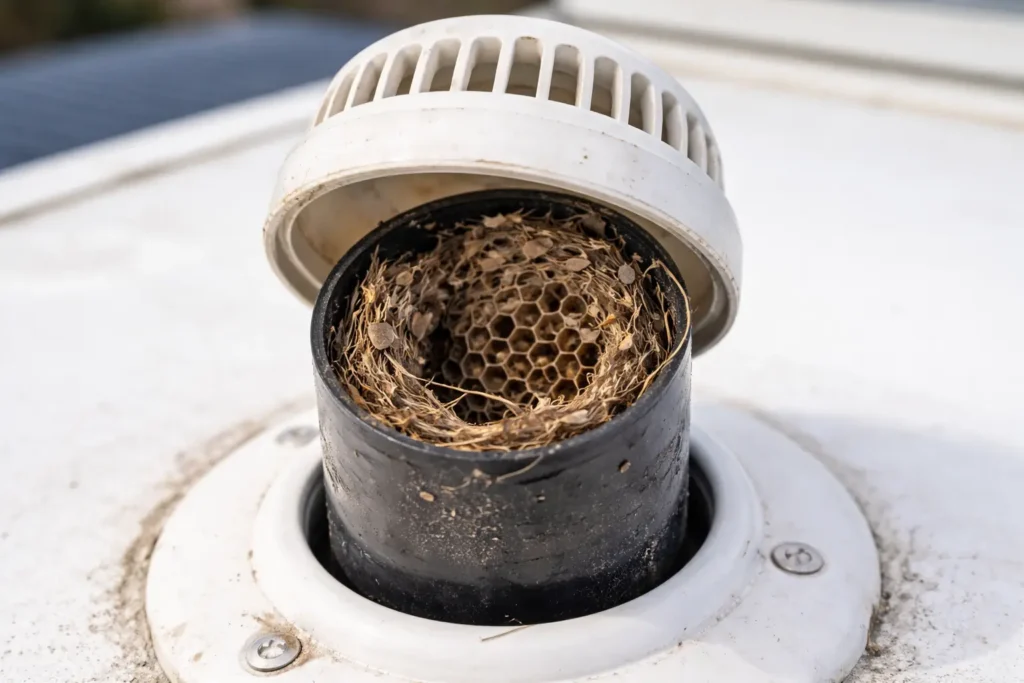
What’s happening: Your black tank has a pipe that runs from the top of the tank through the RV roof. Its job is to let gases escape outside. Wasps and spiders are particularly attracted to sewer gas and frequently build nests inside vent caps, blocking the flow entirely.
When the vent is blocked, gases produced in the tank have nowhere to go but back down — through your toilet seal and into the cabin.
How to diagnose it: If the smell is constant (not just post-dump), strongest near the toilet, and not tied to water level, a blocked vent is a likely cause. Climb on the roof and check the vent cap visually.
The fix: Clear any blockages from the vent cap. A Cyclone vent cap replacement (under $25) creates a low-pressure zone that actively draws gases out rather than letting them stall. If your vent pipe has disconnected at the tank fitting due to road vibration, that’s a repair job — but check it before spending money on treatments.
3. A Failing Toilet Seal or Ball Valve
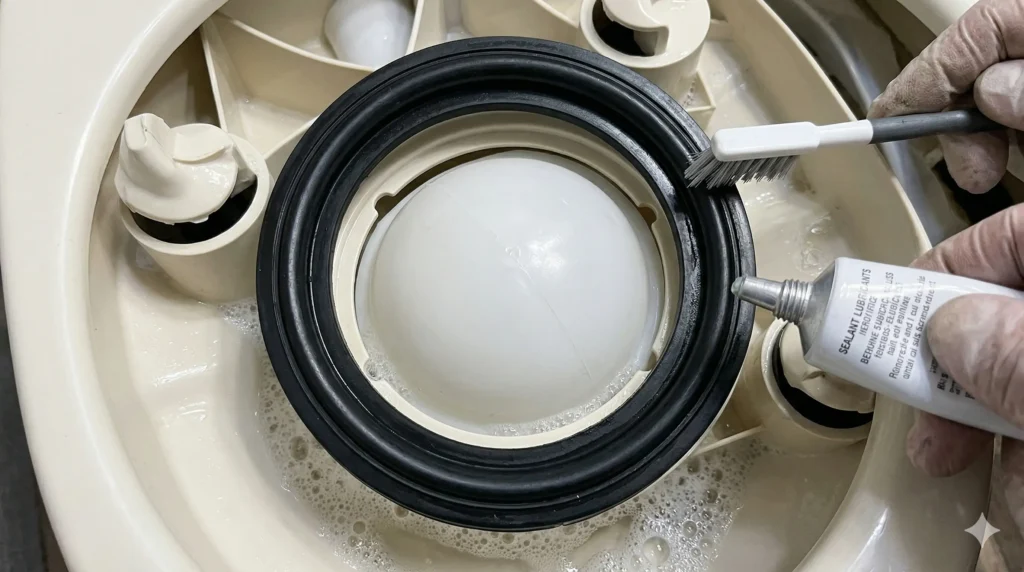
What’s happening: The rubber seal at the base of your toilet is the only barrier between your nose and the tank. It relies on a small amount of water in the bowl to maintain that seal. When it dries out, cracks, or loses elasticity, gas bypasses it constantly.
This is especially common after storage periods when no water has been sitting in the bowl.
How to diagnose it: Pour water into the bowl and watch it closely. If the water drains away in under a minute without flushing, your seal is failing. You can also look for visible cracking or stiffness around the seal ring.
The fix: Seal replacement is a straightforward job that costs $10–$30 in parts. See our detailed guide on replacing an RV toilet water valve for step-by-step instructions. If you’re also seeing moisture at the base of the toilet, check our guide on RV toilet leaking at the base — a seal failure often shows up in both places at once.
4. The Black Tank Valve Was Left Open
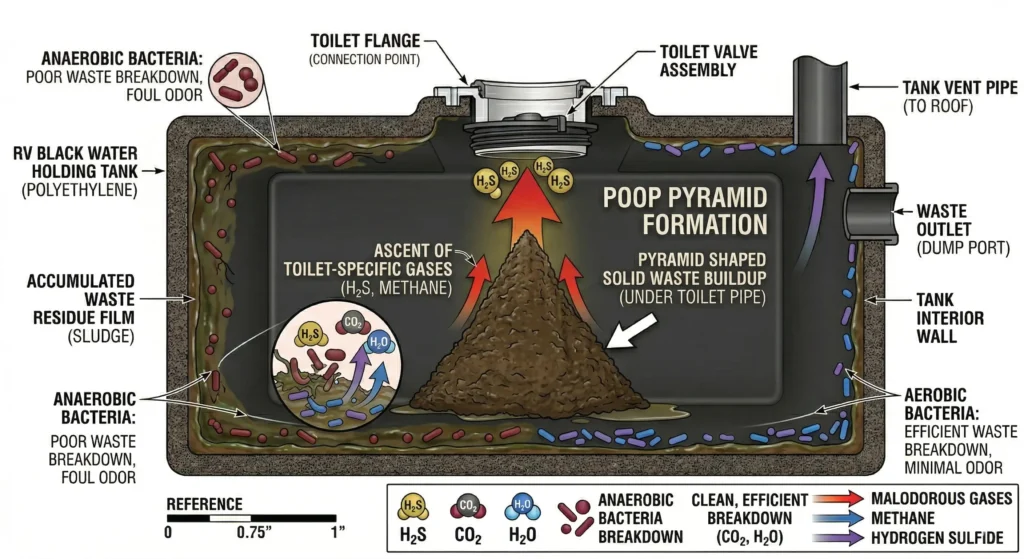
What’s happening: Leaving the black tank valve open while connected to a full hookup campsite seems logical — waste goes straight to the sewer, right? The problem is that liquid drains immediately but solids don’t. This is the leading cause of the infamous “poop pyramid” — a hardened mound of solid waste directly under the toilet that creates severe odor, clogs, and buildup that can take multiple deep cleans to resolve.
How to diagnose it: If you regularly leave the valve open at hookup sites and are now dealing with persistent post-dump odor, this is likely contributing. A tank rinse wand inserted through the toilet opening will tell you if there’s solid buildup at the base of the tank.
The fix: Always keep the black tank valve closed. Dump when the tank is at least two-thirds full — that liquid volume is necessary to keep solids suspended and moving during a dump.
5. Not Enough Water Per Flush
What’s happening: Insufficient water in the tank allows waste to dry and compact, creating ideal conditions for anaerobic bacterial overgrowth. In hot weather this happens fast. If you’re conserving water while dry camping, you’re also accelerating the odor cycle.
How to diagnose it: Post-dump odor that’s significantly worse in summer or after dry camping trips points to dehydrated waste buildup.
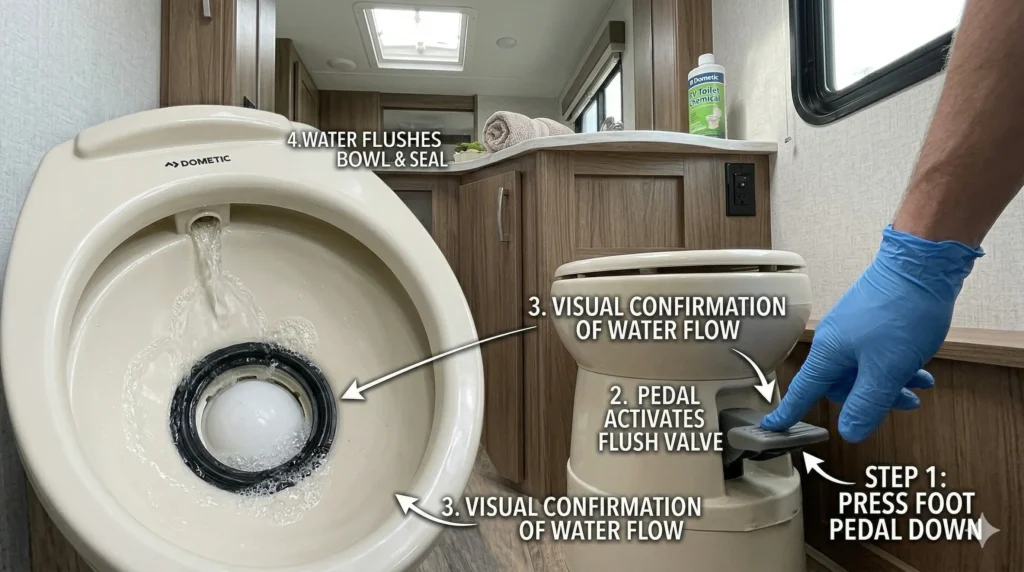
The fix: Hold the flush pedal down for at least 10 seconds on every flush. Add 2–3 gallons of water to the tank after every dump before your next use. Waste that stays suspended breaks down cleanly. Waste that dries on plastic doesn’t.
6. Using the Wrong Tank Treatment
What’s happening: Not all tank treatments work the same way. Chemical treatments that use formaldehyde or bronopol kill bacteria — including the aerobic bacteria you actually want in the tank. They mask odor short-term but create conditions for worse anaerobic activity over time. They also degrade seals and can be banned at many campgrounds and dump stations.
How to diagnose it: If you’ve been using blue chemical tablets and odor seems worse over time (especially after dumping), your treatment choice is working against you.
The fix: Switch to an enzyme-based or mineral-ion treatment. More on this in the products section below.
How to Properly Dump and Rinse Your Black Tank (Step-by-Step)
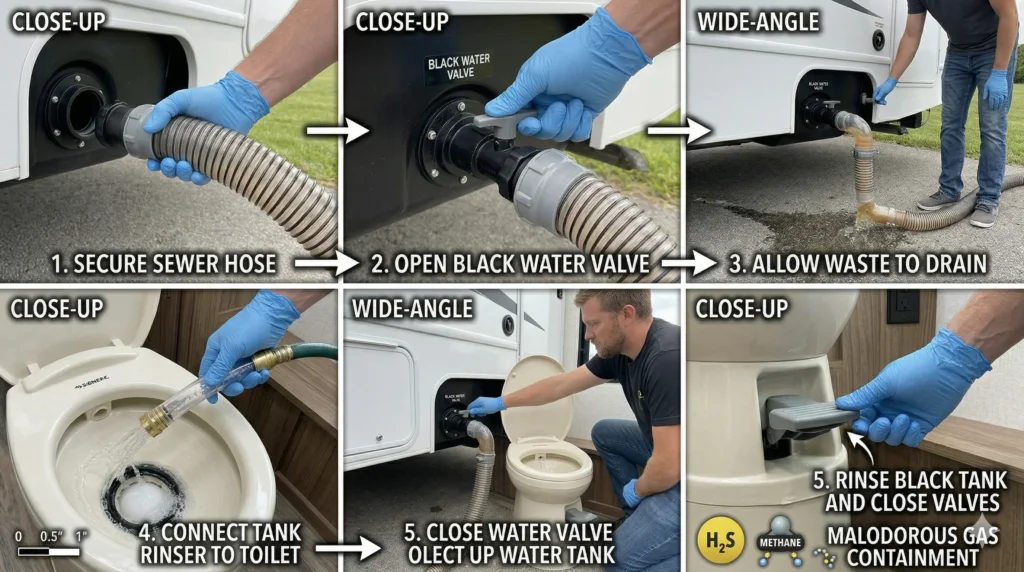
Most post-dump odor problems come down to an incomplete dump process. Here’s what a proper dump actually looks like:
- Connect your hose and open the black tank valve first. Always black before grey — the grey water flush at the end cleans your hose. Let it drain completely.
- Rinse with your built-in tank flush system or a wand. If your rig has a built-in black tank flush port, connect a hose and run it for 3–5 minutes. If not, use a tank rinse wand inserted through the toilet. The goal is to dislodge wall film before it dries.
- Close the valve, fill the tank partially, and agitate. Add 5–10 gallons of fresh water, close the valve, and let it slosh. If you’re at a dump station, drive forward and backward a few feet. This physical agitation dislodges residue that a stationary flush misses.
- Drain again and check the clear elbow. The water running into the sewer should be running clear before you call the rinse done. Tan or brown water means there’s still material in the tank.
- Open the grey tank valve to flush the hose. Grey water is relatively clean and serves as a natural hose rinse.
- Add treatment and fresh water immediately. Don’t wait. Add your enzyme treatment and at least 2–3 gallons of water before you cap the toilet and drive off. That treatment needs liquid to activate and begin working before any new waste is introduced.
The whole process takes 10–15 extra minutes. It’s the single highest-return maintenance habit you can build.
The Toilet Seal Problem — A Silent Cause Most RVers Miss
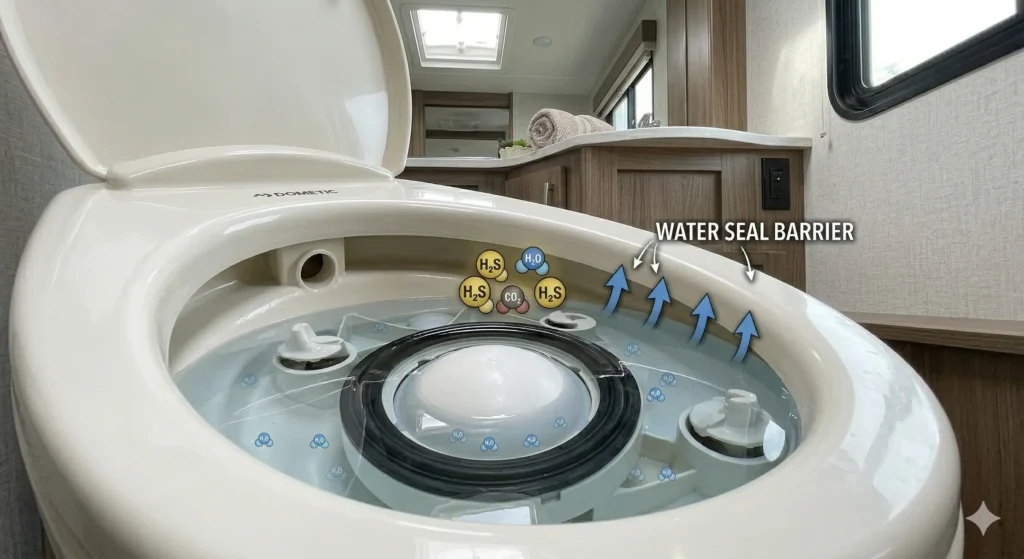
Most RVers troubleshoot smell as a tank problem. But the real entry point for odor is often the toilet itself — specifically the seal.
The ball valve seal in your RV toilet has one job: hold water in the bowl and block tank gas from entering the cabin. When the seal is healthy and the bowl has water in it, you have a proper gas barrier. When the seal dries out or cracks, that barrier is gone — and every small pressure change (flushing, opening a window, running a vent fan) pushes gas from the tank up into your living space.
RVs that sit in storage without water in the bowl are particularly vulnerable — rubber dries out and loses elasticity fast without moisture. Always leave water in the bowl when you park, and check the seal condition at the start of each season.
Signs your seal is failing:
- Water drains from the bowl within 30–60 seconds without flushing
- You can smell tank odor from the toilet even when the flush pedal isn’t engaged
- Visible cracking, stiffening, or deformation on the rubber seal ring
- The ball valve doesn’t seat cleanly when closed
The fix: A replacement toilet seal kit runs $10–$30 and is one of the easiest repairs in RV maintenance. Applying a light coat of seal lubricant two or three times per season adds months to seal life. If you’re dealing with a leak at the base rather than just odor, the problem has progressed — check our guide on RV toilet leaking at the base before it reaches your subfloor.
How Tank Buildup Wrecks Your Sensors (And Makes the Smell Problem Worse)
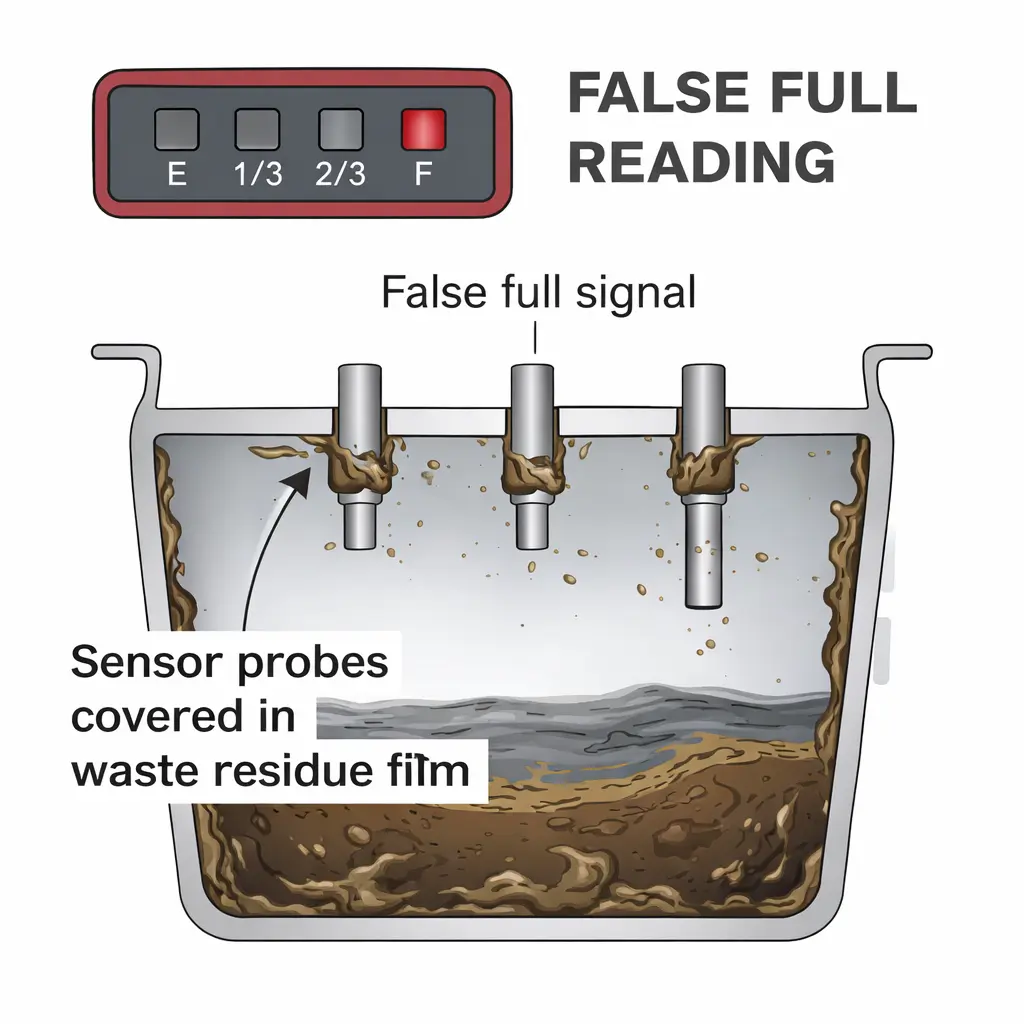
Here’s a connection most guides don’t make: your tank sensors and your odor problem have the same root cause.
False sensor readings happen when waste and toilet paper residue coats the sensor probes on your tank walls, completing an electrical circuit that tricks the display into showing “full” even after you’ve dumped.
When your sensors lie to you, your tank management falls apart. You either dump too early (when the tank is too empty to flush solids properly, worsening buildup) or too late (letting the tank overfill and stress the seals). Either way, the same buildup that causes false readings is also releasing odor.
The good news: the fix for both problems is the same.
Enzyme-based treatments can restore accurate sensor readings in as little as 12–24 hours by dissolving the residue that’s both fouling your sensors and producing odor. For preventative maintenance, cleaning the tank every three months keeps both problems from developing in the first place.
Some estimates suggest up to 60% of sensor “failures” are actually just residue buildup — not broken sensors at all. Try an enzyme soak before you replace anything.
If you’ve tried multiple deep cleans and the sensors are still stuck, it may be time to upgrade to an external sensor system. Systems like the SeeLeveL mount on the outside of the tank and read levels without any internal probes, making them completely immune to buildup-related failures — a permanent fix for RVers who’ve been fighting this problem for years.
Products That Actually Help (And What to Skip)
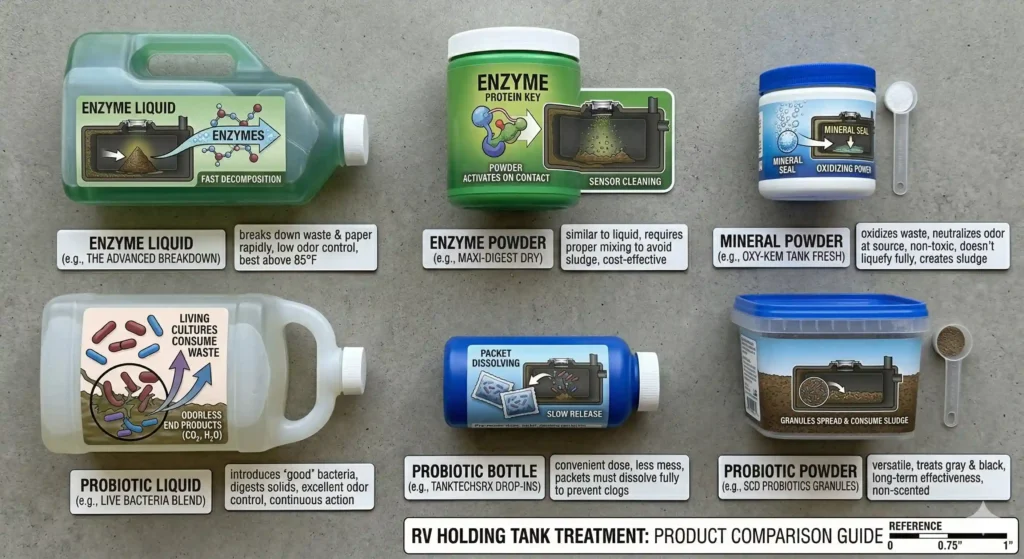
There’s a lot of noise in the tank treatment category. Here’s a straight comparison.
Enzyme / Bacteria Treatments — Recommended
These treatments introduce aerobic bacteria and enzymes that actively digest waste, toilet paper, and organic residue. They address the root cause of odor rather than masking it.
- Unique RV Digest-It — widely considered the benchmark enzyme treatment for liquefying waste and preventing pyramid plugs. Works best in moderate climates. Consistent use also keeps sensors clean.
- Walex Commando — particularly effective for sensor restoration and routine maintenance. Good choice for weekend campers who dump every 3–7 days.
Mineral-Ion Treatments — Recommended for Hot Climates
- Happy Campers — a dry powder that uses mineral-ion chemistry to neutralize hydrogen sulfide at the molecular level rather than masking it. Particularly effective in high heat where enzyme products can lose potency. Cost-effective: one tub covers dozens of treatments.
Probiotic Treatments — Best for Full-Timers
- TanktechsRx — uses beneficial probiotics to colonize the tank and out-compete odor-causing bacteria over time. Requires patience to establish the colony, but produces consistently clean tanks for long-term RVers.
Chemical / Formaldehyde Treatments — Skip These
Chemical treatments kill all bacteria in the tank — including the aerobic bacteria that break down waste cleanly. They mask odor short-term but create conditions for worse anaerobic activity. Many campgrounds and dump stations now ban formaldehyde-based treatments. They can also degrade rubber seals over time. There’s no reason to use them when better options exist.
Accessories Worth Buying
- Cyclone vent cap — passive hardware that creates a low-pressure zone over the vent pipe and actively pulls gases out. Under $25 and genuinely useful if vent issues are contributing to your smell problem.
- Toilet seal lubricant — $8–$12 and applied twice per season, it extends seal life significantly. Much cheaper than waiting until the seal fails and needs replacing.
- Tank rinse wand — if your rig doesn’t have a built-in flush system, a rinse wand inserted through the toilet opening is the best mechanical cleaning tool available for under $20.
Treatment Comparison at a Glance
| Product Type | How It Works | Best For | Heat Stability | Sensor Impact |
|---|---|---|---|---|
| Enzyme / Bacteria | Digests waste biologically | Weekend campers, moderate climates | Moderate | Positive (dissolves buildup) |
| Mineral-Ion (Happy Campers) | Neutralizes H₂S at molecular level | Hot climates, desert camping | High | Neutral |
| Probiotic (TanktechsRx) | Colonizes tank with good bacteria | Full-timers, long-term tanks | Moderate | Positive over time |
| Chemical / Formaldehyde | Kills all bacteria, masks odor | Not recommended | High but counterproductive | Negative (worsens buildup long-term) |
FAQ: RV Toilet Smell After Dumping
Why does my RV toilet smell right after I dump the tank?
When you drain the tank, the liquid layer that suppresses odor disappears. What’s left is a coating of dried waste residue on the tank walls that’s now fully exposed to air and releasing gases rapidly. The primary odor gas is hydrogen sulfide (H₂S), produced by anaerobic bacteria breaking down organic waste in low-oxygen conditions. Adding a proper backflush rinse and treating the tank immediately after dumping prevents this residue from building up in the first place.
How long should I rinse my black tank after dumping?
Rinse until the water running out of the drain hose runs completely clear — not until a timer goes off. For most RVers on a standard trip, that takes 5–10 minutes of active rinsing with a built-in flush or rinse wand, followed by one or two fill-and-drain cycles. Even a thin film of waste left on tank walls after dumping can build up on sensor probes and cause both false readings and persistent odor over multiple dump cycles. Clear water is your confirmation that the rinse is done.
Can a bad toilet seal cause smell after dumping?
Yes — and it’s one of the most commonly missed causes. A failing rubber seal no longer holds the water barrier in the toilet bowl, allowing tank gases to pass directly into the cabin. The pressure disruption that happens when you dump can push odor through a compromised seal much more aggressively than usual, which is why some RVers notice the smell specifically at dump time. Test it by filling the bowl with water and watching whether it holds — if it drains on its own within a minute, the seal needs replacing. See our guide on replacing an RV toilet water valve for the full process.
Do enzyme treatments actually work better than chemical tablets?
For long-term odor control and tank health, yes. Chemical treatments kill all bacteria in the tank — including aerobic bacteria that break down waste cleanly — and only mask odor rather than eliminating its source. Enzyme and bacteria-based treatments actively digest waste and organic residue, which reduces both odor and the buildup that causes sensor problems. The trade-off is that enzymes work best in moderate temperatures and need time to establish — they’re not a one-dose fix. For hot climates where enzymes lose potency, a mineral-ion product like Happy Campers is a more stable alternative.
Why do my tank sensors still read full after I dump, and does that cause more smell?
Sensors that read full after dumping are almost always being fooled by waste and toilet paper residue coating the probe surfaces inside the tank — the same residue that’s also releasing odor. When you can’t trust your sensor, you lose accurate control over dump timing, which leads to either dumping too early (solids don’t flush properly) or too late (tank overfills). Both outcomes worsen buildup and odor. An enzyme treatment soak can restore accurate readings in as little as 12–24 hours by dissolving the residue off the probes. If cleaning doesn’t resolve it, upgrading to an external sensor system is a permanent solution.
Hi, I’m Daniel Brooks. I research and write about RV toilet repair, black tank maintenance, and sanitation troubleshooting. I create practical guides that help RV owners fix problems quickly and prevent costly damage.