⚡ Quick Answer: Flush the toilet until pink RV antifreeze appears in the bowl, hold the pedal a few extra seconds, then pour 1–2 cups directly into the bowl. Flush an additional 1–2 quarts into the black tank (strongly recommended). Always use non-toxic propylene glycol-based RV antifreeze. DIY cost: $25–$100.
Most winterization guides treat the toilet like an afterthought. Drain the tanks, pump antifreeze through the lines — done. But the toilet is one of the most failure-prone spots in the system. Skip it properly and you’ll come back in spring to a cracked flush valve, a damaged bowl seal, or a frozen black tank dump valve.
The toilet has its own vulnerabilities independent of the supply lines: the flush valve, the bowl seal, the dump valve, and residual waste inside the black tank can all freeze on their own. This guide covers the full process — pre-winterization tank prep, antifreeze steps with toilet-specific detail, product recommendations, costs, common mistakes, and how to de-winterize in spring.
Why Your RV Toilet Needs Its Own Winterization Step
The toilet is not just another faucet. It has a rubber seat seal (the blade that holds water in the bowl), a water valve that activates when you press the pedal, and a direct connection to the black tank. Any water left in those components can freeze and crack them — and a cracked toilet valve or damaged seat seal isn’t always obvious until you’re already on the road.
Freeze damage to an RV toilet is not cheap. According to Trailers of the East Coast, busted faucets and toilets average $500+ to repair, and water damage to the surrounding floor can exceed $1,000. Total system-wide freeze damage routinely runs $1,000 to $4,600 — and most RV insurance policies won’t cover it since it’s classified as preventable.
The seat seal also needs liquid contact to stay pliable during months of storage. Let it dry out and you’ll deal with sewer gas inside the RV the moment you dewinterize. A small pool of antifreeze left in the bowl prevents that entirely.
If your toilet was already leaking at the base or the flush valve was acting up before winter, sort those out first. See our guides on RV toilet leaking at the base and replacing an RV toilet water valve before proceeding.
What You Need Before You Start
- Non-toxic, propylene glycol-based RV antifreeze — 2–4 gallons for most rigs
- Water pump converter kit or short plastic tubing (optional but faster)
- Funnel (if pouring into the fresh tank manually)
- Flathead screwdriver (for some water heater bypass setups)
- Small spray bottle (useful for coating the toilet seal without wasting product)
- Rubber gloves and rags for spills
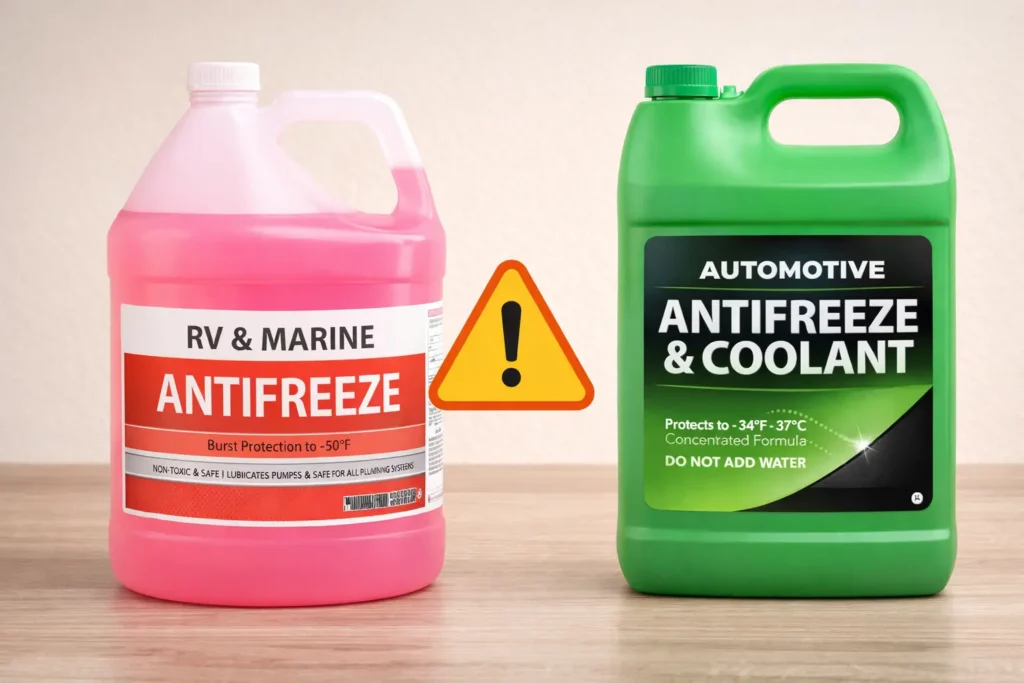
⚠️ Never use automotive antifreeze. It contains ethylene glycol, which is toxic to humans and pets and will destroy your toilet seals, rubber hoses, and gaskets. You want the pink stuff — non-toxic, propylene glycol-based RV antifreeze only.
Also remove any inline water filters before you start. Keystone RV recommends discarding the cartridge and draining the filter housing before running antifreeze — leaving the filter in can damage it and restrict flow.
How to Winterize an RV Toilet with Antifreeze — Step by Step
Step 0: Clean and Empty Both Holding Tanks First
Before any antifreeze goes in, the black and grey tanks need to be flushed and dumped. Winterizing a dirty black tank traps waste residue and odor-causing bacteria against the tank walls all winter — antifreeze alone won’t fix that come spring.
Black tank: Dump at an approved station, then use your black tank flush port (if equipped) or a tank rinse wand to flush the interior until the water runs clear. Dump again.
Grey tank: Dump and flush through all sink drains with hot water to clear grease and soap buildup.
If you’ve been dealing with solid waste buildup, see our guide on how to fix a pyramid plug in your RV black tank before winterizing.
Step 1: Drain the Entire Water System
Disconnect from any external water source. Open the fresh water tank drain valve and let it empty completely. Open all faucets, the showerhead, outdoor shower, and any washer hookup — let everything drain fully. Flush the toilet once now to remove standing water from the bowl and base. The goal is to remove as much water as possible before antifreeze goes in.
Step 2: Turn Off and Bypass the Water Heater
Switch off the water heater at both gas and electric modes. Once it cools, remove the drain plug and open the pressure relief valve to drain it fully. Then set the bypass valves to the bypass position.
Skipping the bypass means your antifreeze floods the 6–10 gallon heater tank first — wasting most of your product before it ever reaches the water lines. Most manufacturers also don’t recommend antifreeze inside the heater tank at all.
Step 3: Pump Antifreeze Through All Water Lines
The fastest method: install a water pump converter kit. Disconnect the inlet line from the fresh tank at the pump, attach a short tube, and place the other end into a gallon jug of antifreeze. Turn on the 12V pump to pressurize the system.
No converter kit? Pour 2–3 gallons of antifreeze directly into the fresh water tank and use the pump to push it through.
Start at the faucet furthest from the pump. Open the cold side until pink antifreeze flows out, then close it. Do the hot side. Work through every faucet, shower, outdoor shower, and any washer hookup — moving toward the pump each time.
Step 4: Flush the Toilet — and Protect the Black Tank
This step has two parts. Both are important.
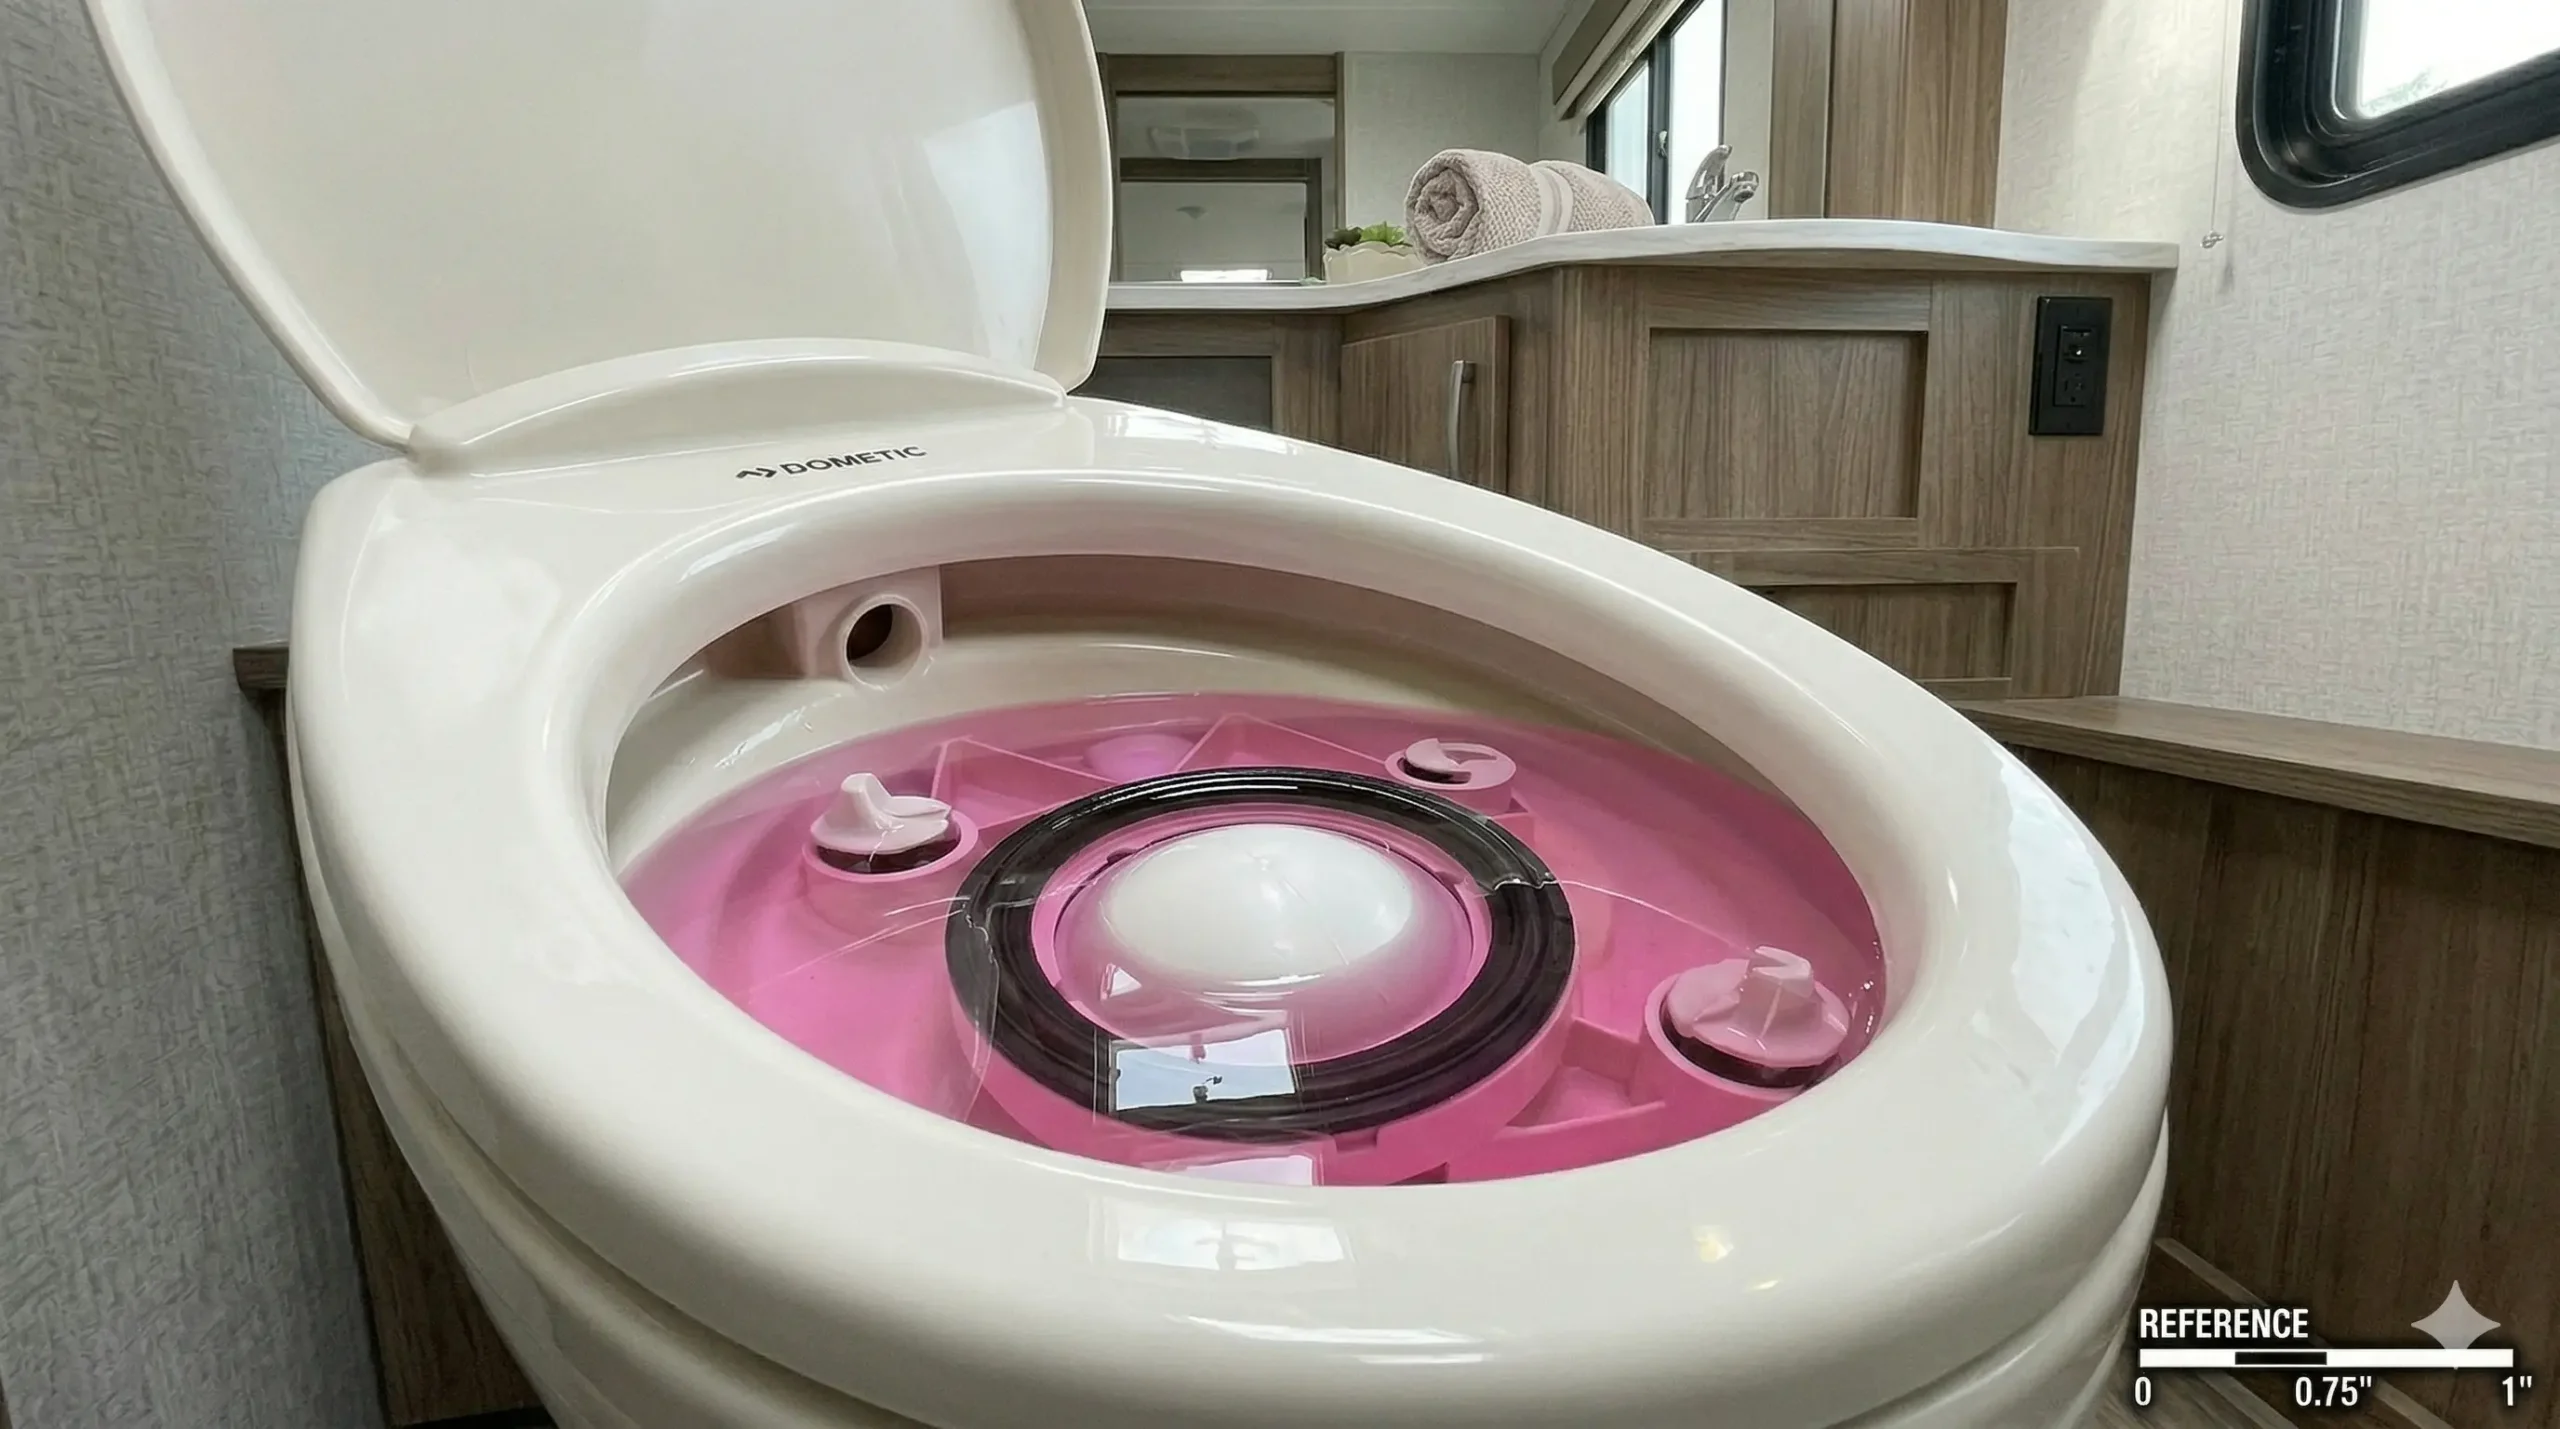
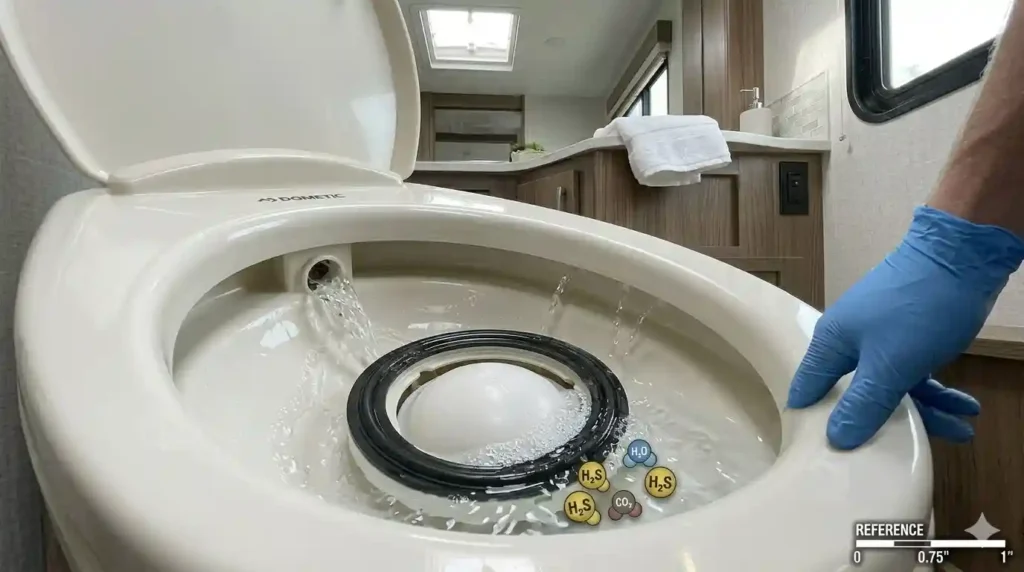
Part A — Flush until pink: Keep pressing the toilet pedal until you see clearly pink antifreeze flowing into the bowl. Pink-tinted water is not enough — wait for visibly pink liquid. Then hold the pedal down for a few extra seconds so the flush valve is fully coated, not just rinsed. After that, pour an extra 1–2 cups directly into the bowl to protect the flush valve and keep the rubber seat seal pliable through storage.
If the bowl drains automatically on your model, use a spray bottle to coat the seal directly — hold the flapper open and spray antifreeze around the interior of the bowl. Leave the liquid inside the bowl untouched — that’s what keeps the seal from drying out. You can wipe the outer rim and seat if you’re worried about staining, but the liquid inside stays.
Part B — Protect the black tank (strongly recommended, not optional):
✅ Do this: Pour 1–2 quarts of antifreeze into the toilet and flush it into the black tank. Keystone RV specifically recommends allowing at least 1 quart to enter the black tank during winterization. Even a thoroughly flushed black tank retains residual waste — antifreeze prevents that from freezing into the walls, protects the dump valve seals from drying out, and reduces odor and clog problems in spring.
If your RV has a separate black tank flush rinse line, run antifreeze through that line too — it holds its own residual water and is easy to overlook.
For a full breakdown of why the flush valve is such a common failure point, see our complete RV toilet repair guide.
Step 5: Protect All P-Traps and Drains
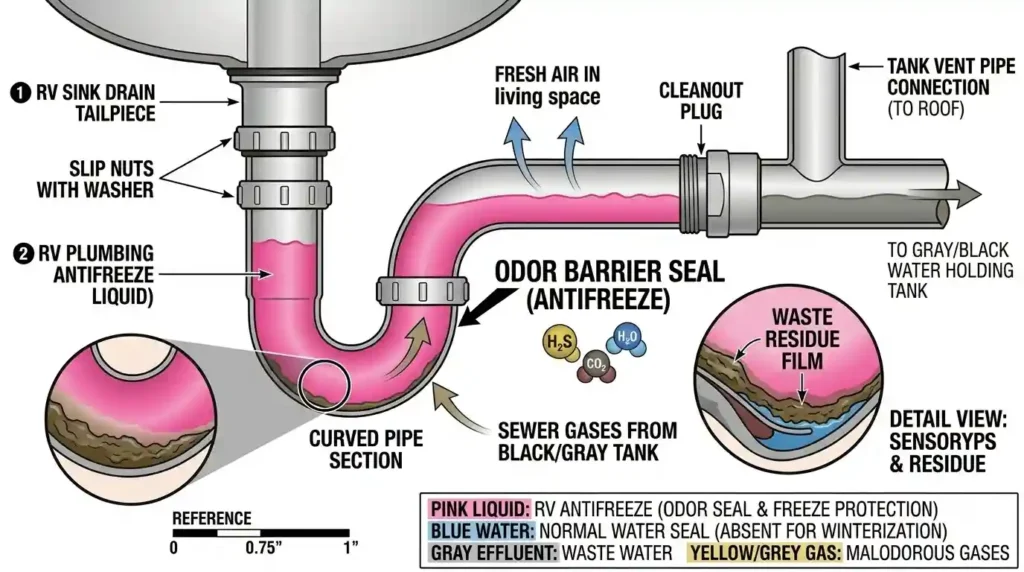
Pour about 1–1.5 cups of antifreeze down each sink drain and the shower drain. The curved P-trap section holds a water seal — fill it with antifreeze instead of water so it won’t crack.
The P-trap also prevents sewer gas from entering the living space during storage. A dry P-trap is an open channel. If you return in spring to persistent odors, a dried-out P-trap or toilet seal is usually the cause. See our guide on why your RV toilet smells for a full breakdown.
Step 6: Final System Checks
- Go to the city water inlet, remove the small screen, press the valve with a screwdriver until antifreeze comes out. Reinstall the screen.
- Close all faucets and valves.
- Reinstall all low-point drain caps.
- Confirm the water heater element is switched off.
- Verify the outdoor shower has been flushed.
- Keep one spare gallon of antifreeze — unexpected cold snaps happen.
🔧 Hybrid Method Note: Many experienced RVers blow out supply lines with compressed air first (max 40–45 PSI to avoid damaging PEX fittings), then add antifreeze only to the toilet, P-traps, and drains. This uses less product and makes spring flushing faster. The trade-off: compressed air can leave moisture in line valleys. The antifreeze-only method in this guide is safer for beginners. America’s RV Warranty breaks down both approaches in detail.
Which RV Antifreeze Should You Use?
Propylene Glycol vs. Ethanol-Based
There are two main types of non-toxic RV antifreeze: propylene glycol (PG) and ethanol-based. For the toilet — especially for 6+ month storage — the difference matters.
Propylene glycol is classified by the FDA as Generally Recognized As Safe (GRAS) for potable water systems. It also acts as a lubricant, actively extending the life of rubber seals and gaskets. In extreme cold or long storage, that lubrication is what keeps your seat seal and flush valve pliable — not brittle and cracked.
Ethanol-based antifreeze dries out rubber seals over time, is flammable, and often leaves an unpleasant aftertaste in water lines come spring. For the toilet specifically, it’s the wrong choice. The few dollars saved per gallon can cost hundreds in seal replacements.
Product Comparison
| Product | Formula | Freeze Protection | Seal Effect | Best For |
|---|---|---|---|---|
| RecPro RV Antifreeze | Propylene Glycol | -50°F / -46°C | Lubricates ✔ | Best overall — FDA GRAS, potable-safe, biodegradable |
| Star Brite Sea Safe | Virgin PG (no alcohol) | -50°F / -46°C | Lubricates + corrosion inhibitors ✔ | Best for older seals or 6+ month storage |
| Splash RV/Marine | Propylene Glycol | -50°F / -46°C | Lubricates ✔ | Budget-friendly, widely available |
| PEAK RV & Marine | Propylene Glycol | -50°F / -46°C | Lubricates ✔ | Solid all-rounder, pre-mixed |
| Ethanol-blend generics | Ethanol + PG blend | -50°F (varies) | Dries seals over time ✗ | Not recommended for toilet |
RecPro, Star Brite, Splash, and PEAK all protect to -50°F and come pre-mixed. Star Brite Sea Safe uses virgin PG with zero alcohol — the best choice for older seals or long-term storage. For most RVers, Splash or PEAK offer solid protection at a lower price.
⚠️ Watch the label on budget brands. Some discount brands quietly blend in ethanol or use recycled propylene glycol and label everything as “-50 RV Antifreeze.” If the formula isn’t listed prominently and the price is under $3/gallon, read the fine print first.
What Does It Cost to Winterize an RV Toilet?
| Approach | Cost Range | What’s Included |
|---|---|---|
| DIY — antifreeze only | $10 – $50 | 2–4 gallons of PG antifreeze at $3–$10/gallon |
| DIY — full kit | $25 – $100 | Antifreeze + water pump converter kit (~$10–$20) |
| Professional service | $85 – $500 | Full flush, antifreeze, P-traps, toilet, labor |
| Freeze damage repairs | $1,000 – $4,600+ | Burst pipes, cracked toilet valve ($500+), water heater ($700+), water damage ($1,000+) |
RV antifreeze runs $3–$10 per gallon, depending on formula and retailer. Most travel trailers and mid-size motorhomes need 2–4 gallons total. Add a converter kit once; future years cost only the antifreeze itself.
If you’d rather hire someone, professional winterization averages $85–$150 for most rigs, up to $500 for larger coaches. Some dealers bundle in spring de-winterization — worth asking about.
A single freeze event can push repair costs past $3,000, and most RV insurance policies classify freeze damage as preventable — meaning claims are frequently denied.
Common Mistakes That Ruin RV Toilet Winterization
Using the Wrong Antifreeze
Automotive antifreeze (ethylene glycol) is toxic and destroys seals. Ethanol-based RV antifreeze dries out rubber over time — bad for a toilet that sits sealed for months. Use propylene glycol, virgin formula if possible.
Stopping Before Pink Appears in the Bowl
Pink-tinted water is not enough. You need clearly pink antifreeze flowing into the bowl, then hold the pedal for a few extra seconds. That confirms the flush valve and black tank connection are fully coated.
Leaving the Bowl Completely Dry
Flushing antifreeze through but leaving the bowl empty defeats part of the purpose. The seat seal needs liquid contact to stay flexible during storage. Always leave antifreeze in the bowl. A dry or cracked seat seal is also the most common cause of sewer smells after long storage.
Skipping the Black Tank Antifreeze
Flushing until pink appears in the bowl does not mean the black tank has adequate protection. Residual waste and dump valve seals need direct antifreeze. Pour 1–2 quarts in and flush it through — not optional.
Forgetting the Water Heater Bypass
Skip this, and your antifreeze fills the heater tank before reaching the water lines. You waste most of your product, and the lines stay unprotected. Always bypass first.
Skipping the Outdoor Shower and City Water Inlet
Both hold residual water independently. The city water inlet valve can crack from a single hard freeze. Work through every outlet before closing up.
Winterizing a Dirty Black Tank
Locking waste residue in for winter guarantees odor and clogging in spring. Always flush and dump both tanks before antifreeze goes in. If you’ve had buildup problems, see our guide on fixing a pyramid plug first.
De-Winterization: How to Flush Antifreeze Out in Spring
Wait until overnight temperatures consistently stay above freezing before starting. Then work through these steps in order.
- Reinstall the water heater drain plug and return bypass valves to normal flow. Do not turn on the water heater until the tank is completely full — the heating element burns out dry.
- Fill the fresh water tank with potable water. Turn on the 12V pump. Open every faucet, shower, and toilet one at a time and flush until the water runs completely clear — no pink color, no antifreeze taste. Antifreeze goes into the holding tanks and is disposed of at a dump station.
- Reinstall water filters only after sanitizing is complete — not now, to avoid exposing the cartridge to bleach in the next step.
- Sanitize the water system. Add ¼ cup of plain unscented bleach per 15 gallons of fresh tank capacity. Run the solution through all faucets and the toilet until you smell bleach at each fixture. Let it sit for 3–12 hours. Drain completely, refill with fresh water, and flush until no bleach smell remains.
- Reinstall water filters now that sanitizing is done.
- Check for leaks with the system under pressure — under sinks, behind the toilet base, and at the water heater connections. Freeze damage isn’t always visible until water is flowing.
- Flush the toilet a few times to restore normal water level in the bowl and reseat the seal. Add tank treatment to the black tank before first use.
💡 Tip: If water still tastes faintly of antifreeze after flushing clear, run one more full tank of fresh water through before drinking or cooking. Propylene glycol is non-toxic but can linger in some systems. Ethanol-based antifreeze is significantly worse for this — another reason to use PG from the start.
Frequently Asked Questions
Can I use automotive antifreeze in my RV toilet?
No. Automotive antifreeze contains ethylene glycol, which is toxic and destroys rubber seals. Always use non-toxic, propylene glycol-based RV antifreeze — it’s specifically formulated for potable water systems.
How much antifreeze do I need to winterize an RV toilet?
For the toilet: enough to flush pink into the bowl, plus 1–2 cups poured in directly, plus 1–2 quarts flushed into the black tank. For the full system, most RVs need 2–4 gallons total. Keep a spare gallon on hand.
Do I need to add antifreeze to the black tank?
Yes — strongly recommended. Even a thoroughly flushed black tank retains residual waste. Flushing 1–2 quarts of antifreeze into the tank prevents that waste from freezing, protects the dump valve seals, and reduces spring odor and clog problems. This is not optional.
Can I still use my RV toilet after winterizing it?
Yes. You can flush using non-toxic RV antifreeze instead of water — pour it into the bowl and flush as normal. Do not use windshield washer fluid, which has been reported to damage dump valves.
When should I winterize my RV toilet?
Before the first hard freeze — specifically before temperatures consistently drop below 32°F (0°C) for 24+ hours. Northern regions: September–October. Mid-latitude: by November. Southern regions have more flexibility, but a single overnight freeze can crack an unprotected toilet valve.
For anything that needs fixing before or after storage, our complete RV toilet repair and troubleshooting guide covers every common problem — valve failures, seal issues, leaks at the base, and more.
Hi, I’m Daniel Brooks. I research and write about RV toilet repair, black tank maintenance, and sanitation troubleshooting. I create practical guides that help RV owners fix problems quickly and prevent costly damage.